Note:
When AV input source is selected, both Y & R/L cable needs to be
connected in order to get audio output. For composite & PC-VGA output,
please switch to YPbPr.
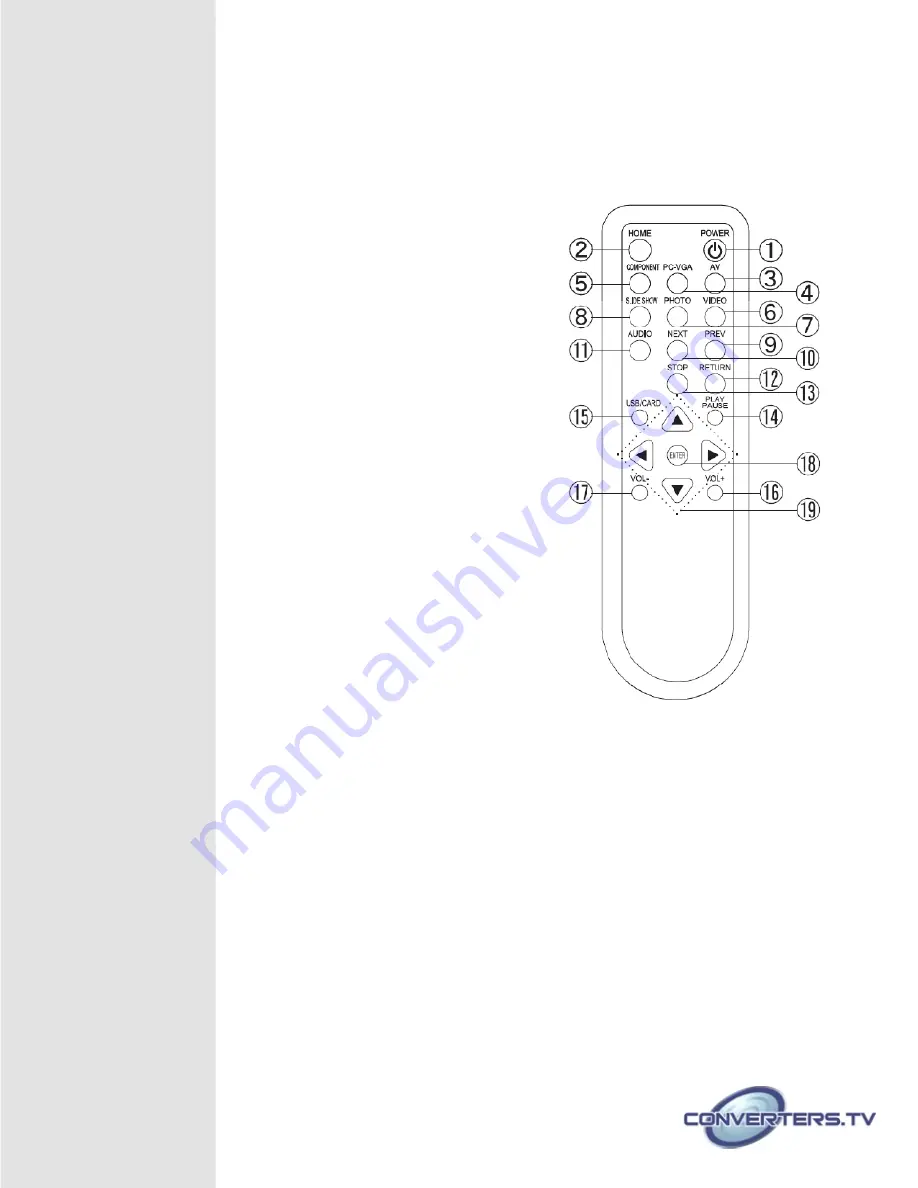
Remote Control
①
. POWER –
Press to turn on/off the device.
②
. HOME –
Press to return back to the main
menu.
③
. AV –
Press to switch to AV mode. (When
Color
Bar appears on the AV mode selection, press
this button will resume back to normal,
AV480i
or 576i).
④
. PC VGA –
Press to switch to PC VGA
mode for
PC/LCD monitor.
⑤
. COMPONENT –
Press to switch to YPbPr /
Component mode for LCD TV.
⑥
. VIDEO –
Press to enter into video clips.
⑦
. PHOTO –
Press to enter into photo clips.
⑧
. SLIDE SHOW –
Press to enter into slide
show
selection.
⑨
. PREV –
Press to go backward or preview
the
past photo/video/music.
⑩
. NEXT –
Press to go forward or next photo/
video/music.
⑪
. AUDIO –
Press to enter into music clips.
⑫
. RETURN –
Press to return back to the last OSD
selection.
⑬
. STOP –
Press to stop playing and go back to the
last OSD selection.
⑭
. PLAY PAUSE –
Press to pause playing
⑮
. USB/CARD –
Press to select the source from USB
or memory card or press twice for entering into the thumbnail view of all files in
the selection.
⑯
. VOL + –
Press to turn up the volume.
⑰
. VOL - –
Press to turn down the volume.
⑱
. ENTER –
Press to enter the selection.
⑲
.
t upq
–
Press to move up, down, left, or right through the menu items
u
– By pressing this arrow key twice the OSD will come up with
play tool selection in the play mode screen.


