background image

20


OPERATING INSTRUCTIONS (CONT.) 


Always use canning supplies specifically manufactured for canning 

purposes.  It is recommended to use mason jars that are 32-ounces or


smaller.  Do not stack jars on top of each other.   


Always inspect your canning supplies to ensure proper function and 

safety.  Avoid using jars with chips, nicks, cracks or other imperfections 
in the glass, rims or lids. 


Wash jars thoroughly in hot water according to manufacturer

instructions. 


Prepare food and fill mason jars and seal according to manufacturer

instructions.   

o


Always make sure there is 1-inch of headspace in the jars. 

o


Use a thin utensil to release any trapped air between the food and 

the jar by pressing food firmly to the sides to dislodge any air 
bubbles. 

o


Set jar lids onto the jar and screw on the outer rings until tight, 
then unscrew 

¼

 turn. 


Place jars into the inner pot. 


If desired, use clean dish towels to tuck around the jars to prevent them 

from touching each other or the sides of the inner pot. 


Fill inner pot (6) with 6-cups of water. (Certain canning recipes may 

require a different amount of water.) 


Secure the lid (1) onto the pressure cooker, turn it Counter-clockwise to 

lock it in place properly. 


Make sure the Pressure Limiting Valve(3) is set to the 

Airtight


position. 


Plug the power cord into a 120V power outlet. 


Follow canning recipe for the type of food you are canning and program 
the 

Pressure Cook Time

 for the specified time frame for the size of 

jars and type of food recipe you are using. 
(EX:  If you set the cook time to 30-minutes, the LED screen will display 

0.0 30) 


Press Start.   


The pressure cooker will begin to operate. 


When pressurization has been achieved, the LED screen will display      

P0 30. 


When the unit has reached optimum pressure, it will begin to pressure-

seal the mason jars.  The programmed time will begin to count down 

until it reaches zero. 


When time has expired, the pressure cooker will beep 6-times and 

automatically go to Keep Warm. 


The Keep Warm indicator light will begin blinking.  This indicates the 

Pressure Cooker is proceeding to Naturally Release the pressure.  (See 
Notes & Tips #6) 


Open lid once pressure has completely released which is indicated by 

the Keep Warm indicator light staying illuminated.   

Summary of Contents for K41143/EPC-678

Page 1: ...1 6 QT DIGITAL PRESSURE COOKER MODEL K41143 EPC 678 INSTRUCTION MANUAL Before operating your new appliance please read all instructions carefully and keep for future reference ...

Page 2: ... __________________________ 7 GLASS LID ASSEMBLY PRESSURE COOKER LID MARKINGS _ 8 BEFORE FIRST USE ______________________________ 9 PREPARING YOUR PRESSURE COOKER ________________ 10 12 OPERATING INSTRUCTIONS _______________________ 13 21 CLEANING MAINTENANCE ______________________ 21 22 FAQ ________________________________________ 22 24 COOKING TIME CHART __________________________ 25 28 ...

Page 3: ...ce cranberries pearl barley oatmeal or other cereals split peas noodles macaroni rhubarb or spaghetti can foam froth sputter and clog the pressure release device steam vent These foods should not be cooked in a pressure cooker 13 Always check the pressure release devices for clogging before use 14 Do not open the pressure cooker until the unit has cooled and all internal pressure has been released...

Page 4: ...he cooker during the cooking process please stop using the device and return to the manufacturer for repair or exchange 29 DO NOT disassemble the product or replace parts with parts not intended for this unit SAVE THESE INSTRUCTIONS HOUSEHOLD USE ONLY SAFETY WARNING There is a potential risk of fire electric shock or injury to persons if the product is not used as instructed Protection against ele...

Page 5: ... its cooking cycle there will be a 6 beep indicator followed by the unit automatically switching to the Keep Warm mode This unit allows the user to choose the period of Pressurized Cooking Time 1 99 minutes according to one s taste and needs in addition to the Pre Set menu A Delay Timer allows the user to delay the start of cooking by up to 24 hours When the timer is set the count down will start ...

Page 6: ...ere it can unintentionally be pulled on or tripped over by children or pets POLARIZED PLUG If this appliance is equipped with a polarized plug one blade is wider than the other please follow the below instructions To reduce the risk of electrical shock this plug is intended to fit into a polarized outlet only one way If you are unable to fit the plug into the electrical outlet try reversing the pl...

Page 7: ...loat Valve Internal View 6 Non stick Inner Pot 7 Control Panel 8 Condensation Collector Snaps On 9 Seal Ring for Float Valve 10 Filter 11 Rubber Seal Ring for Lid 12 Body Cover Structure 13 Lid Rest Lid latches onto the side handle 14 Glass Lid to be used with the SLOW COOK and STEAM functions 14 ...

Page 8: ...im of your pressure cooker body 12 Your Pressure Cooker is equipped with a Tempered Glass Lid 14 that can be used with the SLOW COOK and STEAM functions Please do not use this Glass Lid 14 with any other functions on this Pressure Cooker Assembly of the Knob on the Glass Lid will require a Phillips Screwdriver not included Follow the diagram on the left to assemble the knob on the Glass Lid 14 1 H...

Page 9: ... the lid Hold the handle 2 firmly turn the lid 1 clockwise until it loosens and lift vertically Figures 1 2 the lid 1 can stand on the Lid Rest 13 Figure 3 Note For new units the seal of the lid 1 may be slightly stronger than normal and may be slightly difficult to unlock Once the lid 1 has been opened and closed several times it will loosen up How to close the lid Take the lid 1 off the lid rest...

Page 10: ...3 5 of the Inner Pot 6 Figure 11 The minimum level for cooking would be 1 5 of the Inner Pot 6 Figure 12 7 8 9 Cooking Rice When cooking rice the maximum amount of rice allowed for this 6 quart pressure cooker is 12 cups of uncooked rice Normally one cup of rice requires one cup of water This may vary according to taste 10 11 12 13 3 Be certain the inner receptacle where the Electronic Heater is l...

Page 11: ...it Counter Clockwise to the LOCKED position A clamping sound can be heard See Figures 14 16 Note To ensure you are properly closing the lid 1 please make sure the pressure limiting valve 3 is on your left side when you are facing the front of the pressure cooker when facing the control panel 7 6 Adjust the pressure limiting valve 3 to the Airtight position and ensure that the Float Valve 4 sinks F...

Page 12: ... If any steam is escaping around the lid it means that the Rubber Seal Ring 11 may not have completed a tight seal when the lid 1 was locked Cancel the cooking process release pressure manually or naturally remove the lid 1 and check the Rubber Seal Ring 11 Reposition the lid 1 and ensure that it is secure Re Start the cooking process Please note that steam escaping from the Valve 3 or around the ...

Page 13: ...es POTATOES 12 minutes STEAM 1 40 minutes BEEF MEAT 26 minutes SLOW COOK 0 5 9 5 hours RICE 10 minutes BROWN SAUTE CHICKEN 20 minutes 1 Prepare desired food and place into cooking pot 6 2 Secure the lid 1 onto the unit turn it Counter clockwise to lock it properly in place 3 Make sure the Pressure Limiting Valve 3 is set to the Airtight position 4 Plug the power cord into a 120V power outlet 5 The...

Page 14: ...releasing the pressure See Notes Tips 6 This will take approximately 10 15 minutes Once all pressure has been released the KEEP WARM indicator light will turn solid 12 You may also Quick Release the pressure If you wish to Quick Release the pressure move the Pressure Limiting Valve 3 tothe Exhaust position to release the pressure until the Float Valve 4 sinks Figures 20 21 CAUTION Use an oven mitt...

Page 15: ...0V power outlet 5 The LED screen will display 0 0 00 6 Set the desired cooking time by pressing the PRESSURE COOK TIME button Each push of the Pressure Cook Time button will increase the cooking time by 1 minute or hold the button down for rapid increase of time The maximum amount of time allowed is 99 minutes 7 For example if you set the PRESSURE COOK TIME to 18 minutes the LED screen will displa...

Page 16: ...ser wants the unit to wait before the cooking process begins EX If you wish to program the pressure cooker to automatically turn on in 3 hours press the DELAY TIMER button then press the DELAY TIMER button 5 more times until the LED screen displays 3 0 00 7 After choosing the desired delay time choose your MENU BUTTON or PRESSURE COOK TIME MENU SELECT BUTTONS Select one of the ten MENU BUTTONS and...

Page 17: ...vegetables to ensure juices are retained during cooking It also provides nice coloring when meat or vegetables are cooked and ready to serve To brown sauté 1 Open and or remove the lid 1 depending on your preference 2 Select the BROWN SAUTE button the light will begin blinking and the display will show0 0 00 Press the Start button to manually begin the heating process the indicator light will illu...

Page 18: ...ire rack 3 Add water to a level just below the top of the rack 4 Place food in heat resistant container on the rack Do not fill pot more than 4 5 full with food If steaming rice put rice in an 8 inch or smaller bowl and place on rack 5 Place the Tempered Glass Lid 14 included onto the pressure cooker 6 Press STEAM button the indicator light will begin blinking and display will show 0 0 01 equals 1...

Page 19: ...ssure will not be achieved until the internal temperature has reached a preset level If the recipe states the meat be cooked for 10 minutes after pressure has been achieved it will still be the same but will take longer to come to the pressure point It is not recommended to pressure cook larger cuts of frozen meats such as a whole roast a block of frozen ground meat or a whole chicken Larger cuts ...

Page 20: ...th 6 cups of water Certain canning recipes may require a different amount of water Secure the lid 1 onto the pressure cooker turn it Counter clockwise to lock it in place properly Make sure the Pressure Limiting Valve 3 is set to the Airtight position Plug the power cord into a 120V power outlet Follow canning recipe for the type of food you are canning and program the Pressure Cook Time for the s...

Page 21: ...the exterior of the outer body 12 and the exterior surface of the pressure cooker NEVER immerse the pressure cooker in any liquids 3 Remove the Condensation Collector 8 and rinse it thoroughly and let dry Clean the Upper Body 12 with a damp sponge or wash cloth 4 Clean the Lid 1 with warm soapy water including the Rubber Seal Ring 11 Pressure Limiting Valve 3 Filter 10 Vent and Floating Valve 4 an...

Page 22: ... on top is set to Airtight and the lid 1 is locked securely Once you have selected the Menu Button simply leave the unit alone and it will start to heat up and build up pressure This sometimes may take up to 5 10 minutes depending on what you re cooking Once the unit has built up enough pressure the red display will change to a letter P This is the time the unit will start cooking the food This ma...

Page 23: ...omatically set itself to OFF or to Keep Warm when it senses that no liquid is present so it does not over heat You will need to add more liquid to the inner pot 4 Steam is being released around the rim of the lid 1 during the pressurizing sequence How do I fix this The Rubber Sealing Ring 11 did not make a proper seal Cancel all the functions Exhaust any remaining pressure and steam Open the lid 1...

Page 24: ...en mitt and carefully adjust it so it is seated properly This will help settle the lid and all the valves properly The pressure will quickly push up on the Floating Valve 3 and seal it properly then finish the pressurizing sequence 7 My food is finished cooking and all the pressure is released but I cannot unlock and open my lid 1 What is stuck Make sure all the pressure and steam has completely b...

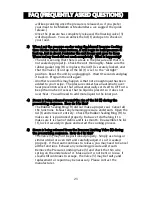
Page 25: ...on Quick Release Beef meatballs 1 2 lbs 7 12 or use the Meat Button Natural Release Beef Corned 55 65 Natural Release Pork roast 43 47 Natural Release Pork ribs 2 lbs 18 or use the Meat Button Quick Release Pork ham shank 25 28 Natural Release Leg of Lamb 42 45 Natural Release Chicken whole 2 3 lbs 15 18 or use the Meat Button Quick Release Chicken pieces 2 3 lbs 12 15 or use the Meat Button Quick...

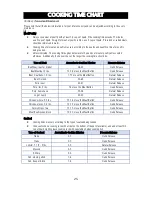
Page 26: ...ots 1 inch chunks 5 Quick Release Carrots 1 4 inch slices 1 2 Quick Release Cauliflower flowerets 3 5 Quick Release Corn on the cob 4 6 4 Quick Release Escarole coarsely chopped 2 3 Quick Release Kale coarsely chopped 2 3 Quick Release Okra small pods 3 5 Quick Release Onions whole 3 Quick Release Potatoes 11 2 inch chunks 7 Quick Release Potatoes new small whole 6 Quick Release Potatoes sweet and...

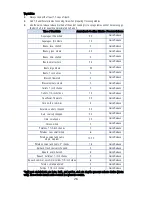
Page 27: ... Release Lentils red 10 15 Natural Release Lima Beans 7 8 Natural Release Applesauce and cranberries can foam froth and sputter and can clog the pressure release device steam vent These foods should not be cooked in a pressure cooker Grains Before cooking soak certain grains such as wheat berries and pearl barley in four times their volume of lukewarm water for at least four 4 hours or overnight i...

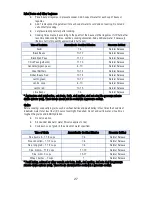
Page 28: ...sh unstuffed 4 to 8 pounds breast 30 80 minutes cook time 8 to 12 pounds 35 to 45 minutes cook time Chicken fresh whole roasting hen 25 35 minutes cook time 5 to 7 pounds breast halves bone in 8 15 minutes cook time or press MEAT button 6 to 8 ounces breast halves boneless 6 10 minutes cook time or press MEAT button 4 ounces legs or thighs 8 20 minutes cook time or press MEAT button 4 to 8 ounces ...

Reviews: