I.
Features
•
Supports both 9.5mm drives and new 12.5mm drives
•
USB 2.0 Interface and eSATA Interface
•
USB 2.0 Interface, support high speed data transfer rates up to 480 Mbps
(Backward compatible with USB 1.1 specifications)
•
eSATA Interface up to 3 Gbps
•
Hot swappable and true Plug-n-Play
•
Fully compatible with 2.5” SATA I and SATA II hard disk
•
Suitable for Notebook and Desktop
•
Insulating designed PCB
•
One touch file backup
II.
Specification
•
HDD: 2.5” SATA I/II up to 500gb
•
Interface type: USB 2.0 (Backward to USB 1.1) up to 480mbps
Interface type: eSATA up to 3 Gbps
•
Material Case: Carbon Fiber/Aluminum/ABS
•
Power LED/HDD LED
III. Installation Tutorial
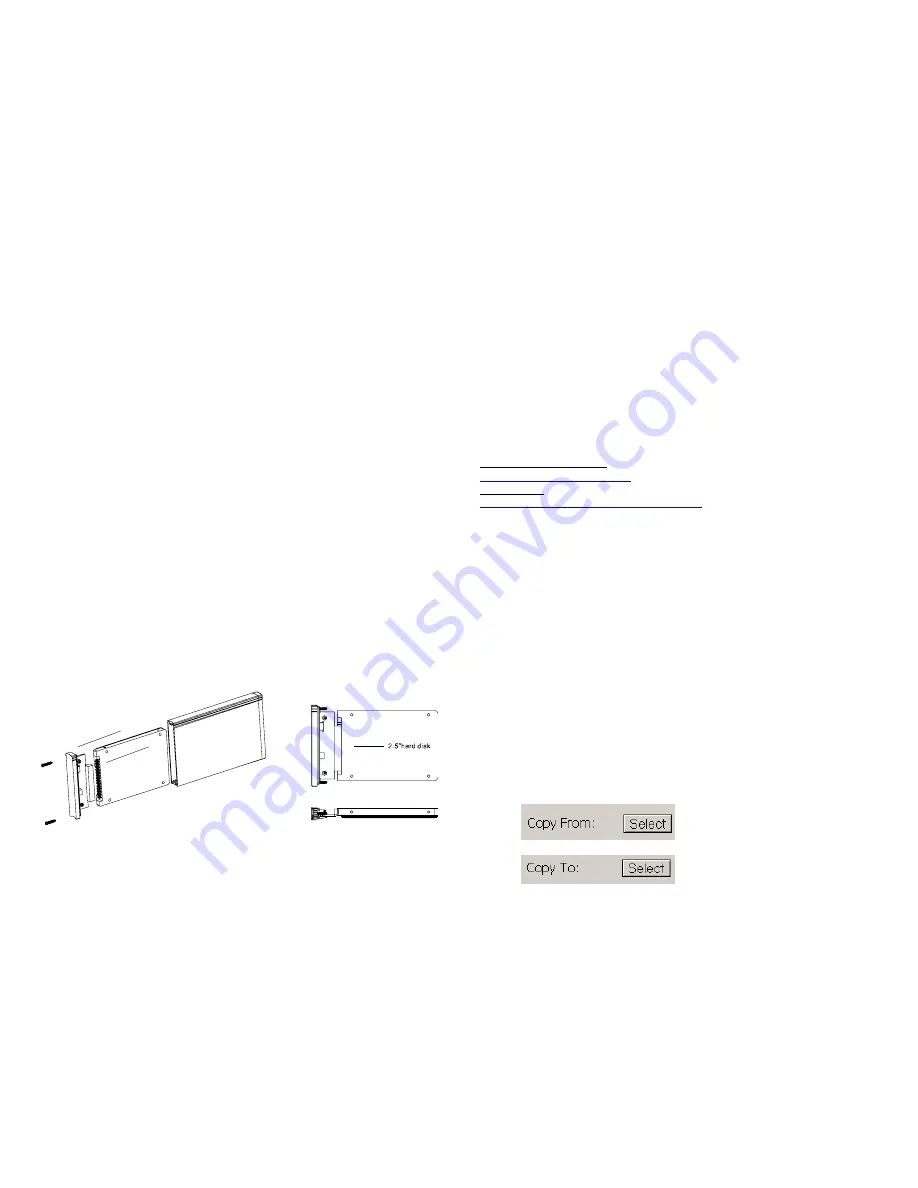
Part I: Install Hard Disk (SATA HDD) - Can not support IDE HDD
1. Un-load 2 screws from front panel with led
2. Remove the front panel from case
3. Connect the SATA HDD to the SATA slot on the PCB board firmly
4. Screw the front panel with the SATA drive back to the case
IV. Instructions
The 2.5" HDD Enclosure connects to the host computer through USB or
eSATA cable. This comes with Y-USB cable having 2xType A connector for
connection to 2xUSB port on the host notebook or rear 2xUSB of your desktop; and
Type B USB direct to the enclosure. Using eSATA, connect the eSATA cable and
1x Type A USB to your notebook or rear USB port on your desktop.
(Users of Windows 98 need to download the driver first)
V. Special OTB Functions
•
One Touch Button File Backup
Download OTB software:
http://coolmaxusa.com/otb.asp
Instructions:
http://www.coolmaxusa.com/usermanual.asp
VI. OTB Software installation and use
1.
Extract “CF_OTBv1.2.rar” to your drive
2.
Open folder and click on StorageButtonManager-12.exe
3.
This will add task to your startup program, if a pop-up requires
verification, choose allow
4.
Button Manager setup box will open
5.
Restart Computer to take effect
6.
Connect the USB cable direct to rear USB for desktop;
notebook USB port for notebooks. We do not recommend use
of USB hubs.
7.
For 12mm hard drives, BELCRO (Foam) is included and
should be used for support
8.
Turn on the enclosure with hard drive installed
9.
Open application “ StorageButtonManager-12.exe “ from OTB
folder or Press the OTB button
-
Button manager Setup box will open
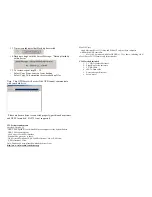
10.
Click on Copy From “Select” to select source path for backup
11.
Click on Copy To “Select” to select destination path for backup
12.
Click on OTB button on the enclosure to start the backup


