background image

For Customer Services & Spare Parts please call 0161 772 5666

Opening times: Monday - Friday 9am – 4pm

or visit us at 

www.coolmed.co.uk

14

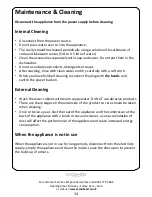
Maintenance & Cleaning

Disconnect the appliance from the power supply before cleaning.

Internal Cleaning 

Disconnect from the power source.

Do not pour water over or into the appliance.

The cavity should be cleaned periodically using a solution of bicarbonate of 

soda and lukewarm water (5ml to 0.5 litre of water)

Clean the accessories separately with soap and water. Do not put them in the 

dishwasher.

Do not use abrasive products, detergents or soaps. 

After washing, rinse with clean water and dry carefully with a soft cloth. 

When you have finished cleaning reconnect the plug with 

dry hands 

and 

switch the power back on.

External Cleaning

Wash the outer cabinet with warm soapy water. Do NOT use abrasive products.

There are sharp edges on the underside of the product so care should be taken 

when cleaning.

Once or twice a year, dust the rear of the appliance and the compressor at the 

back of the appliance with a brush or vacuum cleaner, as an accumulation of 

dust will affect the performance of the appliance and cause increased energy 

consumption.

When the appliance is not in use

When the appliance is not in use for long periods, disconnect from the electricity 

supply, empty the appliance and clean the inside. Leave the door open to prevent 

the build-up of odours.

Summary of Contents for CMWF125

Page 1: ...F300 For Customer Services Spare Parts please call 0161 772 5666 Opening times Monday Friday 9am 4pm or visit us at www coolmed co uk IMPORTANT RETAIN FOR FUTURE REFERENCE WARD FRIDGE Instruction Manual SET LO HI SET LO HI SET LO HI ...

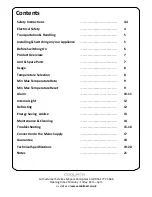
Page 2: ...Handling 5 Installing Switching on your Appliance 5 Before Switching On 6 Product Overview 7 Unit Spare Parts 7 Usage 8 Temperature Selection 8 Min Max Temperature Data 9 Min Max Temperature Reset 9 Alarm 10 11 Internal Light 12 Defrosting 12 Energy Saving Advice 13 Maintenance Cleaning 14 Troubleshooting 15 16 Connection to the Mains Supply 17 Guarantee 18 Technical Specifications 19 20 Notes 21 ...

Page 3: ...t use electrical appliances in the refrigerator compartment of the appliance If this appliance is to replace an old refrigerator with a lock the lock must be removed as a safety measure before storing it or disposing of it This is to protect children from locking themselves inside the appliance Old refrigerators and freezers contain insulation gases and refrigerant they must be disposed of properl...

Page 4: ... as that indicated on the rating plate This product is designed to operate on 230 240V AC 50Hz Connection to any other power source may damage the unit This product may be fitted with a non re wireable plug If it is necessary to change the fuse in the plug the fuse cover must be refitted If the fuse cover becomes lost or damaged the plug must not be used until a suitable replacement is obtained If...

Page 5: ...our appliance in an area that is not exposed to direct sunlight Your appliance should be placed at least 10cm away from stoves ovens and other heating sources This appliance should never be used outdoors or left in the rain When your appliance is placed next to a chest freezer or freezer there should be at least 10cm between them to prevent humidity on the outer surface Do not place anything on to...

Page 6: ...een positioned adjust the feet to ensure the unit is stable This is essential to ensure quiet running and proper door opening closing Connect to the electrical socket but do not switch on the power to the refrigerator for at least 3 hours The coolant within the product needs time to settle after it has been transported and installed Failure to do this will affect the cooling performance of your ap...

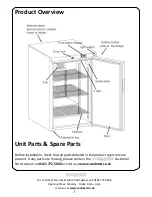
Page 7: ...iled in the product overview are present If any parts are missing please contact the Customer Service team on 0161 772 5666 or visit us at www coolmed co uk For Customer Services Spare Parts please call 0161 772 5666 Opening times Monday Friday 9am 4pm or visit us at www coolmed co uk 7 ...

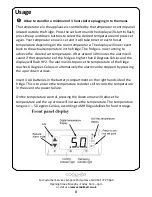
Page 8: ...ius and the display will flash HP2 The alarm will stop once the temperature of the fridge reaches 8 Degrees Celsius or alternatively the alarm can be stopped by pressing the up or down arrows Insert 4 AA batteries in the battery compartment on the right hand side of the fridge This is to ensure the temperature recorder still records the temperature in the event of a power failure On the temperatur...

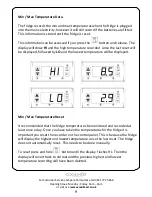
Page 9: ...set It recommended that the fridge temperatures be monitored and recorded at least once a day Once you have taken the temperatures for the fridge it is important you reset the recorder on the control panel This is because the fridge will display the highest and lowest temperature since the last reset The fridge does not automatically reset This needs to be done manually To reset press and hold but...

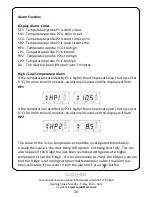
Page 10: ...d and the display will flash HP1 If the temperature recorded by P2 is higher than the preset value factory set at 8 C for more than 10 minutes an alarm will sound and the display will flash HP2 The cause of the rise in temperature should be investigated immediately Usually the cause is the door being left open or not being shut fully This can also happen if the fridge has just been restocked with ...

Page 11: ...e investigated immediately Usually the cause is that extremely cold goods have been placed in the fridge The fridge should be monitored to ensure it is returning back to the correct temperature Remote Alarm In the event of a low high temperature or door alarm the alarm can be connected remotely to the red alarm connector at the back The 4 pin connector is not to be used as this is factory use only...

Page 12: ...defrost should be performed Ensure all goods in the fridge are transferred to another fridge prior to defrosting Defrost by pressing and holding and buttons together for 6 seconds until the controller beeps and the defrost light is on The fridge will now start to defrost and this will take approximately 25 minutes If you want to cancel the defrosting then press and hold buttons together for 6 seco...

Page 13: ...he air vents are clear Try to avoid keeping the doors open for a long time warm air will enter the cabinet and may cause a build up of ice as well as affecting the energy consumption Ensure there are no obstructions preventing the doors from closing properly Ensure that the door seals are clean and there are no tears or splits Do not overload the appliance the cooling air that circulates to keep t...

Page 14: ...se with clean water and dry carefully with a soft cloth When you have finished cleaning reconnect the plug with dry hands and switch the power back on External Cleaning Wash the outer cabinet with warm soapy water Do NOT use abrasive products There are sharp edges on the underside of the product so care should be taken when cleaning Once or twice a year dust the rear of the appliance and the compr...

Page 15: ...ck that the ambient temperature is within the operation limits of the appliance Are the doors of the appliance opened frequently Once the door is opened the humidity found in the air in the room enters the appliance especially if the humidity levels in the room are very high The more frequently the door is opened in humid conditions the more chance of the build up of moisture The temperature withi...

Page 16: ...he socket and a jug or bucket is in place to catch the flow of water The doors do not close properly Ensure there are no obstructions preventing door closure Check the door compartments and shelves are correctly in place Check the door seal is not warped or torn Check the appliance is level Unusual noises Check that the appliance is on a flat level surface and is stable Check the spacing around th...

Page 17: ...he coloured markings identifying the terminals in your plug proceed as follows The GREEN YELLOW wire is the EARTH and must be connected to the terminal which is marked with the letter E or by the earth symbol or coloured GREEN or GREEN YELLOW The BLUE wire is the NEUTRAL and must be connected to the terminal marked with the letter N or coloured BLACK The BROWN wire is the LIVE wire and must be con...

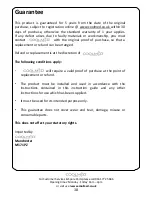
Page 18: ...t contact with the original proof of purchase so that a replacement or refund can be arranged Refund or replacement is at the discretion of The following conditions apply will require a valid proof of purchase at the point of replacement or refund The product must be installed and used in accordance with the instructions contained in this instruction guide and any other instructions for use which ...

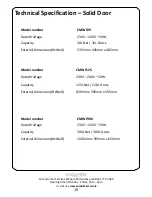
Page 19: ... number CMWF29 Rated Voltage 230V 240V 50Hz Capacity 30L Net 31L Gross External Dimensions HxWxD 535mm x 445mm x 485mm Model number CMWF125 Rated Voltage 230V 240V 50Hz Capacity 125L Net 128L Gross External Dimensions HxWxD 820mm x 595mm x 595mm Model number CMWF300 Rated Voltage 230V 240V 50Hz Capacity 300L Net 308L Gross External Dimensions HxWxD 1500mm x 595mm x 650mm ...

Page 20: ...For Customer Services Spare Parts please call 0161 772 5666 Opening times Monday Friday 9am 4pm or visit us at www coolmed co uk 21 Notes ...

Page 21: ...f materials contained within Your co operation is vital to make sure the success of these schemes and for the protection of the environment For your nearest disposal facility visit www recycle more co uk or contact your local authority for details reserves the right to make changes to design specification or alter the instruction manual without prior notice For Customer Services Spare Parts please...

Reviews: