background image

Page 3

Door reversal

This appliance has the facility to hang the door on
the opposite side.

Depending upon where you plan to locate the
appliance, reversing the door may make access
more convenient.

Care must be taken to support the doors while
removing the brackets and hinges.

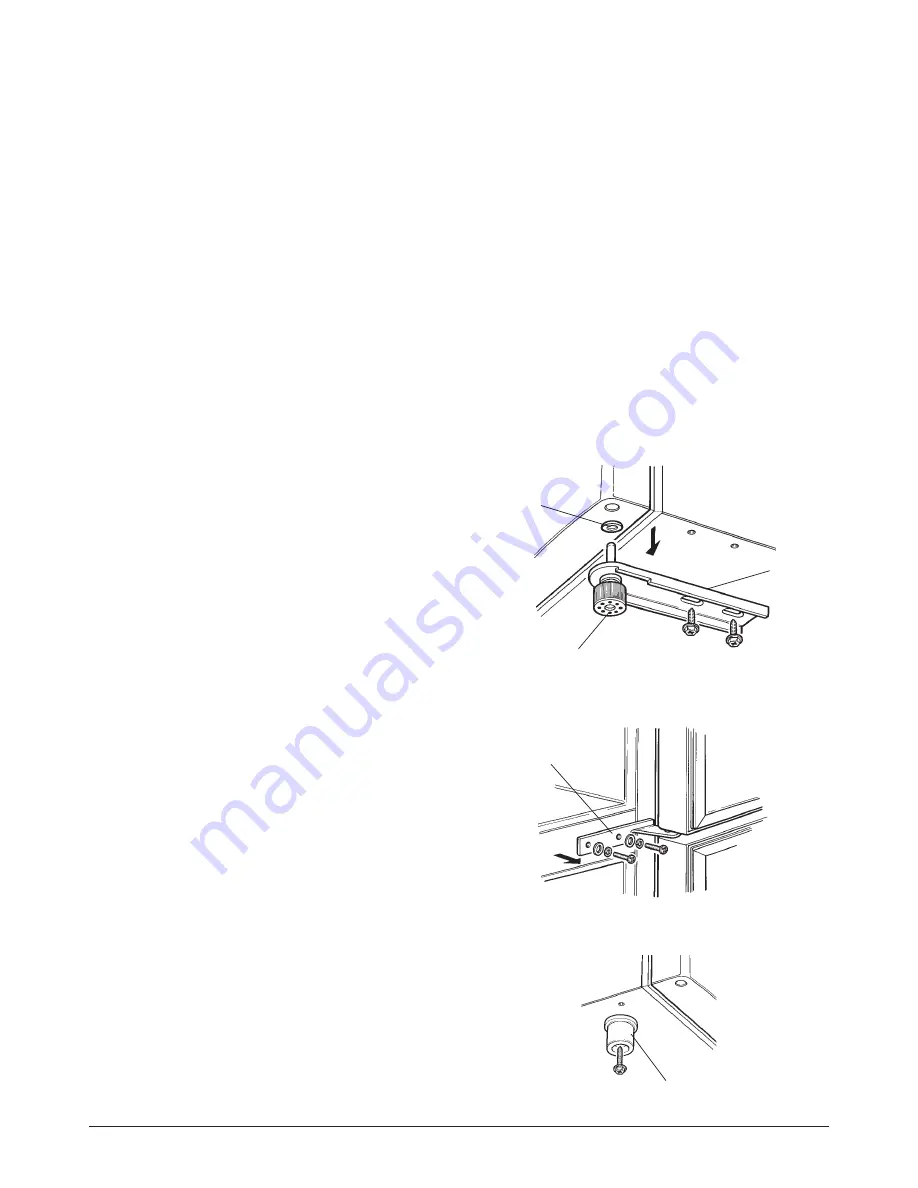
1. Remove the lower bracket, spacer and

adjustable foot (Figure 2).

2. Remove the lower door.

3. Remove the central hinge, washers, spring

washers and screws (Figure 3).

4. Release the top door from the cabinet.

5. Remove the fixed foot (Figure 4).

6. Remove any blanking caps which cover the left-

hand fixing holes and fit them to the holes on
the other side of the cabinet and doors.

7. Reassemble the hinges and doors on the

opposite side of the casing.

8. Screw the fixed foot into the corresponding hole

on the other side of the cabinet.

LOWER
BRACKET

FIGURE 3

FIGURE 2

CENTRAL
HINGE

FIXED FOOT

FIGURE 4

SPACER

ADJUSTABLE FOOT

O

Do read these instructions thoroughly before
using this appliance.

O

Do install the appliance only in the vertical
position.

O

Do stand for 2 hours to allow the cooling gases
to stabilise if transported in a horizontal position.

O

Do install to allow for adequate ventilation
around the appliance.

O

Do not install near heaters or other heat
sources.

O

Do unplug before cleaning and maintenance.

O

Don’t install the appliance in humid or extreme
conditions.

O

Don’t attempt to repair the appliance yourself –
(see Helpline information – page 7).

O

Only use it in accordance with the
manufacturer’s instructions.

O

Don’t use any other electrical device inside the
appliance to defrost.

O

Don’t store goods containing inflammable or
other explosive gases.

O

Don’t leave door closed if appliance is left
switched off for long periods.

Do and Don’t

Summary of Contents for CZ51105

Page 1: ...CZ51105 Dual Compartment Drinks Chiller U US SE ER R I IN NS ST TR RU UC CT TI IO ON NS S Please read these instructions carefully before using this product and keep them safe for future reference...

Page 2: ...de with a damp cloth ready for use 1 3 4 2 FIGURE 1 Before use Packaging The packaging is recyclable so dispose of it according to local regulations Keep the packaging materials out of reach of young...

Page 3: ...hole on the other side of the cabinet LOWER BRACKET FIGURE 3 FIGURE 2 CENTRAL HINGE FIXED FOOT FIGURE 4 SPACER ADJUSTABLE FOOT O Do read these instructions thoroughly before using this appliance O Do...

Page 4: ...hermostats switching on and off The appliance is designed to operate at normal room temperatures Position it away from any heat source such as a boiler ovens and heaters which will reduce the cooling...

Page 5: ...a constant temperature dependent upon the thermostat setting Beware of the back wall as this may be cold to the touch Wipe the outside casing from time to time in order to remove dirt and dust Draina...

Page 6: ...the terminal which is marked with the letter E or E symbol or coloured GREEN or YELLOW GREEN The wire which is coloured BLUE must be connected to the terminal in the plug which is marked with the let...

Page 7: ...al authority your household waste disposal service or the retailer where you purchased the product After sales service Never try to repair the appliance or the electrical parts yourself Any repair car...

Page 8: ...CZ26139 200208 We continuously try to improve our products for the benefit of our customers For this reason we reserve the right to make changes to any product at any time without notice...

Reviews: