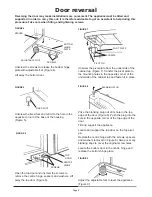
1.
Freezer drawers
2.
Salad crisper
3.
Adjustable glass shelves
4.
Thermostat and light housing
5.
Balcony shelf
6.
Bottle rack
Page 3
Parts identification
The parts are listed and numbered below to help
identification.
Important
Make sure that the voltage marked on the rating label on the product corresponds with the voltage in your
home. This quality product has been tested and certified to meet all applicable UK electrical and safety
standards.
Installation and controls
Operating conditions
The appliance is designed to work in room
temperatures b16°C and +32°C. Do not
allow the room temperature to 32°C
otherwise the temperature inside the fridge will rise.
The refrigerator must be installed on a firm flat and
level surface for it to work quietly and efficiently. If
necessary, level the unit using the adjustable feet
(Figure 9).
The fridge requires space around the casing for
efficient cooling and operation. The minimum
clearances are shown in Figure 2.
Switching on
Plug the appliance into a nearby power socket and
switch on. Open the door to reveal the temperature
control (Figure 3). Turn the temperature control to a
half-way position on the dial. Leave the appliance
running with the door closed for approximately two
hours. This will allow the inside temperature to
stabilise.
FIGURE 2
Diagrams show alternative methods of providing correct air
flow around the appliance.
100 mm
25 mm
25 mm
100 mm
Notes on operation
During normal operation the following noises may
be heard:
O
Stifled murmur from compressor when it is
working.
O
Soft gurgling from the refrigerant flowing
through the cooling system.
O
Click from the thermostat switching on and off.
FIGURE 1
1
2
3
4
5
6


