background image

13

ANALISI DEGLI EVENTUALI DIFETTI

Mancata accensione

Serbatoio vuoto.

Riempire.

Eiettore ostruito.

Sostituire l’eiettore.

Pressione del gas alta  

Spostare la leva di coman-

o troppo bassa.

do nella positione minima o
massima.

Il pulsante di accensione 

Rileggere “Come usare l’ut-

scatta troppo velocemente.

ensile con le punte saldanti

Dispositivo di accensione

Sostituire con uno nuovo.

consumato.

Dopo il boom, rilasciato

Pipetere l’opérazione rilas-

il pulsante di accensione, 

ciando il pulsante di accen-

la fiamma non è accesa.

sione più lentamente.

La punta non scalda 

Catalizzatore consumato. 

Sostituire la punta.

Pressione del gas

Riempire il serbatoio con 

insuffisante.

gas butano.

Eiettore ostruito. 

Sostituire l’eiettore.

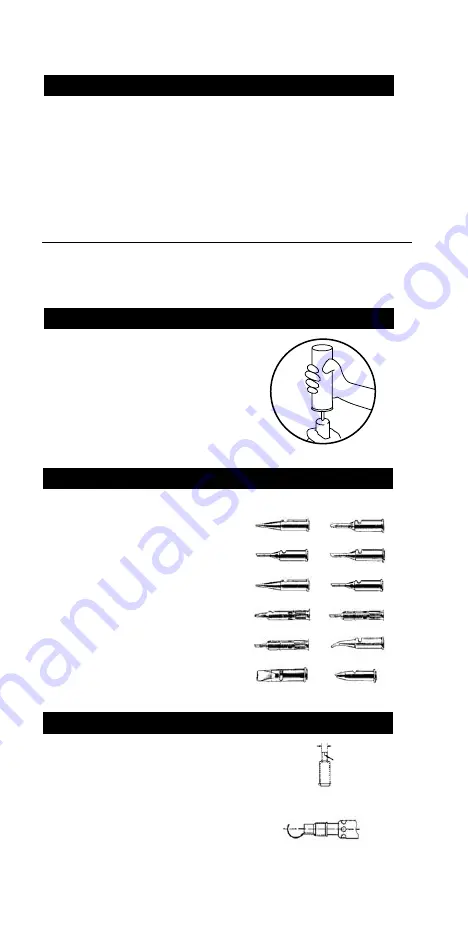
BOMBOLETTA DI RICARICA (5 16 160 99)

1.

Usare bombolette di gas di ricarica originali Weller 
Pyropen.

2. 

Assicurarsi che la leva del gas APERTO/CHIUSO sia 
sulla posizione "OFF".

3.

Impugnare il Pyropen in modo che la punta sia rivol
ta verso il basso e la valvola di riempimento verso 
l'alto. Inserire l'ugello della bomboletta e premere.

4.

Non appena il Pyropen è completamente carico, il 
gas in eccesso uscirà fuori.

5.

Tenere adesso l'utensile orizzontalmente e osserva
re attraverso l'apposita finestra la quantità di gas 
inserita.

PUNTE SALDANTI

Codice

Descrizione

1.

70-01-01

Conica

2.

70-01-02    

Cacciavite

3.

70-01-03

Taglio sbieco ø 2 mm 

4.

70-01-04

Taglio sbieco ø 3 mm     

5.

70-01-05

Conica

6.

70-01-06

Micro taglio sbieco

7.

70-01-07

Pyramide     

8.

70-01-08        Taglio sbieco 35°, ø 2 mm 

9. 

70-01-09       Taglio sbieco 35°, ø 3 mm 

10.

70-01-10

Curva conica

11.

70-01-11      Cacciavite 8 mm

12.

70-01-12

Testa arrotondata conica, ø 3mm

13. 

70-01-13

Cacciavite 5 mm

14. 

70-01-14

Punta adattore ø 8,4 mm (con  
filetto M4, ad es per coltello a lame 
calde)

Codice

est. ø mm

int. ø mm

15.

70-01-50 2,5 

1,59

16.

70-01-51

4,25

3,3

17.

70-01-52

5,7

4,9

18. 

70-01-53 8,0 

7,4

70-01-54

Ugello per termorestringenti, 8 mm

70-01-55

Ugello per termorestringenti, 6 mm

UGELLI PER AIRA CALDA

15 - 18

1

6

5

4

3

2

11

12

10

8

7

9

Summary of Contents for Weller PYROPEN Piezo

Page 1: ...D Betriebsanleitung F Manuel d Utilisation I Istruzioni per l uso GB Operating Instruction S Bruksanvisning E Instrucciones para el Manejo PYROPEN Piezo...

Page 2: ...1 D Betriebsanleitung 2 5 6 9 10 13 14 17 18 21 22 25 F Manuel d Utilisation I Istruzioni per l uso GB Operating Instruction S Bruksanvisning E Instrucciones para el Manejo...

Page 3: ...der N he der Windschutzscheibe in einem LKW oder PKW auf 11 Halten Sie das Ger t von Kindern fern 12 Halten Sie die H nde und brennbare Stoffe von der Auslass ffnung fern und ver schlie en Sie das Geh...

Page 4: ...n und darauf achten dass keine Anschluss dr hte des Piezoteiles besch digt wer den BENUTZUNG DER HEISSLUFTDUSE Kontrollschalter auf Position 3 einstel len Gas EIN AUS Schalter in EIN Stel lung bringen...

Page 5: ...l ssel festdrehen Den Hauptdraht und die Z ndkerze aus richten GEBRAUCH DES ABLAGE CLIPS Clip kann auf jede Kante der Metallbox aufgesteckt werden u ere Laschen nach innen Den Hauptdraht festhalten un...

Page 6: ...rs aufstecken und Gasbeh lter niederdr cken 4 Der Tank des Pyropen ist gef llt sobald Gas berstr mt 5 Pyropen waagerecht halten und Gasf llstand am Fenster ablesen LOTSPITZEN FUR WELLER PYROPEN PIEZO...

Page 7: ...teur d un fourneau ou de mat riaux combustibles 4 Utiliser uniquement du gaz butane non aromatique ainsi qu il est recommand par le fabricant 5 S assurer que l interrupteur est bien positionn vers le...

Page 8: ...au fil de l allumage Piezo LE PYROPEN EN FER A AIR CHAUD Placez le curseur de r glage sur la posi tion 3 Placez le curseur ON OFF sur la position ON Dans le cas o la temp rature ambiante est basse ou...

Page 9: ...t que le tube isolant est dans le prolongement du fil d allumage COMMENT SE SERVIR DU SUPPORTFER Monter le support sur un des bords de la bo te comme le montre l illustration la double patte l int rie...

Page 10: ...l outil avec la t te vers le bas introduisez la recharge l arri re et pressez celle ci vers le bas 4 Le r servoir de l outil Pyropen est plein lorsqu on remarque un d bordemente du butane 5 Remettre...

Page 11: ...re mani e combustibili lontano da val vole di scarico e da carter ribaltabili 11 Non immergerlo nell acqua 12 Non cercare di smontarlo usarlo in modo non appropriato modificarlo o manometterlo 13 Non...

Page 12: ...COME USARE L UTENSILE CON UGELLI AD ARIA CALDA Posizionare la leva di regolazione nella posizione 3 e successivamente l inter ruttore ON OFF nella posizione ON A tem perature basse o immediatamente d...

Page 13: ...posita chiave per serrarlo Posizionare il dispositivo di accensione ed il filamento in maniera che siano per fettamente in linea USO DEL SUPPORTO Sistemare il supporto come illustrato nel disegno Affe...

Page 14: ...ne OFF 3 Impugnare il Pyropen in modo che la punta sia rivol ta verso il basso e la valvola di riempimento verso l alto Inserire l ugello della bomboletta e premere 4 Non appena il Pyropen completamen...

Page 15: ...nk of car 11 Keep out of reach of infants 12 Keep hands and combustibles clear out of exhaust opening and tip housing to avoid burns or fire 13 Do not immerse in water 14 Do not try to disassemble or...

Page 16: ...ousing being careful not to cut piezo wiring HOW TO USE THE HOT BLOW NOZZLE Set control lever to 3 Set gas ON OFF lever to ON position In cold tempera tures or immediately after gas filling set lever...

Page 17: ...ry wrench to tighten Place the lead wire and ignition plug in a straight line HOW TO USE THE IRON HOLDER Put accessory on any box edge as illustrated one larger nail of holder comes outside of box and...

Page 18: ...ith tip pointing downward refill nozzle in upright position Insert nozzle of gas container and press down 4 As soon as the Pyropen is filled gas will over flow 5 Hold the tool horizontal and see the w...

Page 19: ...ej n ra vindrutan eller i bilens bagageutrymme 11 F rvaras utom r ckh ll f r barn 12 H ll h nder och br nnbara f rem l borta fr n munstycket och l dspetsh llaren f r att undvika br nnskador eller bran...

Page 20: ...den r fflade muttern Se till att ingen anslutningstr d till piezode larna skadas ANV NDNING AV VARMLUFTMUNSTYCKET St ll kontrollreglaget p l ge 3 St ll TILL FR N ventilen i l get TILL Vid l g tempera...

Page 21: ...kabeln och t ndstiftet i en r t linje ANVANDNING AV FORVARINGSCLIPS Clipset kan f stas p alla kanterna p metall dan De yttre h llarna p insidan H ll fast huvudkabeln och dra l ngsamt t sidan D lossnar...

Page 22: ...in munstycket p gasbeh llaren och tryck ned den 4 Pyropens tank r fylld n r gasen str mmar ver 5 H ll Pyropen v gr tt och kontrollera gasniv n i f nstret LODSPETSAR Tillbeh r nr Beskrivning 1 70 01 01...

Page 23: ...Mantenga fuera del alcance de los ni os 12 Mantenga las manos y los combustibles lejos del orificio de salida de gases y de la punta de la carcasa para evitar quemaduras o fuego 13 No sumerja en agua...

Page 24: ...se da en los alambres de conexi n del piezo EL USO DE LA TOBERA DE AIRE CALIENTE Mueva el bot n regulador del gas hacia la posici n 3 y el bot n de ABIERTO CERRA DO hacia ABIERTO Al haber temperatu r...

Page 25: ...LDADOR El soporte puede ser enganchado en cualquier borde de la caja de metal vea ilustraci n La garraexterna m s ancha debe encontrarse en el lado interno de la caja tal como se ve en la ilustraci n...

Page 26: ...jo Enchufar la tobera del recipiente de gas y presionar el recipiente de gas para abajo 4 El tanque del Pyropen esta lleno cuando el gas se derrama 5 Mantener el Pyropen en posici n horizontal y con t...

Page 27: ...Europa 80 20090 Cusago MI Italy Tel 02 90 33 101 Fax 02 90 39 42 31 Erem S A Rue de la Roseli re 1401 Yverdon les Bains T l 024 426 12 06 Fax 024 425 09 77 005 16 666 03 01 08 Copyright by CooperTools...

Reviews: