background image

RC107 - Version D - 3 June 2014 - Copernicus Educational Products Inc. 

6

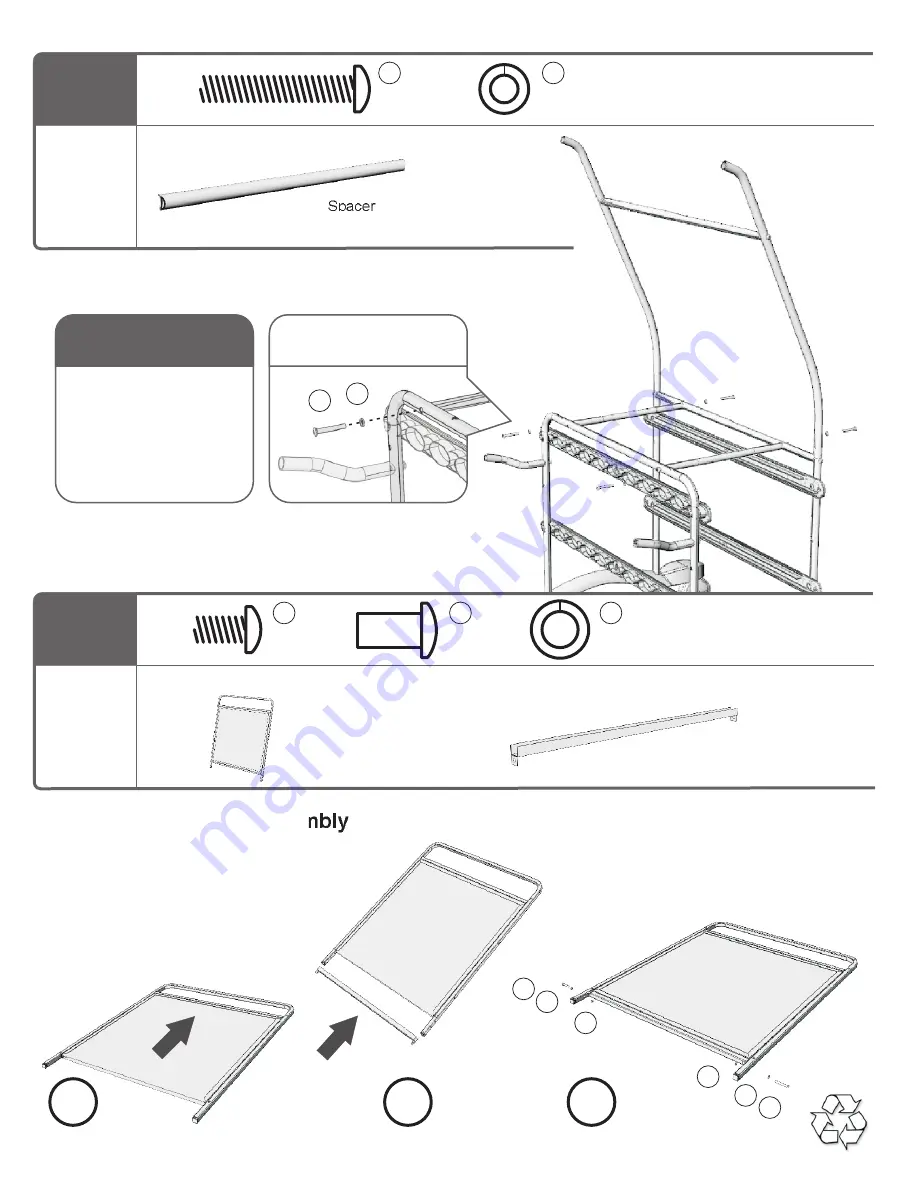
Spacer

No Thru Holes

2x

You will need: 

(Not to Scale)

Actual Size:

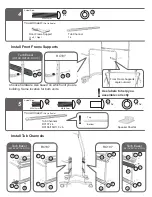
Install Spacers

7

Front Frame Assembly
1x

You will need: 

(Not to Scale)

Actual Size:

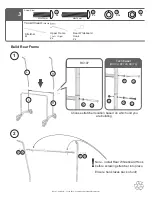
Build Front Frame Assembly 

Tighten bolts

3

2

1

1. Slide whiteboard as far up as it will go.
2. Slide whiteboard channel up to bottom
    of whiteboard.
3. Fasten the whiteboard channel in 
    place. 

Tighten bolts

RC107

Tech Easel 

(RC108, RC109, RC110)

Do NOT install 

Spacers if building

a Tech Easel. Move 

onto the next step.

4x

D

M6x35mm

4x

D

A

2x

M6x15mm

2x

2x

Whiteboard Channel 
1x

A

A

H

H

F

F

F

i

i

i

i

i

i

Summary of Contents for Regal RC107

Page 1: ...present a hazard To be used under direct supervision of an adult WARNING For assistance please contact us 1 800 267 8494 Email info copernicused com Have your packing slip ready for reference RC107 R...

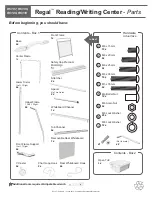
Page 2: ...rame Support 1 Left 1 Right 2x Front Frame 1x Tub Channel 4x Chart Loop Hook 2x Hardware Actual Size Contents Box 1 In Box 1 In Box 1 Whiteboard Channel 1x Contents Box 2 Removable Rear Whiteboard 1x...

Page 3: ...be a hazard l to small children it should be assembled by an adult l Follow the steps in sequence l Before beginning each step find the part s that you need for that step l Pay attention to the labeli...

Page 4: ...ower 2x You will need Not to Scale 4x 4x Actual Size Install Casters Front Press Casters firmly into the Base Casters will click into place If necessary tap the caster in using a rubber mallet You sho...

Page 5: ...install Rear Whiteboard Hook before screwing stretcher into place Ensure hook faces back of unit L R R L Stretcher 2x Rear Whiteboard Hook 2x Upper Frame 1 Left 1 Right 2x 1 2 RC107 Choose stretcher l...

Page 6: ...ub Channels RC107 Tech Easel RC108 RC109 RC110 RC107 Tech Easel RC108 RC109 RC110 R R RC107 Choose hardware size based on which unit you are building Same location for both units Tech Easel RC108 RC10...

Page 7: ...ctual Size Build Front Frame Assembly Tighten bolts 3 2 1 1 Slide whiteboard as far up as it will go 2 Slide whiteboard channel up to bottom of whiteboard 3 Fasten the whiteboard channel in place Tigh...

Page 8: ...will need Not to Scale Peel off protective film Note the spring tension is designed to discourage children from unhooking the book ledge 1 Put brakes in the LOCKED DOWN position to help hold unit stea...

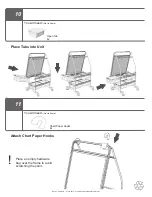
Page 9: ...Educational Products Inc 10 Place Tubs into Unit Open Tub 4x You will need Not to Scale 11 Attach Chart Paper Hooks Chart Paper Hooks 2x You will need Not to Scale Place an empty hardware bag over th...

Page 10: ...other products online at www copernicused com This product is meant to be assembled by an adult In its unassembled state small parts present a hazard To be used under direct supervision of an adult W...

Page 11: ...In everyone s life at some time our inner fire goes out It is then burst into flame by an encounter with another human being We should all be thankful for those people who rekindle the inner spirit A...

Reviews: