background image

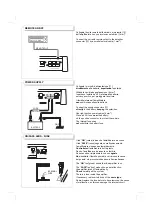
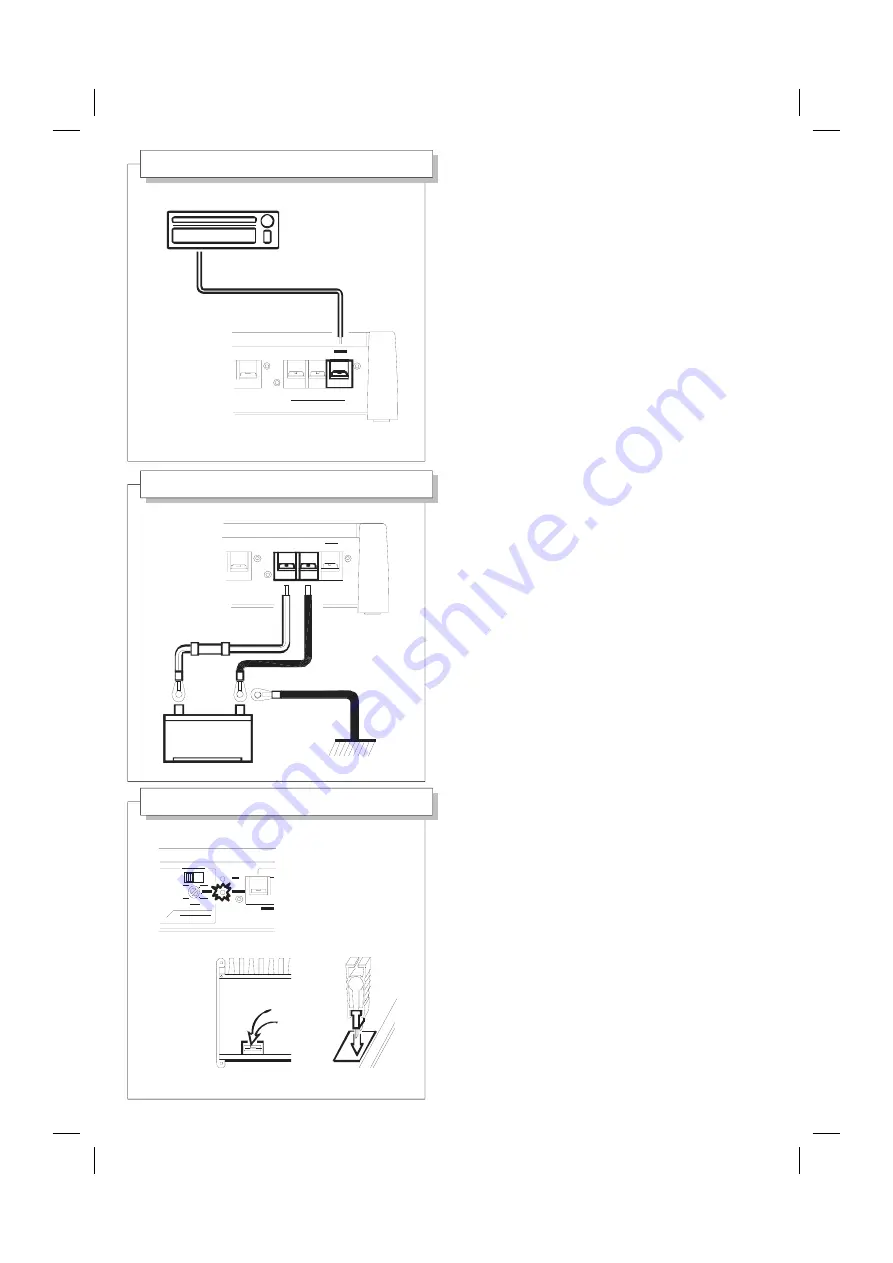
Collegate l'uscita remote dell'autoradio al morsetto [12] 
dell'amplificatore con un piccolo cavo elettrico (1 mm

2

). 


Connect the car radio remote output to the amplifier 
connector [12] by a small electrical cable (1 mm

2

).


Collegate i morsetti d'alimentazione [11] 

direttamente

 alla batteria, 

rispettando

 le polarità. 

 
Utilizzate cavi di adeguata sezione (6 mm

2

). 

Inserite un fusibile da 40 A, 

vicino

 alla batteria, 

sul cavo positivo, per proteggere la vettura. 

 
Il fusibile interno all'amplificatore 

non 

sostitisce quello sulla batteria. 


Connect the supply connectors [11] 
directly to the battery, keeping the polarities. 

 
Use right section power cables (6 mm

2

). 

Place a 40 A fuse, near the battery, 
on the positive conductor, to protect the vehicle. 

 
The internal fuse does 
not substitute the battery fuse. 

REMOTE ON/OFF 

ON/SAFE LEDS - FUSE 

POWER SUPPLY 

Il led “

ON

” (verde) indica che l'amplificatore è acceso. 

 
Il led “

SAFE

” (rosso) segnala un malfunzionamento, 

l'amplificatore si spegne automaticamente. 

Controllate

 attentamente tutto l'impianto. 

 
Dentro l'amplificatore è presente un fusibile. 
Se necessario, rimpiazzatelo con uno 

uguale

 
Non

 sostituite il fusibile prima di aver rimosso la causa 

del guasto: ciò provocherebbe danni alla circuitazione. 
 

The “ON” led (green) shows that the amplifier is on. 

 
The “SAFE” led (red) makes known a malfunction, 
the amplifier turns off automatically. 
Check carefully all the system. 

 
There is a fuse inside the amplifier. 
If necessary, replace it whit one of the same type

 
Do not replace the fuse before to have removed the cause 
of malfunction, as this can damage the internal circuit. 

FM 101.5 - RDS

REMOTE OUT

+

-

+

-

-

+

BATTERY

FUSE

40A

GND

INTERNAL
FUSE

Summary of Contents for HA 250

Page 1: ...HA 250 HA 280 stereo power amplifier ...

Page 2: ...VITY Regola la sensibilità d ingresso Adjusts the input sensitivity 4 INPUT SWITCH Seleziona l uso STEREO MONO Switches the STEREO MONO mode 5 MRX CONTROL LOW PASS Regola la frequenza di taglio Adjusts the cut frequency 6 MRX SWITCH LOW PASS Attiva disattiva la funzione MRX Sets the MRX on off status 7 MRX CONTROL HIGH PASS Regola la frequenza di taglio Adjusts the cut frequency 8 MRX SWITCH HIGH ...

Page 3: ...3 WAY SYSTEM Hz FLAT ON LOW P ASS MRX FLAT ON Hz HIGH PASS Hz FLAT ON LOW P ASS MRX FLAT ON Hz HIGH PASS ST MO 2 0 4 1 4 0 8 R IN VOLT ST MO VOLT Hz FLA T ON LOW PASS M ST MO 2 0 4 1 4 0 8 R IN VOLT Hz FLAT ON LOW P ASS MRX FLAT ON Hz HIGH PASS X OVER WOOFER MIDRANGE TWEETER X OVER MIDRANGE TWEETER WOOFER X OVER WOOFER TWEETER SUBWOOFER A A B B A e B B A A A B ...

Page 4: ...o 4 ST stereo per collegare una coppia di cavi provenienti dall autoradio Sui morsetti d uscita 10 è presente un segnale stereo MO mono per collegare un solo cavo proveniente dall autoradio sull ingresso L Sui morsetti di uscita 10 terminali bridge è presente un segnale mono Choose the right position of input switch 4 ST stereo to connect a couple of cables from car radio A stereo signal is presen...

Page 5: ... uscita Non collegate mai a massa alcun altoparlante Connect two speakers or two speaker systems to the connectors 10 keeping the polarities Use right section speaker cables 1 2 mm2 Use right power handling loudspeakers Never link together the negative outputs Never connect to ground any speakers Collegate un altoparlante o un sistema di altoparlanti ai connettori 10 su BRIDGE come in figura Utili...

Page 6: ...vehicle The internal fuse does not substitute the battery fuse REMOTE ON OFF ON SAFE LEDS FUSE POWER SUPPLY Il led ON verde indica che l amplificatore è acceso Il led SAFE rosso segnala un malfunzionamento l amplificatore si spegne automaticamente Controllate attentamente tutto l impianto Dentro l amplificatore è presente un fusibile Se necessario rimpiazzatelo con uno uguale Non sostituite il fus...

Page 7: ...e controls 5 and 7 HIGH PASS Set the switch 6 FLAT and the 8 one ON Adjust the right cut frequency by the control 7 MRX SYSTEM SWITCH MRX SYSTEM USE Scegliete la posizione dei deviatori MRX 6 e 8 Con entrambi i deviatori su flat il circuito è disattivato L apparecchio è un normale amplificatore stereo o mono I controlli 5 e 7 non agiscono Choose the right position of MRX switches 6 e 8 Both switch...

Page 8: ... option Integral replacement is excluded Coral will not be liable for any damage in any way occurred Coral products are warranted for one year from the date of purchase stated by the sales receipt voucher Warranty service is given only by the authorized laboratories Shipping packing and related risks charges are paid by the original purchaser In case of misuse this warranty is void This certificat...

Reviews: