background image


3

. INSTALLATION (continued

)


3.5


CLEANING BEFORE USE 


Wipe the inside of the unit with a light solution of baking soda and water. Then rinse with warm water using a soft 
sponge or cloth. Wash the shelves and vegetable crisper bins in warm soapy water and dry completely before replacing 
in the unit. Clean the exterior of the unit with a damp cloth. 


3.6


STORAGE ACCESSORIES 


Different glass or plastic shelves and storage racks are included with your appliance - different models may include 
different combinations. 

 
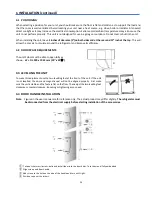
You should always slide one of the full-sized glass storage shelves into the lowest set of guides, above the fruit and 
vegetable bins and keep it in this position. To do this, pull the storage shelf forward until it can be swiveled upwards or 
downwards and then removed.  


In order to make full use of the volume of refrigerator compartment and of the freezer compartment you may remove 
one or more shelves and/or racks out of the appliance to better suit your needs.


4.


REVERSING THE DOORS  

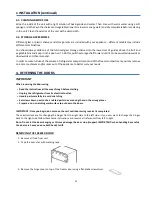
IMPORTANT  


When reversing the door swing


Read the instructions all the way through before starting. 


Unplug the refrigerator from its electrical outlet. 


Handle parts carefully to avoid scratching 


Set screws down next to their related parts to avoid using them in the wrong places. 


Prepare a non-scratching work surface to put down the  doors. 


IMPORTANT: Once you begin, do not move the unit until door-swing reversal is completed. 

These instructions are for changing the hinges from the right side to the left side—if you ever want to change the hinges 
back to the right side, follow these same instructions and reverse all references from left to right. 


Note: Do not let the doors hanging as this may damage the door stop (stopper). IMPORTANT: when handling be careful, 
the doors are heavy and use both hands to lift. 


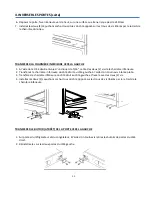
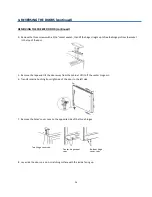
REMOVING THE FREEZER DOOR 


1.


Remove all food from unit. 

2.


Tape the door shut with masking tape. 


3.


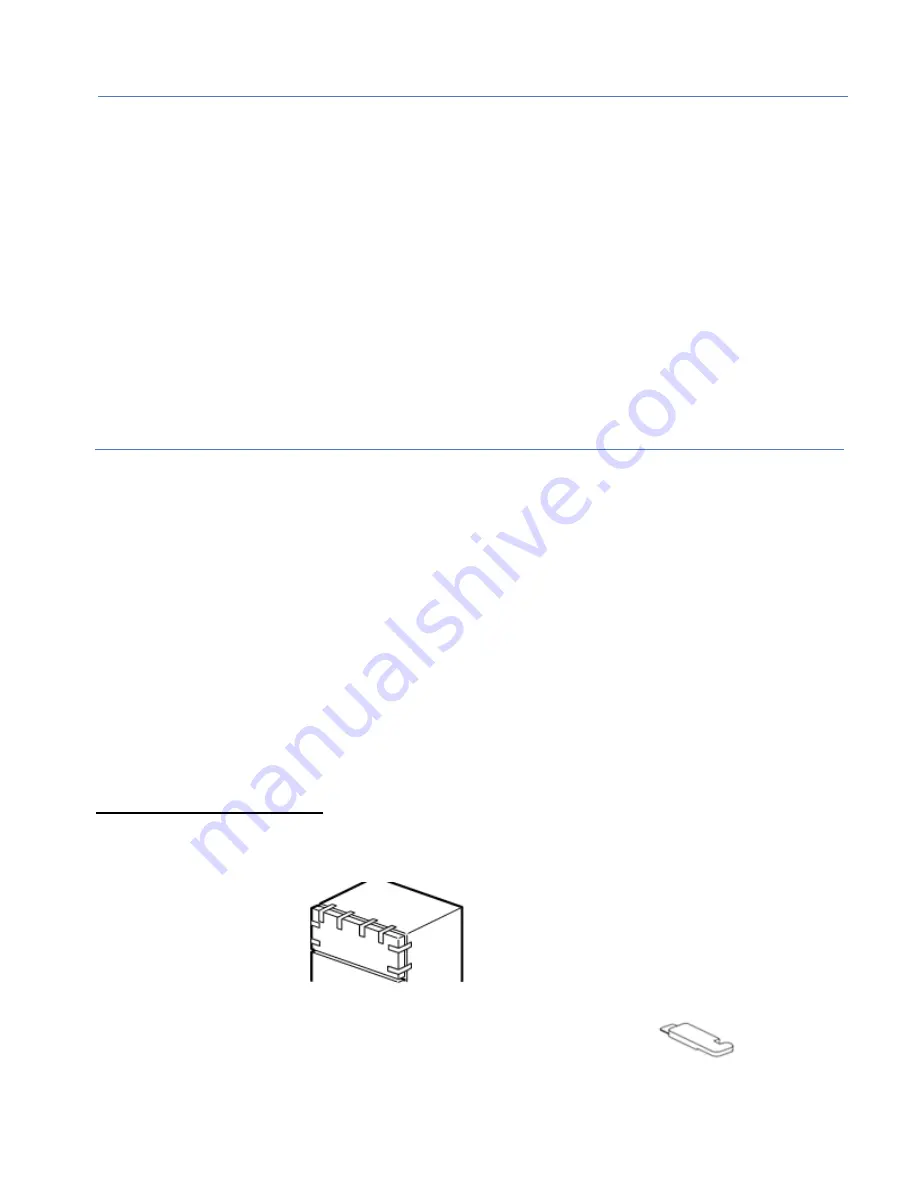
Remove the hinge cover on top of the freezer door using a flat-blade screwdriver. 


25 

Summary of Contents for Ellipse ERTM180S

Page 1: ...TM180W ERTM180S Pour une utilisation optimale de cet appareil ainsi que pour votre sécurité veuillez lire attentivement les instructions contenues dans ce manuel avant de faire fonctionner votre appareil To ensure proper use of this appliance and your safety please read the following instructions before operating this appliance R240119NP ...

Page 2: ...ATIÈRES 1 IMPORTANTES CONSIGNES DE SÉCURITÉ 3 4 2 APERÇU DU PRODUIT 5 3 INSTALLATION 6 8 4 INVERSER LES PORTES 9 13 5 UTILISATION DE VOTRE APAPREIL 14 15 6 NETTOYAGE 16 7 ENTRETIEN 17 8 GARANTIE 17 9 DÉPANNAGE 18 ...

Page 3: ... de toute obstruction 2 AVERTISSEMENT Attention de ne pas endommager le circuit réfrigérant 3 AVERTISSEMENT N utilisez pas d appareils électriques à l intérieur des compartiments de stockage d aliments 4 AVERTISSEMENT DANGER Risque de piégeage des enfants Avant de jeter votre vieux réfrigérateur Enlevez les portes Laissez les étagères en place pour éviter que les enfants grimpent facilement 5 Débr...

Page 4: ...RÉPARATIONS EFFECTUÉES SUR CET APPAREIL NE DOIVENT ETRE FAITES UNIQUEMENT QUE APR LE PERSONNEL DE SERVICE AUTORISÉ NE TENTEZ PAS DE RÉPARER L APPAREIL VOUS MÊME NE TENTEZ PAS D ALTÉRER LES SPÉCIFICATIONS DU PRODUIT OU DE LE MODIFIER DE QUELQUE MANIÈRE QUE CE SOIT TOUT DOMMAGE PEUT REPRÉSENTER UN RISQUE DE COURT CIRCUIT D INCENDIE OU D ÉLECTROCUTION 12 DANGER Risque d incendie ou d explosion Réfrig...

Page 5: ...éférence Tablette Compartiments de porte du congélateur Bouton de réglage du congélateur Panneau de commande du réfrigérateur avec témoin au DEL Rangement pour le beurre Étagères de verre Compartiments de porte petits Couvercle en verre du bac à légumes Compartiments de porte grands Bacs à légumes Pieds de réglage 5 ...

Page 6: ... gel 7 N installez pas l appareil à proximité de sources de chaleur telles que des cuisinières cheminées ou radiateurs 8 Cet appareil requiert une alimentation 115V 60Hz AC 9 N utilisez pas l appareil si le cordon d alimentation est endommagé ou si la fiche est usée 10 Assurez vous que la fiche ne soit pas écrasée ni abimée Sinon cela pourrait provoquer un court circuit une électrocution ou même u...

Page 7: ...appareil Lors de l installation veillez à ce que 5 cm 2 d espace libre soit laissé des deux côtés 5 cm à l arrière 2 et 30 cm 12 au dessus de l appareil Cela permettra à l air froid de circuler autour du réfrigérateur et améliorera l efficacité du processus de refroidissement 3 2 INSTALLATION DE LA POIGNÉE DE PORTE Note Les images dans le présent manuel sont uniquement à titre de référence Le prod...

Page 8: ...carbonate de soude dilué dans deux 2 litre d eau puis rincez à l eau tiède avec une éponge ou un chiffon doux et bien essoré Lavez les tablettes et le compartiment à fruits légumes avec de l eau chaude savonneuse et séchez les complètement avant de le remettre dans l appareil Nettoyez l extérieur de l appareil avec un chiffon doux humide Pour de plus amples informations référez vous à la section N...

Page 9: ... références faites aux côtés droit et gauche REMARQUE Ne laissez pas les portes pendre vers sur le sol Cela pourrait endommager le butoir l arrêt de porte ATTENTION lors de la manutention faites attention les portes sont lourdes Soulevez le à deux mains MARCHE A SUIVRE POUR RETIRER LES PORTES COMPARTIMENT CONGÉLATEUR 1 Retirez tous les aliments des bacs situés à l intérieur de la porte 2 Immobilis...

Page 10: ...nière du milieu en enlevant les deux 2 vis qui la retiennent à l aide d une clé à douilles munie d un cliquet de 5 16 Remisez la charnière centrale et les vis 4 Enlevez le ruban adhésif et retirez la porte à une bonne distance du cadre du réfrigérateur Soulevez la vers le haut pour la libérer du piot inférieur situé dans la charnière inférieure 5 Transférez la cheville du haut de la porte du côté ...

Page 11: ... vis de la charnière inférieure 2 Transférez la charnière inférieure du côté droit au côté gauche à l aide d un tournevis à lame plate 3 Transférez la charnière inférieure du côté droit au côté gauche et fixez la avec les deux 2 vis 4 Installez les deux 2 capuchons cache trous du côté opposé sur les trous de vis libérés par le retrait de la charnière inférieure TRANSFÉRER LE BUTOIR ATRRÊT DE LA PO...

Page 12: ...ntage Utilisez une clé hexagonale de 1 8 pour serrer les vis de montage REMARQUE ATTENTION DE NE PAS TROP SERRER INVERSION DES POIGNÉES DE PORTE RÉFRIGÉRATEUR 1 Desserrez les vis de montage de la poignée à l aide d une clé de 1 8 et retirez la poignée 2 Retirez la fixation de la poignée et bouchez l orifice de la vis que vous venez de créer avec le capuchon cache vis situé du côté opposé 3 Insérez...

Page 13: ...ONGÉLATEUR 1 Déposez doucement la porte du congélateur sur le pivot de la charnière du milieu 2 Placez la charnière supérieure gauche de façon à ce qu elle soit enlignée au boîtier de la porte la charnière supérieure gauche et le couvre charnière sont fournis avec la trousse d accessoires Soutenez la porte sur le côté de la poignée et assurez vous qu elle est bien droite et que l écart face avant ...

Page 14: ...porairement la réfrigération réfrigérateur et ou congélateur maintenir appuyée la touche SET Réglage pendant 3 trois secondes Le témoin de mise en attente STANDBY s allumera et la réfrigération sera interrompue Appuyez de nouveau sur SET Réglage pour annuler le mode de mise attente STANDBY et reprendre laréfrigération 5 2 RÉGLAGE DES VALEURS À chaque fois que vous appuyez sur la touche SET Réglage...

Page 15: ...e ambiante est inférieure à 10 C pendant une longue période de temps le panneau de contrôle du réfrigérateur doit être positionné au réglage 4 ou 5 et celui du régulateur d air du congélateur à la position PLUS FROID COLDER 3 Si la température ambiante est supérieure à 43 C pendant une longue période de temps le panneau de contrôle réfrigérateur doit être positionné à 4 ou 5 et le régulateur d air...

Page 16: ...ANGER L AMPOULE INTÉRIEURE LORS DE CHANGEMENT D AMPOULE METTRE LE CONTRÔLE DU RÉFRIGÉRATEUR HORS DE TENSION OFF NE COUPER PAS L ALIMENTATION ÉLECTRIQUE ATTENTION L AMPOULE EST PEUT ÊTRE CHAUDE PARAMÈTRE D ÉCLAIRAGE DE LA LAMPE MAX 40W 1 Débranchez le réfrigérateur 2 L ampoule se trouve sur la partie supérieure du compartiment près del ouverture 3 Remplacez l ancienne ampoule avec une nouvelle ampo...

Page 17: ...és à l accessibilité de l appareil pour une réparation par exemple enlever des garnitures armoires étagères etc qui ne font pas partie de l appareil Les appels de service concernant la réparation ou du remplacement de matériel tel que boutons poignées ou autres pièces esthétiques Les dommages causés au fini de l appareil ou à la maison pendant l installation incluant planchers aux armoires aux mur...

Page 18: ...iez si l ampoule est endommagée La porte du réfrigérateur ne se ferme pas correctement La porte du congélateur peut être bloquée par des aliments Il y a trop de produits dans le réfrigérateur Le réfrigérateur n est pas au niveau Bruits Vérifiez si les produits sont placés à plat Vérifiez si le réfrigérateur est au niveau Vérifiez si les pièces du réfrigérateur tablettes tiroirs sont installées et ...

Page 19: ...ONTENTS 1 IMPORTANT SAFETY WARNINGS 20 21 2 PRODUCT OVERVIEW 22 3 INSTALLATION 23 25 4 REVERSING THE DOORS 25 29 5 OPERATING THE APPLIANCE 30 31 6 CLEANING 32 7 MAINTENANCE 32 8 WARRANTY 33 9 TROUBLE SHOOTING 34 ...

Page 20: ...HE INSTRUCTIONS CONTAINED IN THIS MANUAL UNDER THE SECTION INSTALLATION WHEN USING AN ELECTRICAL APPLIANCE YOU SHOULD ALWAYS OBSERVE BASIC SAFETY PRECAUTIONS TO REDUCE THE RISK OF ELECTRIC SHOCK FIRE OR PERSONAL INJURY 1 WARNING Keep the ventilation openings in the enclosure free of obstructions Do not cover the appliance 2 WARNING Be careful not to damage the refrigerant tubing Flammable refriger...

Page 21: ...flammable propellant 11 Do not use extension cords or 2 prong adapters to connect this appliance to an electrical outlet DANGER AUTHORIZED SERVICE PERSONNEL ONLY ARE TO MAKE REPAIRS ON THIS APPLIANCE DO NOT ATTEMPT TO REPAIR THIS APPLIANCE YOURSELF DO NOT MODIFY THE SPECIFICATIONS OF THIS PRODUCT OR CHANGE IT IN ANY MANNER ANY CHANGES MAY RESULT IN A SHORT CIRCUIT FIRE OR ELECTRIC SHOCK 12 DANGER ...

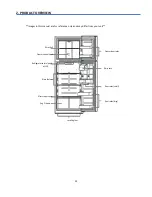
Page 22: ...e for reference only and may differ from your unit Wire shelf Freezer door racks Freezer control knob Refrigerator control panel w LED Dairy rack Glass shelves Door racks small Glass crisper cover Door racks large Veg Crispers Levelling feet 22 ...

Page 23: ...ose the unit to direct sunlight rain or frost 7 Do not install the appliance near heat sources such as stoves fireplaces or radiators 8 The appliance requires power supply of 115V 60Hz AC 9 Do not use the appliance if the power cord is damaged or the plug is worn 10 Do not place flammable explosive volatile and highly corrosive objects in the appliance as they may cause damage or even fire 11 Do n...

Page 24: ...PACE REQUIREMENTS The unit s door must be able to open fully as shown W D 990 x 1025 mm 39 x 40 D W 3 3 LEVELLING THE UNIT To make this adjustment use the two levelling feet at the front of the unit If the unit is not levelled the door and magnetic seal will not be aligned properly First make sure the unit is stable and the feet are flat on the floor Then adjust the two levelling feet clockwise or...

Page 25: ...ve one or more shelves and or racks out of the appliance to better suit your needs 4 REVERSING THE DOORS IMPORTANT When reversing the door swing Read the instructions all the way through before starting Unplug the refrigerator from its electrical outlet Handle parts carefully to avoid scratching Set screws down next to their related parts to avoid using them in the wrong places Prepare a non scrat...

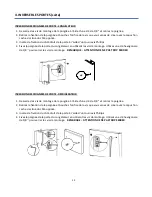
Page 26: ...e top of the door 5 Remove the tape and tilt the door away from the cabinet Lift it off the center hinge pin 6 Transfer plastic bushing from right side of the door to the left side 7 Remove the holes cover caps on the opposite side of the three hinges 8 Lay aside the door on a non scratching surface with the inside facing up 26 Top Hinge cover cap Center hinge cover caps Bottom hinge cover caps ...

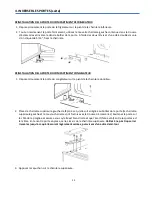
Page 27: ...oor to the left side 6 Set the door aside on a non scratching surface with the inside facing up 7 Install the two 2 hole cover caps from the opposite side of the cabinet to the empty screw holes of the center hinge TRANSFERING THE BOTTOM HINGE TO THE LEFT SIDE 1 Using a 5 16 Socket wrench remove the two 2 screws from the bottom hinge 2 Move the bottom hinge pin from the right to the left side with...

Page 28: ...opposite side 3 Insert the fasteners on the left side using a Phillips screwdriver 4 Attach the handle to the freezer door using the mounting screws Use a 1 8 Allen key to tighten the screws NOTE Do not over tighten TRANSFERING THE REFRIGERATOR DOOR HANDLE TO THE LEFT 1 Unscrew on the handle using a 1 8 Allen Key and remove handle 2 Removethefasteners fromthesurfaceof thefreezer door and cover the...

Page 29: ...EEZER DOOR 1 Lower the freezer door onto the center hinge pin 2 Place the left top hinge lined up with the door socket left top hinge and cover can be found are supplied with the unit s accessories Hold the door on the handle side and make sure the door is straight and the gap between the 2 doors is even across the front While holding the door in place tighten the top hinge screws Do not overtight...

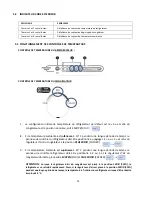
Page 30: ...o your personal preference To temporarily suspend cooling in the refrigerator and freezer press and hold the SET button and hold for 3 three long seconds The STANDBY button will turn on and cooling will be turned off Press the SET button again to cancel standby mode and resume cooling 4 2 SETTING INDICATORS Each time the key SET is pressed the position changes Once the setting has been chosen the ...

Page 31: ...is theMID position 2 If the ambient temperature is lower than 10ᵒ C for a long period oftime the refrigerator control panel can be placed at the 4 or 5 setting while the freezer air shutter can be placed on the COLDER position 3 If the ambient temperature is higher than 43ᵒ C for a long period of time the refrigerator control panel can be placed at the 4 or 5 setting while the freezer air shutter ...

Page 32: ...1 Unplug the refrigerator 2 The bulb is located at the top of the compartment near the opening 3 Replace with an appliance bulb of equal or lower wattage 4 Plug the refrigerator back in 7 2 HANDLING MOVING YOUR UNIT Hold the unit from its sides or its base when moving it Under no circumstances should it be lifted by holding the top end or edges The unit s condenser is located at the bottom of the ...

Page 33: ...les or knobs handles or other cosmetic parts Pickup and delivery costs your appliance will be repaired at home Damages to the finish of appliance or home incurred during transportation or installation including but not limited to floors cabinets walls etc Damages caused by services performed by unauthorized Service Centers use of parts other than genuine parts or parts obtained from persons other ...

Page 34: ...oes not work Check if the refrigerator is connected to power Check if light is damaged The refrigerator door does not close properly The freezer door is blocked by food packages Overstuffed compartments Refrigerator is not level Noises Check if food is properly set flat Check if the refrigerator is level Check if refrigerator parts are properly installed 9 1 TIPS The walls of the refrigerator can ...

Reviews: