background image

15

G

F

D

PR185

F

F

F

E

E

G

PR22

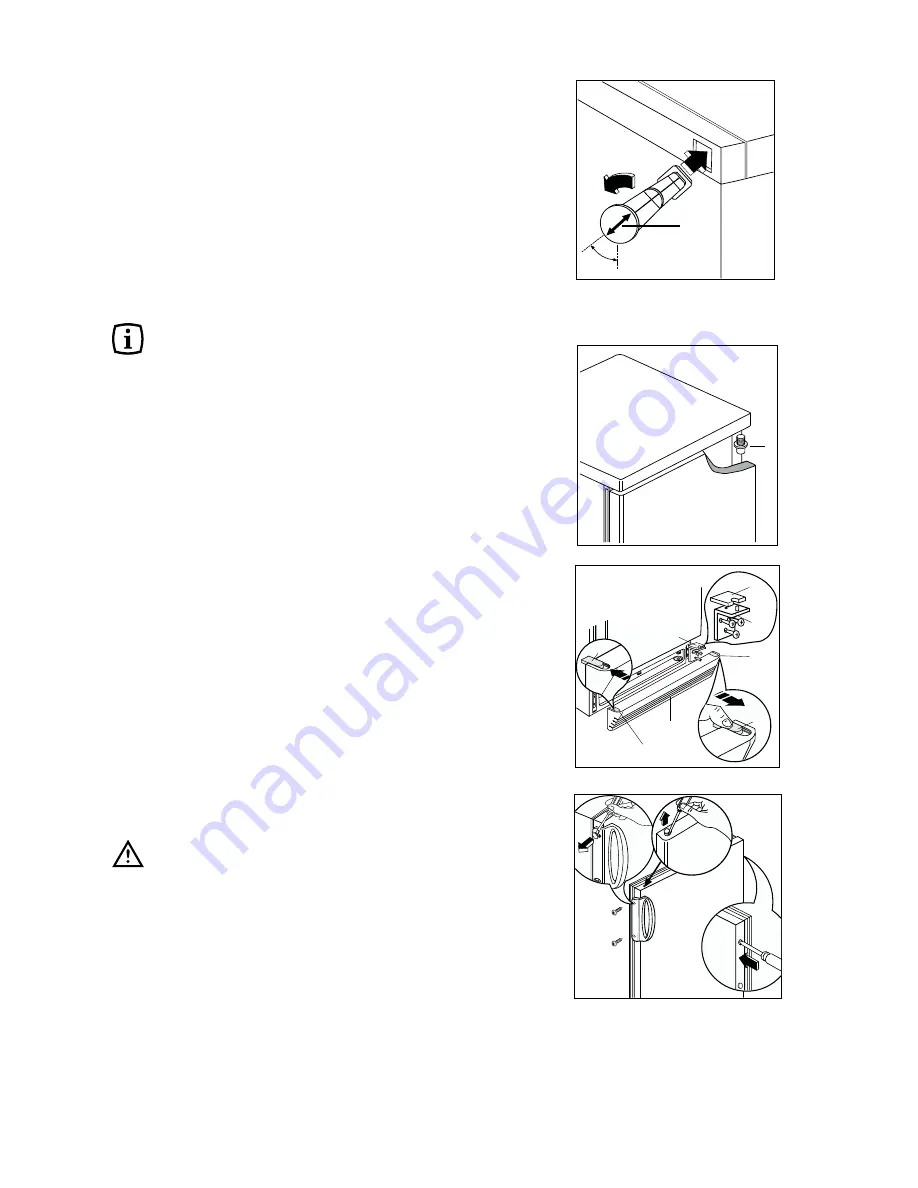
Door reversal

Unplug the appliance before all operations.

To reverse the door, proceed as follows:

1. Remove the ventilation grill (D).

2. Unscrew the bottom hinge (E).

3. Remove the door by releasing it from the top

hinge pin (G).

4. Remove the pin then mount these on the

opposite side.

5. Remove the two plugs, to reveal the holes for the

hinge pivots, and remount them on the other side.

6. Replace the freezer door.

7. using a 10 mm spanner, unscrew the hinge pin

(E) and reassemble it on the opposite side of the
hinge;

8. Screw down the bottom hinge (E) on the opposite

side by using the screws previously removed.

9. Remove the plug (F) from the ventilation grill (D)

and replace it on the opposite side.

10.Re-assemble the ventilation grill (D).

11.Unscrew the handle. Refit it on the opposite side

after having pierced the plugs with a punch.
Cover the holes left open with the plugs
contained in the documentation pack.

Warning:

After having reversed the opening direction of
the doors check that all the screws are properly
tightened and that the magnetic seal adheres to
the cabinet. If the ambient temperature is cold
(i.e. in Winter), the gasket may not fit perfectly to
the cabinet. In that case, wait for the natural
fitting of the gasket or accelerate this process by
heating up the part involved with a normal
hairdrier.

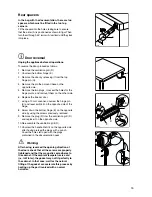
Rear spacers

In the bag with the documentation, there are two
spacers which must be fitted in the two top
corners.

Fit the spacers into the holes, taking care to ensure
that the arrow (A) is positioned as shown in figur. Then
turn them through 45° (arrow (A) vertical) until they lock
into place.

PR60

A

45°

Summary of Contents for CV1600S/3

Page 1: ...CONGELADOR FREEZER CV 1600 S 3 LIBRO DE INSTRUCCIONES INSTRUCTION BOOKLET 2222 256 41 ...

Page 2: ...igerators and freezers are designed to be used specifically for the storage of edible foodstuffs only Best performance is obtained with ambient temperature between 18 C and 43 C class T 18 C and 38 C class ST 16 C and 32 C class N 10 C and 32 C class SN The class of your appliance is shown on its rating plate Warning when the ambient temperature is not included within the range indicated for the c...

Page 3: ... 9 Use 10 Cleaning the interior 10 Control panel 10 Operation 11 Temperature regulation 11 Quick freezing 11 Warning light 11 Storage of frozen food 11 Freezing fresh food 12 Thawing 12 Ice cube production 12 Hints 12 Hints for freezing 12 Hints for storage of frozen food 12 Maintenance 13 Periodic cleaning 13 Periods of no operation 13 Defrosting 13 Customer service and spare parts 14 Installatio...

Page 4: ...temperature alarm light to remain lit up for a short time after the freezer is initially turned on It will remain lit up until the optimum temperature for the conservation of frozen food is attained Storage of frozen food When first starting up or after a period out of use before putting the products in the compartment let the appliance run for at least two hours on the fast freeze setting then tu...

Page 5: ...pare food in small portions to enable it to be rapidly and completely frozen and to make it possible subsequently to thaw only the quantity required wrap up the food in aluminium foil or polythene and make sure that the packages are airtight do not allow fresh unfrozen food to touch food which is already frozen thus avoiding a rise in temperature of the latter lean foods store better and longer th...

Page 6: ...ack of the appliance with a brush or a vacuum cleaner This operstion will improve the performance of the appliance and save electricity consumption Defrosting The freezer compartment will become progressively covered with frost This should be removed with a plastic scraper whenever the thickness of the frost exceeds 4 mm During this operation it is not necessary to switch off the power supply or t...

Page 7: ...ppliance is positioned below an overhanging wall unit the minimum distance between the top of the cabinet and the wall unit must be at least 100 mm A Ideally however the appliance should not be positioned below overhanging wall units B Accurate levelling is ensured by one or more adjustable feet at the base of the cabinet Electrical connection Before plugging in ensure that the voltage and frequen...

Page 8: ... 10 Re assemble the ventilation grill D 11 Unscrew the handle Refit it on the opposite side after having pierced the plugs with a punch Cover the holes left open with the plugs contained in the documentation pack Warning After having reversed the opening direction of the doors check that all the screws are properly tightened and that the magnetic seal adheres to the cabinet If the ambient temperat...

Reviews: