background image

16

TECHNICAL SPECIFICATIONS

Electrical connection

Before plugging in, ensure that the voltage and frequency shown on the serial number plate
correspond to your domestic power supply. Voltage can vary by ±6% of the rated voltage. For
operation with different voltages, a suitably sized auto-transformer must be used.

The technical data is indicated in the rating plate on the left side inside the appliance.

GB

8mm

PR34

PR35

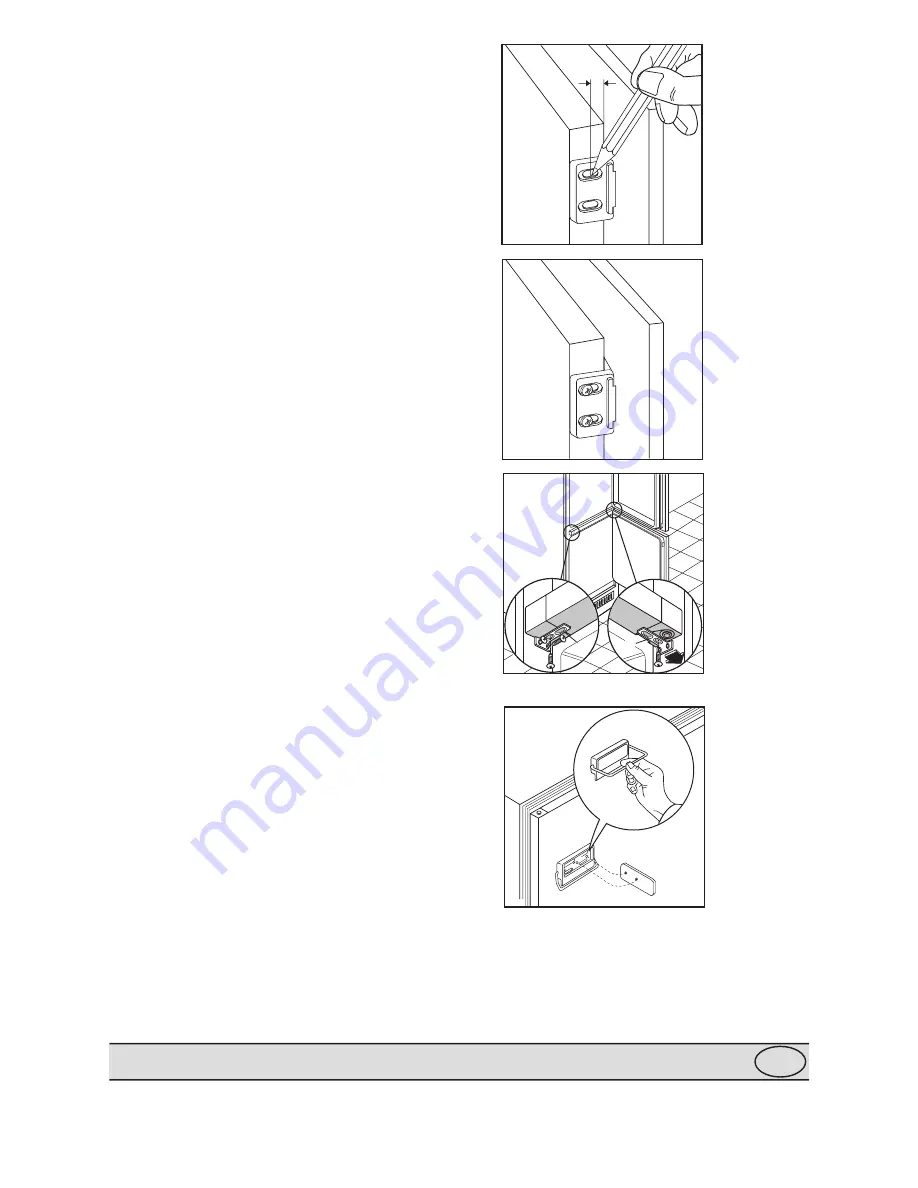
Open both the appliance door and that of the
kitchen unit to approx. 90°. Place the little plates
over the runners. Hold the doors of the appli-
ance and the unit together and mark the holes.

Remove the little plates and make the holes
with a diam. of 2 mm. Replace the little platee
over the runners and screw in the screws
provided (3.5x16 mm).
For the alignment of the kitchen unit door, if
necessary, use the clearance size of the slotted
holes. At the end of the procedure, check that
the doors of the appliance and the kitchen unit
open properly.

If the appliance is fixed to the side of the kitchen
unit, simply slacken the screws in the fixing
brackets (G), move the brackets as shown in
the figure and re-tighten the screws.

The doors can be opened using the sliding
system previously illustrated, or one of the two
doors can be opened by fitting the small handle
supplied as an accessory (see figure).

Fig. 9

Fig. 10

Fig. 11

D735

E

E

D029

Fig. 12

Summary of Contents for FC 1801 I

Page 1: ...REFRIGERADOR CONGELADOR FRIDGE FREEZER FC 1801 I LIBRODEINSTRUCCIONES INSTRUCTION BOOKLET 2222 284 05 ...

Page 2: ...he storage of edible foodstuffs only Frozen food must not be re frozen once it has been thawed out Manufacturers storage recommendations should be strictly adhered to Refer to relevant instructions The inner lining of the appliance consists of channels through which the refrigerant passes If these should be punctured this would damage the appliance beyond repair and cause food loss DO NOT USE SHAR...

Page 3: ...d 32 C class N 10 C and 32 C class SN The class of your appliance is shown on its rating plate For building into kitchen units follow the special Building in instructions given Important It is essential that the appliance be connected to an efficient earth tap For this purpose the supply cable plug incorporates a special earth contact If the sockets of your domestic wiring system are not earthed h...

Page 4: ... touches the kitchen unit Fig 3 50 mm min 200cm2 200cm 2 min D567 A D023 Instructions for totally built in appliances Door reversibility Fig 1 a b c The appliance is supplied with the right door opening To change the opening direction of the door proceed as in the following instructions before installing it 1 Unscrew the upper pin and remove the spacer 2 Remove the upper door 3 Unscrew the pins B ...

Page 5: ...5x16 mm screws D724 D726 B PR33 20mm A Fig 4 Fig 5 Fig 6 Fig 7 Fig 8 D265 A D C D723 If after having carried out the previously described operation there is still some space left between the appliance and the kitchen unit fit the trimming provided together with the appliance on the stop strip A Open the door and push the appliance against the side of the kitchen unit opposite to that of appliance ...

Page 6: ...it together and mark the holes Remove the little plates and make the holes with a diam of 2 mm Replace the little platee over the runners and screw in the screws provided 3 5x16 mm For the alignment of the kitchen unit door if necessary use the clearance size of the slotted holes At the end of the procedure check that the doors of the appliance and the kitchen unit open properly If the appliance i...

Page 7: ...eed the storage times shown by the manufacturer on the commercially frozen food packets Under normal circumstances to freeze fresh foods it is not necessary to change the setting of the thermostat knob with respect to the normal running position Depress the ambient switch at least 3 hours before loading food to be frozen However for a quicker freezing operation turn the thermostat knob to the cold...

Page 8: ...rmostat has six operating positions and an 0 Stop position The higher the number selected the lower the temperature in the refrigerator When first starting up the appliance an initial setting of 3 or 4 is recommended The temperature inside the compartment depends on a number of factors such as the ambient temperature the amount of food stored in the appliance the frequency with which the door is o...

Page 9: ...rosting should be carried out and it is advisable to carry out this operation when the appliance is empty To carry out complete defrosting of the freezer compartment proceed as follows Remove any stored food wrap it in several layers of newspaper and put it in a cool place Pull out the plug from the wall socket or turn the thermostat knob to the a O setting Leave the door open Introduce the plasti...

Page 10: ... MAINTENANCE GB DEFECTIVE OPERATION GB Before calling your local dealer for servicing assistance check the following points to see if you may not resolve the problem yourself Make sure that the freezer is plugged into the wall socket correctly and that electrical current arrives to the freezer without interruption Control the thermostat setting In the event that the freezer makes excessive noise o...

Reviews: