background image

15

SE LP10 Integrated Wired  

With and Without MELR Option (Electric Latch Retraction) 

Copyright © 2020, ASSA ABLOY Access and Egress Hardware Group, Inc. All rights 

reserved. Reproduction in whole or in part without the express written permission of ASSA 

ABLOY Access and Egress Hardware Group, Inc. is prohibited.

Inside of Door

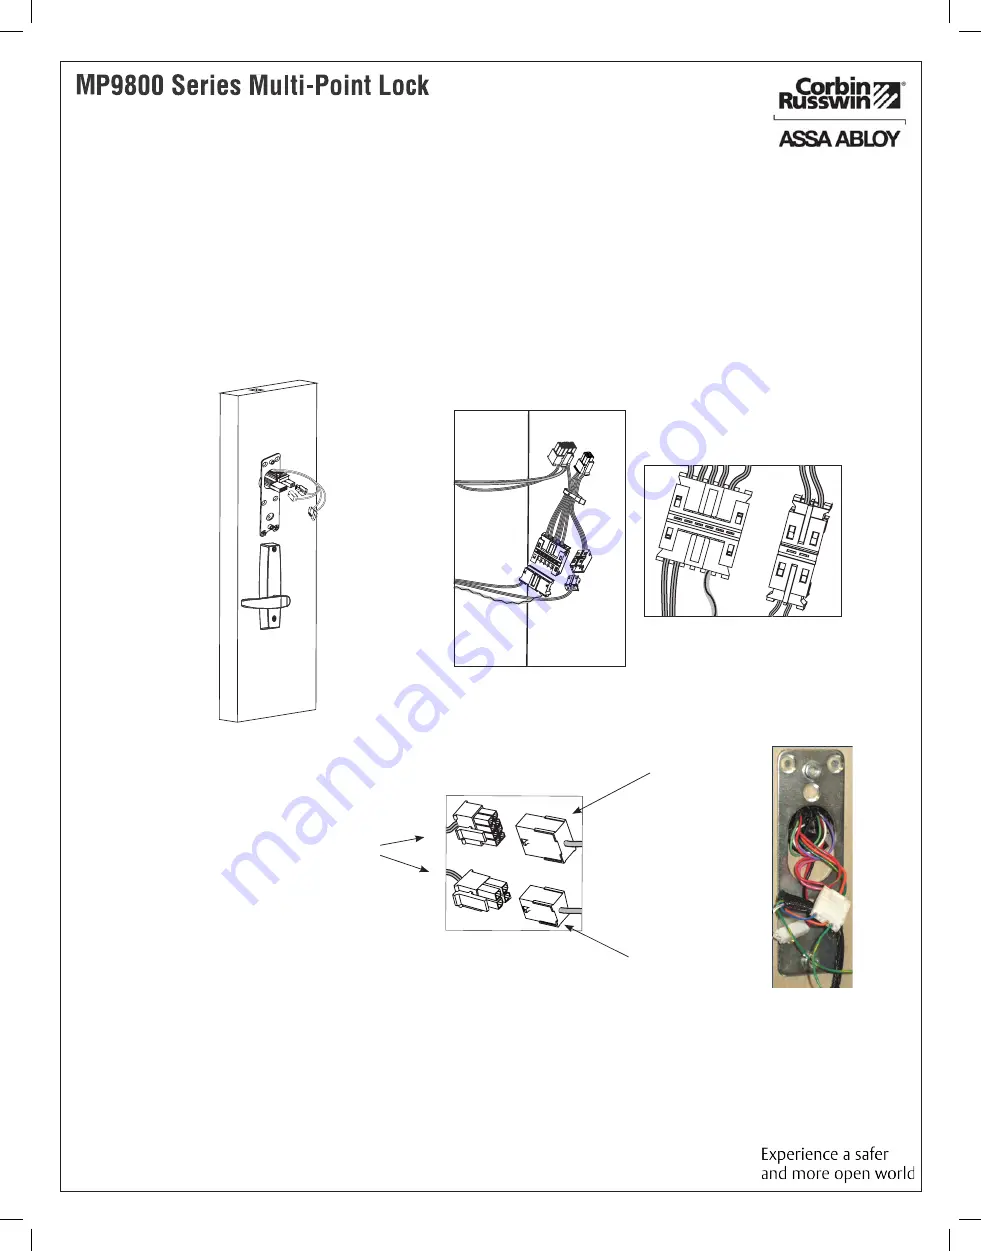
6A   Inside Mounting Plate and Wire Connections (Non-MELR)

1.  Attach mounting plate using (2) #8 x 1/2” self-drilingl screws (Fig. 6A).
2.  Connect 6- and 2-pin connectors from device to 6- and 2-pin connectors on reader  

harness (Fig. 6B, C).

3.  Connect ElectroLynx 4- and 8-pin connectors from the door harness to (black) 4- and 8-pin 

connectors of the SE LP10 harness (Fig. 6D).

NOTE: Neatly fold excess wires into remaining space to prevent pinching  
            wires when mounting inside escutcheon (Fig. 6E).

Fig.  6D

SE LP10 

Harness

8-pin               

ElectroLynx

4-pin               

ElectroLynx

Fig.  6C

Fig.  6B

Fig.  6E

Inside of Door

Fig.  6A

Summary of Contents for ASSA ABLOY MP9800 Series

Page 1: ...ing important steps Please Note Improper installations may result in damage to the lock and void the factory warranty Important The accuracy of the door preparation is critical for proper functioning and security of this lock Misalignment can cause premature wear and a lessening of security FM488 06 20 Copyright 2020 ASSA ABLOY Access and Egress Hardware Group Inc All rights reserved Reproduction ...

Page 2: ...ction in whole or in part without the express written permission of ASSA ABLOY Access and Egress Hardware Group Inc is prohibited 1 Regulatory Compliance 3 2 Warning 3 3 General Description 4 4 Specifications Features 4 5 Wiring Diagrams 6 6 Product Illustrations 9 7 Installation Instructions 12 8 Concealed Door Position Switch 18 9 Operational Check 19 Table of Contents ...

Page 3: ...er Cet équipement est conforme aux limites d exposition aux radiations de la FCC définies pour un environnement non contrôlé Cet équipement doit être installé et utilisé à une distance minimale de 20 cm entre le radiateur et votre corps Cet émetteur ne doit pas être co localisé ou fonctionner en conjonction avec une autre antenne ou un autre émetteur Under Industry Canada regulations this radio tr...

Page 4: ...ed ET Trim available Wire from EAC Panel to door must be shielded with a drain terminated at EAC Panel controller SE LP10 MP9800 Series Multi Point Lock Cylinder override available for MP9800 with Auxiliary Control Outside lever can be controlled by multiple credential formats 3 General Description 4 Specifications Features 125 kHz credential compatibilty HID Prox AWID EM4102 13 56 MHz credential ...

Page 5: ...22 18 16 16 14 14 12 10 200 20 18 16 14 14 12 12 10 250 18 16 14 14 12 12 12 10 300 18 16 14 12 12 12 10 400 18 14 12 12 10 10 500 16 14 12 10 10 750 14 12 10 10 1 000 14 10 10 1 500 12 10 Wire Gauge Chart 24VDC Electrical Specifications 12 24VDC System 12V 24V Average Peak Average Peak Reader 100mA 220mA n a n a Actuator 15mA 500mA 15mA 500mA Wiring methods shall be in accordance with the Nationa...

Page 6: ...dential causes LED to turn amber as credential is authenticated Reader emits a short beep when credential is successfully read Reference Diagram 1 PIN 4 Tan DPS COM PIN 2 Gray Lock POS PIN 1 Violet Lock NEG PIN 3 Pink DPS NC Note NC Normally Closed NO Normally Open PIN 8 Yellow TAMPER PIN 6 Blue RX COM PIN 4 Green Data 0 PIN 2 Red Reader POS PIN 1 Black Reader NEG PIN 3 White Data 1 PIN 5 Orange R...

Page 7: ...s Control Panel By Others Use NC for Fail Safe Operation Lock Relay NO Fail Secure Operation DPS DPS QC12 Electric Hinge From McKinney Panel Circuitry Unsupervised Open Collector Tamper 5VDC A to D Converter 1KΩ 1KΩ 1KΩ Input Connection Input Connection IMPORTANT Pin 7 must be tied to earth ground in the access control panel Wiring in accordance with the NEC ANSI NFPA 70 Fail secure installations ...

Page 8: ...iolet 9 LOCK POS Gray 10 DPS NC Pink 11 DPS COM Tan 12 12VDC DATA 1 DATA 0 RX NO RX COM Electrical Access Control Panel By Others Use NC for Fail Safe Operation Lock Relay NO Fail Secure Operation DPS DPS Power Supply By Others 12 24VDC H N G 120 VAC Input Black Hot White Neutral Green Gnd QC12 Electric Hinge From McKinney Panel Circuitry NOTE If your lock is configured with End of Line Resistors ...

Page 9: ...on in whole or in part without the express written permission of ASSA ABLOY Access and Egress Hardware Group Inc is prohibited SE LP10 MP9800 Series Tools Required Phillips screw driver standard size Slotted screw driver standard size 8 32 tap tap drill for metal door applications T10 Torx Driver 2 1 3A 5A 4 6 18 7 12 13 14 15 16 17 15 15 22 22 20 22 6 Product Illustrations ...

Page 10: ...n in whole or in part without the express written permission of ASSA ABLOY Access and Egress Hardware Group Inc is prohibited 2 6 5A 19 10 1 3A 4 7 23 22 Tools Required Phillips screw driver standard size Slotted screw driver standard size 8 32 tap tap drill for metal door applications T10 Torx Driver SE LP10 MP9800 Series 12 13 14 15 16 22 20 6 Product Illustrations Continued ...

Page 11: ...52 I S MELR Escutcheon Assembly 1 11 764F577 Top Strike Pack not shown 764F587 Bottom Strike Pack Fire A B M107 not shown 764F567 Top and Bottom Strike Pack STD not shown 12 763F809 BIPS B03 Reader and Harness Assembly Bluetooth Standard Indicator Configuration 1 763F649 FIPS B03 Reader Harness Assembly 200 bit Wiegand output 763F669 FIPS B04 Reader Harness Assembly 75 bit Wiegand output 763F629 I...

Page 12: ...ner Case Installation 1 Refer to instruction sheet FM438 for rod and inner case installation on metal doors 2 Refer to instruction sheet FM436 for rod and inner case installation on wood doors Check hand of door The Multi Point lock may be handed Door should be fitted and hung Verify box label for size of the Multi Point lock function and hand Change hand if necessary Left Hand Reverse LHR Outside...

Page 13: ...and outside door surface Fig 3A 2 Feed wire through the through hole and attach the outside exit trim to the door A Outside Trim 3 Install Outside Trim and Inside Trim B Inside Trim Fig 3A Fig 3B Outside of Door Fig 4A Reader Backplate Fire Shield Fig 4B Gasket for exterior doors 4 Install Reader Backplate and Optional Fire Shield or Gasket 1 For fire rated doors only install reader backplate and ...

Page 14: ...should be mounted so the holes face the bottom of door Fig 5B 2 Align top of reader with top of backplate Pivot reader down until seated Guide wires as needed to avoid pinching 3 Secure the reader with 1 6 32 x 3 8 Phillips or anti tamper security torx screw to the mounting plate Fig 5C 5 Installation of SE LP10 Reader Trim Bezel Fig 5A Observe precautions for handling electrostatic sensitive devi...

Page 15: ... and Wire Connections Non MELR 1 Attach mounting plate using 2 8 x 1 2 self drilingl screws Fig 6A 2 Connect 6 and 2 pin connectors from device to 6 and 2 pin connectors on reader harness Fig 6B C 3 Connect ElectroLynx 4 and 8 pin connectors from the door harness to black 4 and 8 pin connectors of the SE LP10 harness Fig 6D NOTE Neatly fold excess wires into remaining space to prevent pinching wir...

Page 16: ...se enough to slide the MELR assembly on 2 Snake the wire through opening in MELR assembly 3 Slide the mounting clip of the MELR assembly underneath the installed screw and tighten it to secure the assembly in place Note Be careful not to pinch or disconnect the wire located in that area 4 Install the remaining three 3 mounting screws 8 32 x 5 8 Fillister for metal doors or 8 x 5 8 self tapping Fil...

Page 17: ...h two 8 x 1 1 4 Phillips pan head self drilling screws Note For non fire rated doors omit fire plate 8A Position Inside Escutcheon Wires Non MELR 1 Carefully and neatly fold lock body wires onto themselves ElectroLynx connectors should be positioned side by side under the fire block plate Device connectors should be positioned side by side on top of the ElectroLynx connectors 2 Position inside esc...

Page 18: ...r by hooking the top edge on the top of the MELR assembly Verify that no wires are being pinched 2 Mount inside escutcheon assembly to plate using 1 8 32 x 5 8 Phillips flat head undercut machine screw Figure 8B Machine screw detail 8 Concealed Door Position Switch Instructions 1 Concealed Door Position Switch Model 708F989 is included with this product System integrator shall determine use and in...

Page 19: ...fy system operation functions i e when prox credential is presented to reader that the door unlocks Feature WT1 WT2 12 or 24VDC lock voltage adjustable X X Operates as Fail Safe or Fail Secure X X Learn mode allows testing of specific cards without programming at the panel level X X Card reader data integrity is validated at test unit X X Displays detailed Wiegand data including hexadecimal string...

Page 20: ...e owners Corbin Russwin 225 Episcopal Road Berlin CT 06037 Phone 800 543 3658 Fax 800 447 6714 corbinrusswin com For installation assistance contact Corbin Russwin 1 800 810 WIRE 9473 techsupport corbinrusswin assaabloy com FM488 05 20 Copyright 2020 ASSA ABLOY Access and Egress Hardware Group Inc All rights reserved Reproduction in whole or in part without the express written permission of ASSA A...

Reviews: