background image

0 5

INSTALLATION

Always bolt your Safe down.

1.  Choose a location for the Safe that is preferably concealed from view

2.  Take care that there is sufficient floor load bearing capacity. 

3.  If installing the Safe in a cupboard or closet, make sure that its load bearing  


     capacity is sufficient and that a secure anchorage point can be made through to  

     the wall or floor.

4.  Make sure that there is no plumbing or wiring below or behind the chosen location.

5.  Always mount using fixing bolts no smaller than those supplied and use more than  

     one bolt.

6.  When the Safe is to be anchored to a wood floor, try to anchor at least one of the  

     bolts into a joist/support beam rather than just the floorboards.

0 5

SECTION 03

SECURING THE SAFE

‘Instructions for Use’ label

The ‘Instructions for use’ label, provided in the Safe accessory box, outlines basic 

operational details of the Safe specifically for the user. 

It is recommended that this label is applied onto the Safe or a wall/surface near to the 

Safes location. 

The label shows how to set the primary code and will guide the user to the reset 

button.


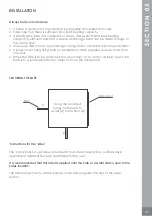
Using the provided

fixings, fix the safe to

a wall (A) or the floor (B)

Safe door

Bolt

A

B

Summary of Contents for qq 2032 v

Page 1: ...COI0011_V1_190913 U S E C A R E M A N U A L S A F E www corbyofwindsor com...

Page 2: ...ad through them thoroughly before use and retain for future reference Failure to follow them could cause injury and or property damage CONTENTS SECTION 01 Important safety 03 Special inistructions 03...

Page 3: ...uction of a separate power supply other that supplied BATTERY CAUTION Use of rechargeable batteries is not recommended for this product Do not attempt to recharge non rechargeable batteries Only use b...

Page 4: ...the waist It is better to reposition your feet Avoid upper body top heavy bending Always bend from the knees rather than the waist Do not lean forward or sideways whilst handling the Safe Always grip...

Page 5: ...ller than those supplied and use more than one bolt 6 When the Safe is to be anchored to a wood floor try to anchor at least one of the bolts into a joist support beam rather than just the floorboards...

Page 6: ...ow 2 Use the override key and turn it 90 clockwise 3 Turn the handle 90 clockwise 4 Open the safe door 5 Open the battery pack and insert the supplied batteries observing polarity Note Only use dry ce...

Page 7: ...f your Safe this will allow you to enter your code as normal Alternatively the override keys can be used to gain entry into the Safe if the power for the batteries has run out LED definitions INPUT Wi...

Page 8: ...e product will not be covered by the guarantee if it has been misused transformed modified or altered in any way If your product fails within the guarantee period please ensure that you have all neces...

Reviews: