background image

13

14

15

Page 7

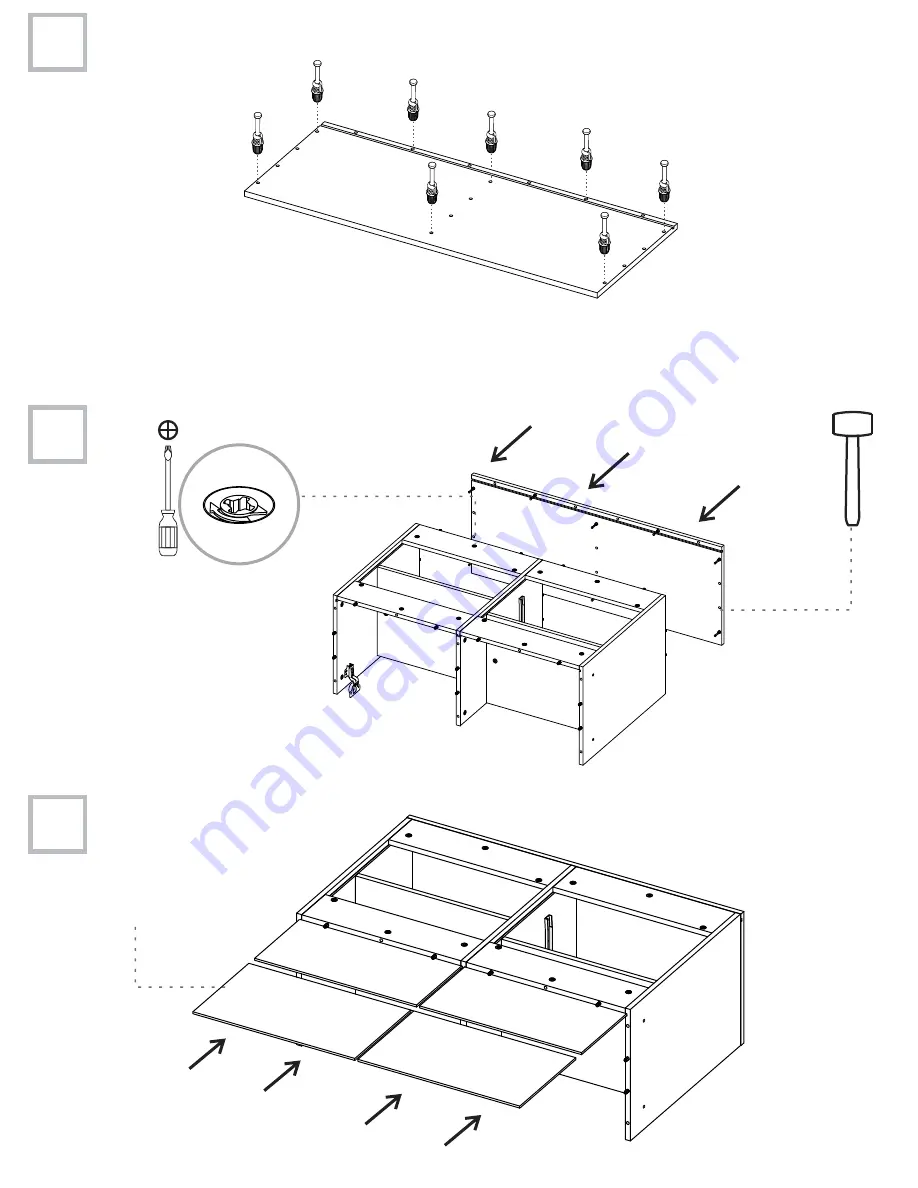
Rotate to tighten

Gently hit 

to adjust.

Slide the back panels

inside the cabinet


Summary of Contents for HR915

Page 1: ... cause slight movements in the board material so please avoid placing your furniture close to radiators or other direct sources of heat Please avoid exposing your furniture to continued bright sunlight as this can affect the colour Any fluid spills should be removed as quickly as possible Always lift your furniture when moving as dragging may cause damage to your furniture or flooring Always use pla...

Page 2: ...Includes screws Page 2 ASSEMBLY PARTS MAX SUGGESTED LOADS A x1 B x1 C x1 D x1 E x1 F x4 G x2 H x1 I x1 J x1 K x1 L x1 M x1 N x1 O x4 8kg End Panel Hinge EPH Includes screws x4 x4 Screw 50 8mm 10kg 5kg 15kg 8kg Handle Includes screws x3 Leg x4 Screw 28 5mm x8 ASSEMBLY HARDWARE O O O O B C D E F F F F H G G I L K J M N A ...

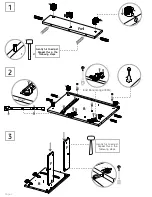
Page 3: ...nt B B F F 1 2 Gently hit to adjust Repeat this in the following steps Gently hit to adjust Repeat this in the following steps Gently hit to adjust Repeat this in the following steps 2 1 Rotate 180 End Panel Hinge EPH 4 13 ...

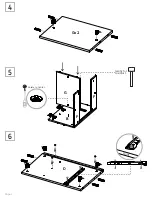
Page 4: ...Page 4 4 5 6 Gx2 G F F B Rotate to tighten Gently hit to adjust D Front 4 13 ...

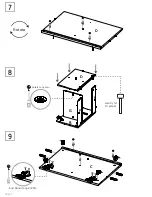
Page 5: ...7 8 9 Page 5 Rotate D D G F F B Rotate to tighten C End Panel Hinge EPH Gently hit to adjust ...

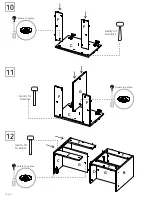
Page 6: ...10 11 12 Page 6 Rotate to tighten F F C F F C G F F F F G G D B C Rotate to tighten Gently hit to adjust Gently hit to adjust Gently hit to adjust Rotate to tighten ...

Page 7: ...13 14 15 Page 7 E E F F F F D B C G G Rotate to tighten B D B E F F F F G O O O O Gently hit to adjust Slide the back panels inside the cabinet ...

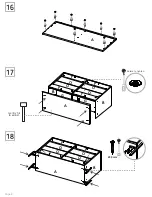
Page 8: ...16 17 18 Page 8 A Rotate to tighten Gently hit to adjust A B G G O B F F F F O O O 28 5mm A B O F F F F O O O ...

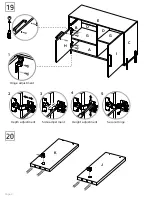
Page 9: ...19 Page 9 20 1 5 4 3 2 E H I C A G G B O D J K Depth adjustment Hinge adjustment Side adjustment Height adjustment Secure Hinge ...

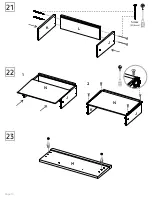
Page 10: ...21 Page 10 22 23 L K J Screw 50 8mm N J 1 2 N J K M ...

Page 11: ... top using the 15mm screw washer and securely tighten Place fixing strip against the wall and mark position for drilling hole Drill hole in your wall to a depth of 30mm using a 6mm drill bit If the surface of your wall is soft and crumbly we would advise you to use a 5mm drill bit for a tighter fit Insert plug into hole with end flush to the wall surface Attach fixing strip to the wall using the 25mm ...

Reviews: