I ns t al l at i o n C MA - XX X- A E N
P a ge 3 4
Draft
Figure
4-13. Example of External Alarm Wiring Connections
10. Verify that fans are operational and refer to status LEDs on the inside of the cabinet door and verify that all show green
4.3
Grounding MRU Chassis
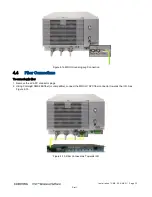
The grounding connection is performed via a two-hole, standard barrel grounding lug located on the front of the MRU
chassis (see Figure
4-14).
Required tools and components
The following additional (not supplied) tools and components are required for connecting the system ground:
•
Grounding wire - The grounding wire should be sized according to local and national installation requirements. The
provided grounding lug supports 14 AWG to 10AWG stranded copper (or 12 AWG to 10 AWG solid) wire conductors.
Note: The length of the grounding wire depends on the proximity of the switch to proper grounding facilities.
•
Phillips-head screwdriver
•
Crimping tool to crimp the grounding wire to the grounding lug.
•
Wire-stripping tool to remove the insulation from the grounding wire.
Connecting system ground
1. Use a wire-stripping tool to remove approximately 0.4 inch (10.9 mm) of the covering from the end of the grounding wire.
2. Insert the stripped end of the grounding wire into the open end of the grounding lug.
3. Crimp the grounding wire in the barrel of the grounding lug. Verify that the ground wire is securely attached to the ground
lug by holding the ground lug and gently pulling on the ground wire.
4. Prepare the other end of the grounding wire and connect it to an appropriate grounding point at the site to ensure
adequate earth ground.

