background image

- 28 -

EVO1ST

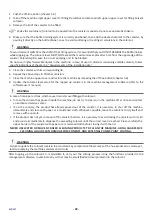
1.  Push the off-line button (chapter 5.6).
2.  Take off the machine right upper cover for filling Decorative colorant and left upper upper cover for filling Solvent 

colorant.

3.  Remove the lid of the canister to be filled.

Shake the container of colorant to be poured into the canister manually. Do not use automatic shakers.

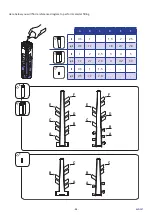
4.  Make sure that the bottle draining system is correctly positioned, then add the desired colorant to the canister, by 

pouring it directly on the bottle drainer, so as to avoid spattering or creating air emulsions in the colorant.

WARNING

To avoid colorant spills from the shaft of the stirring system, it is essential that you DO NOT REMOVE the bottle drainer 

while topping up. The colorant level MUST NOT exceed the maximum level, placed at 5 cm from the upper edge of the 

canister. Colorant spills cause the circuit pumping unit to be blocked.
Do not pour highly flammable liquids in the machine; in case of use of colorants containing volatile solvents, follow 

specific indications of chapter 3.5 “Requirements of the installation site”.

5.  Close the canister with its corresponding lid.
6.  Repeat the above steps to fill other canisters.
7.  Close the machine upper cover and restore the machine by releasing the off-line button (chapter 5.6).
8.  Update the colorant level value for the topped up canisters in the machine management software (refer to the 

software user’s manual).

WARNING

In case of improper actions, which caused canister overfilling with colorant:
•  In case the colorant has poured inside the machine, do not try to clean; turn the machine off at once and contact 

an authorized service center. 

•  If, on the contrary, the product has already poured out of the canister, it is necessary to shut off the machine 

immediately and clean with paper or a moistened cloth. Whenever possible, leave the colorant to dry itself and 

remove with a spatula.

•  If the product has not yet come out of the canister borders, it is necessary to avoid closing the canister with its lid 

and provide immediately to dispense the exceeding colorant until the correct level is reached. Clean carefully the 

upper border of the canister with paper or a moistened cloth before closing it with the lid.

NEVER USE WATER OR SOLVENT-BASED CLEANING PRODUCTS TO CLEAN THE MACHINE. USING AGGRESSIVE 

CLEANING LIQUIDS CAN DAMAGE COMPONENTS AND EXTERNAL PANELS PAINT COATING.

WARNING

Failure to update the colorant levels in the canisters may compromise the accuracy of the hue produced or, worse yet, 

lead to emptying the machine canisters and circuits.

After  topping  up  the  colorant,  it  is  advisable  to  carry  out  the  stirring  process  using  the  functions  provided  in  the 

management software, to eliminate any air that may be emulsified and incorporated into the colorant.

Summary of Contents for EVO1ST

Page 1: ...4043862 EVO1ST Automatic Dispenser User s manual V1 0 R2 09 2019 ...

Page 2: ...the right to modify and or update the information herein to correct editorial errors and or inaccuracy of the information herein without notice or commitment on its part The present manual contains all information necessary for the foreseeable and normal use of the COROB products by the final user The manual does not contain guidelines and or information for product repair For safety reasons only ...

Page 3: ...of overfilling act as indicated in the user s manual The colorant to be poured inside the canisters must be stirred manually Do not use automatic shakers Close the canisters with their lids right after filling operations Remember to update accordingly the canisters filling levels via the management software With humidifier for water based colorants Top up the water bottle as soon as the minimum le...

Page 4: ...rounding instruction ETL version only 18 5 3 Management computer 20 5 4 Initialization 20 5 5 Control devices and connections 20 5 6 Use of the Off line button 21 5 7 Electrical connection and start up 22 5 8 Shut down 23 6 USING THE DISPENSER 24 6 1 General warnings 24 6 2 At the beginning of the working day 24 6 3 Running the machine 24 6 3 1 Adjusting the can shelf height and positioning the ca...

Page 5: ...s manual were taken from prototypes some details may differ on machines in standard production 1 1 1 Conventionally used graphics Boldface type is used to highlight notes or information of particular importance to a topic DANGER Indicates a risk of personal injury WARNING Indicates a risk of damage to the machine that could interfere with its operation Indicates important instructions referring to...

Page 6: ...covery function if used with firmware and dispensing programs that support these functions 1 3 2 4 The dispenser consists of 1 Dispensing area and can handling system 2 Off line button 3 Canister filling area 4 Front access door The dispenser is managed by the computer The manufacturer can also supply a wide range of software applications to manage all of the machine s functions If the machine is ...

Page 7: ...d at the desired height by simply inserting it in the slots provided No Dry Nozzle Humidifier Thehumidifierforwater basedcolorantsguaranteesthenozzlesareconstantlyhumidified The air humidified by the water contained in the bottle is transferred to the nozzles area Based on the humidity level detected the system activates or shuts off whenever needed The two systems can be present individually or t...

Page 8: ...y sealed It is managed by the software which opens it automatically before dispensing and closes it immediately afterwards Bung Hole Locator B H L This is a system that emits laser beams that allow the positioning of pre punched cans so that the hole is in line with the center of the dispensing nozzles ...

Page 9: ...ed in the table of chapter 8 1 Technical data and according to the procedures described in this manual Any use of the machine other than that stated which cannot be implied or deduced from this manual is to be considered improper and unintended therefore it voids any manufacturer s liability arising from non compliance with these requirements 2 5 Identifying information The machine has an identifi...

Page 10: ...lvents follow specific indications of chapter 3 5 Requirements of the installation site Avoid naked flames or material that may create sparks and cause a fire It is forbidden to smoke in the machine nearby area The machine must not be employed for food use The OPERATOR must not carry out operations reserved to the MAINTENANCE TECHNICIAN or the INSTALLATION TECHNICIAN The manufacturer CANNOT BE HEL...

Page 11: ...e is suitable for use with tinting products in general Scrupulously follow the instructions for use given on the colorant package and carefully read the MATERIAL SAFETY DATA SHEETS MSDS that the dealer or manufacturer of the product is required to provide Observe all of the safety instructions provided When compulsory wear the specified personal protective equipment Below are some of the most comm...

Page 12: ...e injuries The machine must be used by a single operator Keep hands away from the dispensing area at all times while the machine is operating ch 6 Risk of crushing entanglement During colorant refilling operations the stirrer inside the canister may automatically start rotating Before performing any intervention press the off line button ch 6 5 Risk of cuts During the punching operations or mainte...

Page 13: ...XXX MM YYYY S N POWER INLET FUSE FUSIBLE ENTREE PUISSANCE XXXXX XXXXX PROD ORDER CODE machine name MM YYYY XXX XXX V XX XX Hz XXXX W X XX A COROB India Pvt Ltd Mumbai c o Daman Factory Plot No 10 13 13A Daman Industrial Estate Somnath Road Daman India It is strictly forbidden to use the machine without protections or with the safety devices disabled broken down or removed The panels must be kept c...

Page 14: ...ted to the type of colorants used ask for information from the paint manufacturer The requirements indicated above are valid for the machine only Do not place the machine near heat sources or in direct sunlight Also humidity sources should be avoided The machine must be used indoors only Environment conditions outside the values indicated chapter 8 1 may cause serious damage to the machine especia...

Page 15: ... placement 1 x 13 14 mm 1 x 8 mm To remove the screws that secure the machine to the pallet DANGER The following procedure must be carried out by at least 2 people Store the packing material for future use or dispose of it according to current regulations In any case we recommend that you keep it for the entire duration of the machine warranty Make sure the packing has not suffered any damage or t...

Page 16: ...t must be chosen based on machine weight chapter 8 5 Remove the machine from the pallet using a suitable lifting equipment and place the machine in its working position 6 Insert the shelf on the machine 130 kg 287 lb 5 To repack the machine follow the unpacking instructions in reverse order We recommend reusing the original packing any time the machine must be moved or shipped ...

Page 17: ...th a suitable temperature and humidity degree and protected from dust 4 4 Disposal and recycling This equipment must not be disposed of with unsorted municipal waste Carry out a separate collection Pursuant to the WEEE Directive collection treatment recovery and environmentally sound disposal of Waste Electrical and Electronic Equipment WEEE shall be carried out in compliance with the national mea...

Page 18: ...tructions ETL version only The conductors of the power cable which is supplied are color coded as follows GREEN YELLOW GROUND WHITE NEUTRAL BLACK LINE DANGER This product must be grounded In the event of an electrical short circuit grounding reduces the risk of electric shock by providing an escape wire for the electric current This product is equipped with a cord having a grounding wire with an a...

Page 19: ...plug and a 3 slot receptacle that will accept the plug on the product Make sure your extension cord is in good condition When using an extension cord be sure to use one heavy enough to carry the current your product will draw For lengths less than 25 feet no 18 AWG extension cords should be used An undersized cord will cause a drop in line voltage resulting in loss of power and overheating Note Th...

Page 20: ...ry phase that must be carried out when the machine is turned on If the computer is turned off and back on again initialization is not strictly necessary even if required by the software it is solely at the discretion of the operator Moreover initialization must be carried out in the following cases At the beginning of each work shift even if only the computer had been shut down 5 5 Control devices...

Page 21: ...ed After interrupting the machine functions it will be possible to carry out canister refilling The status of the ON lamp highlights the condition in which the machine is Initial machine condition Press the off line button Final machine condition ON lamp Off line For an instant On line ON Off line For a few seconds Off line Blinking fast On line Off line Only with sliding Autocap For a few seconds...

Page 22: ... properly connected to the power sockets and that the corresponding switches have been turned on When the software is launched it offers the operator a series of procedure requests that have the purpose to get the machine ready for use These procedures are strictly related to the type of management software used 1 2 3 0 I a 0 0 b ...

Page 23: ...c timed functions help keep the colorant preserved and homogeneous Should it be essential to shut down the machine avoid keeping it off for extended periods of time When the machine is not being used if necessary shut off only the computer Very little power is used by the machine itself when inactive or during a stirring cycle 1 2 0 ...

Page 24: ...ng operations Check that the nozzle center is clean With humidifier for water based colorants Check that the water in the bottle is not below the minimum level Carry out system Purge 6 3 Running the machine The operator is guided in running the machine by the management software which displays the instructions to be carried out and the actions performed by the machine Steps Ref Make the selections...

Page 25: ...use it to open Place the can so as to make sure that photocell A is obscured 6 3 2 Dispensing When the dispensing command is entered the automatic cap opens to expose the nozzles and the machine begins to dispense the products included in the formula in the set amounts the cap will automatically close when dispensing is finished The dispensing system depends on the machine version 1 2 ...

Page 26: ...erval between one stirring cycle and another can be customized via the configuration software refer to the CorobTECH user s manual based on the nature of the products used on the machine We recommend to keep the canisters closed with their corresponding lids do not insert hands in the canister even when no colorant is present When an automatic process is in progress the machine can still be used t...

Page 27: ... 27 EVO1ST 6 5 Refilling the canisters 1 3 4 2 5 cm 2 in ...

Page 28: ...e colorant level value for the topped up canisters in the machine management software refer to the software user s manual WARNING In case of improper actions which caused canister overfilling with colorant In case the colorant has poured inside the machine do not try to clean turn the machine off at once and contact an authorized service center If on the contrary the product has already poured out...

Page 29: ...ence diagram to perform canister filling A C B C B A F B D A E C C E F D B A 2 5 l t 5 l t 1 5 l t A B C D E F 2 5 l t lt 0 5 1 1 5 2 2 5 qt 0 5 1 1 1 6 2 1 2 6 5 l t lt 1 2 2 5 3 4 5 qt 1 1 2 1 2 6 3 4 2 5 3 1 5 l t lt 0 5 1 1 5 qt 0 5 1 1 1 6 ...

Page 30: ...ware to make sure you have correctly configured the port used to communicate with the machine Repair the computer serial port or USB port Serial cable damaged Replace the communication cable using manufacturer s original spare parts Connection defective Contact the authorized technical service Colorant dripping from some nozzles The valve of the pumping unit does not work correctly From the manage...

Page 31: ...Check the sponge is clean Check the sponge is saturated Humidifier solvent or no humidifier Moisten the sponge Humidifier solvent or no humidifier Clean the sponge Clean the dispenser externally Fill up the humidifier bottle Humidifier water 7 3 Products to be used We recommend to use products compatible with the type of colorants in the machine when cleaning the nozzle center and moistening the h...

Page 32: ... manufacturer manual for instructions on cleaning the computer 7 5 Cleaning the nozzle center humidifier cap Rotating cap 1 Disconnect power supply chapter 5 8 2 Open the cap by pushing the opening bar inward with your hand 3 Accurately clean the nozzles using a sharp tool remove any dried colorant residue delicately to avoid damaging the ends of the circuits 4 Bring back the cap in its closed pos...

Page 33: ...onge holding cup and remove it 4 Bring back the cap in its closed position 5 Wash the sponge holding cup check the condition of the sponge and moisten as needed The level of the humidifying liquid must not exceed the height of the sponge If it is very dirty remove the sponge from the cap and wash it thoroughly If the sponge is severely damaged replace it 6 Open the cap with your hand and reinstall...

Page 34: ...he condition of the sponge and moisten as needed The level of the humidifying liquid must not exceed the height of the sponge If it is very dirty remove the sponge from the cap and wash it thoroughly If the sponge is severely damaged replace it 5 Screw back the sponge holding lid 6 Connect power supply and switch on the machine chapter 5 7 7 Close the Autocap with the off line button on line chapt...

Page 35: ... 35 EVO1ST H2O ...

Page 36: ...ver where the bottle is located 3 Unscrew the bottle cap and add water 0 5 liters 1 Pint maximum paying attention NOT TO EXCEED THE MAXIMUM LEVEL To reduce the risk of lime encrustations due to hard water it is recommended to use distilled water 4 Re place the cap and firmly tighten 5 Re place the upper cover connect power supply and switch on the machine chapter 5 7 1 2 3 5 0 0 m l MIN MIN MAX MA...

Page 37: ...w rate 0 25 liters min Electronics 5G Dispensing center Internal Type of canisters All purpose POM acetalic resin Type of valves Membrane valve Viton water FFKM universal solvent e Machine 130 kg 287 lb Packed machine 175 kg 386 lb a Excluding connected auxiliary devices machine without optional auxiliary sockets The power information is purely indicative and depends strictlyonthemachineconfigurat...

Page 38: ...l spare parts for all maintenance and replacement interventions Altering or removing the guards and safety devices provided on the machine will not only void the warranty immediately but is also dangerous and illegal The manufacturer may not be held liable for personal injury or property damage caused by improper use of the equipment or tampering with the guards and safety devices installed on the...

Page 39: ... Parte 6 3 Norme generiche Emissione per gli ambienti residenziali commerciali e dell industria leggera Si garantisce poi che la progettazione della macchina e la relativa produzione è effettuata e documentata seguendo precise procedure aziendali conformi con la norma EN ISO 9001 2015 inerente i sistemi di gestione qualità The manufacturer certifies under its own responsibility that the machine to...

Page 40: ...em hefur heimild til að taka saman tækniskjölin vottar á eigin ábyrgð að vélin sem vísað er til í þessari yfirlýsingu sé í samræmi við þær grunnkröfur sem gert er ráð fyrir í eftirfarandi reglugerðum Vélatilskipun2006 42 EB Tilskipunumrafsegulsviðssamhæfi2014 30 EU TilskipunRoHS22011 65 EU WEEE2012 19 EU 2014 53 EU EN61000 6 2 2005 EN61000 6 3 2007 A1 2011 Vélinuppfyllirallaviðeigandistaðla Ennfre...

Reviews: