background image


© Corroventa Avfuktning AB 

2017.11 

1 (18) 


Crawl space dehumidifier 
CTR STD-TT 
User manual  


Summary of Contents for CTR STD-TT

Page 1: ... Corroventa Avfuktning AB 2017 11 1 18 Crawl space dehumidifier CTR STD TT User manual ...

Page 2: ...dehumidifier works 7 Delivery check 8 Overview controls and connections 8 Installation planning 9 Installation 10 External and internal preparations 10 Dry air duct 10 Installing the dehumidifier and its connections 12 Maintenance and service 14 Filter replacement 14 Checking rotor operation 14 Checking heater 15 Accessories 16 Fault tracing 16 Technical data 18 ...

Page 3: ...y operational alarms and service reminders such as filter replacement Properties Energy efficient Service friendly High capacity level Time meter Robust Homevision Lite Pro connection Very quiet Manufacture directive Crawlspace dehumidifier CTR STD TT is CE marked Disclaimer Incorrect installation and or incorrect handling can cause property damage as well as injury The manufacturer assumes no lia...

Page 4: ...ng AB 2017 11 4 18 Any comments regarding the content of this document must be sent to Corroventa Avfuktning AB Tel 46 0 36 37 12 00 Mekanikervägen 3 Fax 46 0 36 37 18 30 SE 564 35 Bankeryd E mail mail corroventa se Sweden ...

Page 5: ...with a high boiling point such as oil grease solvents or similar These can damage the rotor 8 The dehumidifier may not be used in areas where it can produce explosive gases 9 Do not insert objects into the intake or exhaust as this could damage the dehumidifier and injure people 10 Place the dehumidifier on a stable and level bracket or shelf so that it cannot overturn 11 Keep children animals and...

Page 6: ...d which must be controlled At 100 RH the air is saturated and the moisture falls in the form of small water droplets Steel corrodes at 60 RH and at 70 RH there is a risk of mould A rule of thumb is that 50 RH is a good climate for most materials but here in Scandinavia it is rarely so low The annual average value in most places is instead around 80 RH and can be equally high in both summer and win...

Page 7: ...moisture up to 40 of its own weight It is not water soluble and therefore cannot be washed away or blown out with exiting airflows The dehumidification process The desiccant is placed in a rotor 1 The air to be dried is sucked in through the inlet 2 by means of a process air fan 3 The air passes a filter and then the drying rotor after which the dehumidified air goes through the dry air outlet 4 t...

Page 8: ...the packaging also contains Homevision Pro or Homevision Lite the component parts of which are shown in separate manuals Note If this has not already been done consider obtaining an Installation kit TT Multi for a simple energy efficient and well functioning installation Overview controls and connections The images below show CTR STD TT with its external parts and controls Time meter Connector Hom...

Page 9: ...e crawl space and draw in the proposed installation Using this verify that the distance between the dry air duct and external foundation in general is three to four metres The first third of the dry air duct s length the part nearest the dehumidifier is left free from nozzles 12 up to a maximum of 14 nozzles are then distributed along the remaining length Remember that the dry air must be evenly d...

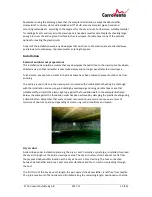
Page 10: ...sealed to prevent outdoor air from entering The entire ground surface in the crawl space is covered with durable plastic sheeting Be thorough with the installation and ensure good sealing by overlapping and using durable tape or another suitable method Install the plastic right up against the foundation wall In the example illustrated below the seal against the foundation walls has been achieved b...

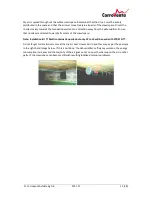
Page 11: ...les are directed towards all corners of the crawl space Note Installation kit TT Multi contains 16 nozzles but only 12 to 14 will be used with CTR STD TT Do not forget to install covers or seal the dry air duct s lower exit in another way as per the example in the right hand image below If this is not done the dehumidifier s efficiency worsens the energy consumption increases and the majority of t...

Page 12: ...e TT Multi installation kit Images and diagrams contain parts from this product Outside the house Install the wall plate with the pipe in through the hole in the foundation wall that was made for this purpose or that possibly was there from before Secure the plate with screw and plug from the installation kit Install the 45 pipe bend with protective grille and turn it in the desired direction Chec...

Page 13: ...the other way that is turned upside down on the brackets Drill out the four Ø12 mm holes according to your markings and insert the supplied plugs Screw the wall mountings in using the four coach screws supplied Position the four self adhesive rubber strips supplied with the dehumidifier on the wall mountings and then place the machine on these Wet air hose The silencer hose is installed at a sligh...

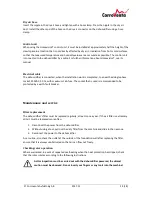
Page 14: ...et 230VAC 50 hz with maximum 16A fuse The socket that is used is recommended to be protected by a earth fault breaker Maintenance and service Filter replacement The dehumidifier s filter must be replaced regularly at least once a year If the air filter is extremely dirty it must be replaced more often 1 Disconnect the power from the dehumidifier 2 Without using a tool pull out the dirty filter fro...

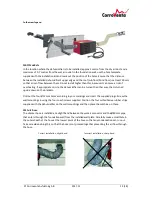
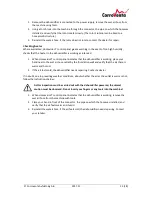
Page 15: ...humidifier is working place your hand next to the wet air hose outlet by the foundation wall and verify that the air there is warm and humid 2 If the air feels cold the dehumidifier needs repairing Contact a dealer If in doubt due to prevailing weather conditions about whether the air at the outlet is warm or not follow the instructions below As this inspection must be carried out with the dehumid...

Page 16: ...ical socket in which the dehumidifier is connected that the fuse has not blown Check that the cable to the control unit is correctly installed in the dehumidifier This connector has a key that guides its position so turn the connector until it reaches the correct position and tighten Homevision control panel gives a warning that the dehumidifier s heat protection has tripped The air flow through t...

Page 17: ... crawl space that the dry air is still freely distributed via all nozzles in the entire space according to the installation description If for example one of the pipe s end plates has fallen off the necessary air distribution is not achieved Check that the ground surface in the space is evenly covered by plastic and that any downpipes that exit close to the crawl space are directed away to prevent...

Page 18: ...level dBA 3m Approx 56 Connection 230VAC 50 Hz Connection effect 860W Consumption during drying normal operation Approx 775W Height x width x length mm 290 x 455 x 325 Weight kg 15 A crawl space dehumidifier like this shall be dimensioned for 1 5 to 2 air exchanges per hour which makes CTR STD TT suitable for crawl spaces with a volume of up to 150 m3 Sound level varies depending on installation T...

Reviews: