background image

GRAPHITE SERIES

®

 380T

32

31

DEUT

SCH

Inhaltsverzeichnis 

Herzlichen Glückwunsch!

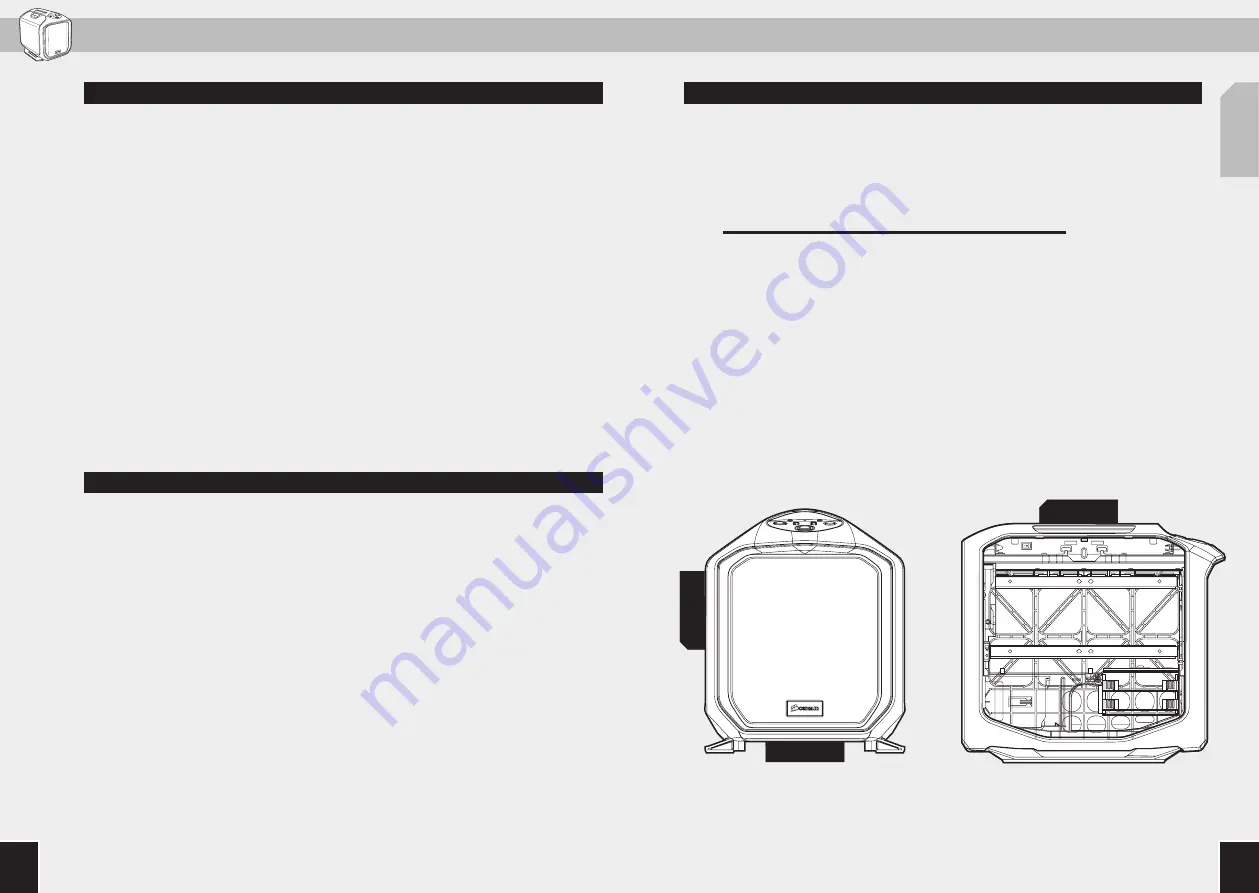
Technische Daten Gehäuse

Herzlichen Glückwunsch

:

 .......................................................................................................................................31

Technische Daten Gehäuse

:

 ..................................................................................................................................32

Inhalt Zubehörkit

:

 .....................................................................................................................................................33

Merkmale Gehäuse

:

 ..................................................................................................................................................34

Entfernen der Seitenplatten

:

 ................................................................................................................................35

Installation des Mainboards

:

 ................................................................................................................................35

Installation des Netzgerätes (PSU)

:

 ..................................................................................................................36

Installation der PCI-E-/PCI-Karte(n)

:

 ...............................................................................................................36

Installation des 2,5-Zoll SSD

:

 ...............................................................................................................................37

Installation des 3,5-Zoll HDD

:

 ..............................................................................................................................37

Antrieb der Gehäuselüfter

:

 ...................................................................................................................................38

Verbindung der vorderen I/O-Anschlüsse

:

 ....................................................................................................38

Häufig gestellte Fragen

:

 .........................................................................................................................................39

Wir danken Ihnen für den Kauf des  
tragbaren Mini-ITX PC-Gehäuses der  
Graphite Series 380T.

Die Graphite Series 380T spickt das tragbare 

Mini-ITX PC-Gehäuse mit Leistungspotenzial. Ein 

integrierter Handgriff macht den Transport zum 

Kinderspiel. Es ist leicht, den Mitnehmcomputer 

Ihrer Träume in dem geräumigen, leicht 

zugänglichen Inneren mit Platz für extra lange 

Grafikkarten zu bauen. Mit Halterungen für bis zu 

fünf Lüftern und einer dreistufigen Lüftersteuerung 

an der Front haben Sie die Kühlung im Griff.

Länge:

........................................................................................................393mm

Breite:

 ........................................................................................................292mm

Höhe:

 .........................................................................................................356mm

Gewicht:

 .......................................................................................................5.4kg

Maximale GPU-Länge:

Der oberen Steckplätze: .....................................................................290mm

Aller Steckplätze: ..................................................................................290mm

Maximale CPU-Kühlerhöhe:

 .............................................................150mm

Maximale PSU-Länge:

 ........................................................................160mm

356mm

292mm

393mm

Summary of Contents for GRAPHITE 380T Series

Page 1: ...fornia 94538 USA corsair com 2014 Corsair Components Inc All rights reserved Corsair the sails logo and Graphite Series are registered trademarks of Corsair in the United States and or other countries All other trademarks are the property of their respective owners Product may vary slightly from those pictured PN 49 001248 rev AA GRAPHITE SERIES GRAPHITE SERIES 380T PORTABLE MINI ITX CASE 380T ...

Page 2: ...English 1 10 Français 11 20 Italiano 21 30 Deutsch 31 40 Español 41 50 Россию 51 60 中文 61 70 ...

Page 3: ...ng the Graphite Series 380T Mini ITX Portable PC Case The Graphite Series 380T packs a powerful punch in a portable Mini ITX PC case A built in carrying handle makes transport a breeze It s easy to build the road ready computer of your dreams within a spacious easy to access interior with room for an extra long graphics card You can keep things cool with mounts for up to five fans and a convenient...

Page 4: ...scia 120mm airflow fan SSD Tool less drive cage I O panel with x2 USB 3 0 headphone and microphone ports PSU dust filter Tool less drive cage Removable front mesh panel 140mm airflow fan Case feet A G B H C I D J E K F a c b d x12 x16 x4 x12 Short Fan Screws Motherboard HDD Screws Zip Ties SSD Screws B C J D E F G H I K A ...

Page 5: ...ce clutter First install your motherboard s I O shield see your motherboard s manual for guidance Align your motherboard with the pre installed standoffs Use the provided screws to secure the motherboard to the motherboard tray Unscrew and remove the PSU mounting back plate then slide in the PSU from the back of the case Next mount the PSU back plate onto the case then align the holes and secure t...

Page 6: ...from the drive cage then insert the HDD into the HDD tray Next align the HDD holes with tray pins to secure and insert the drive tray back into the cage Note This drive cage is also SSD compatible so you can install a 2 5 SSD into the SSD tray See your motherboard s manual for front panel header locations and pin outs USB 3 0 HD AUDIO POWER SW RESET SW HDD LED POWER LED POWER LED 1 2 3 1 Connect t...

Page 7: ...ged or one of the fans is no longer working Please go to corsair force com and request an RMA so that we can replace the damaged part s 4 Where can I mount a fan 5 How do I remove the front panel To remove the front panel push the top corners of the plastic cover 6 How do I remove the bottom PSU filter s To remove the bottom dust filter first locate the pull out tab underneath the PSU then pull the ...

Page 8: ...0T intègre une puissance incroyable dans un boîtier de PC portatif au format Mini ITX Une poignée de manutention intégrée rend le transport plus facile que jamais Un espace interne important facile d accès et suffisant pour accueillir une carte graphique extra longue vous permet d assembler facilement la version nomade de l ordinateur de vos rêves Et vous le refroidirez grâce à des fixations autor...

Page 9: ... à installation sans outil Panneau E S dote de deux connecteurs USB 3 0 et de ports micro et casque Filtre anti poussière de bloc d alimentation Cage pour lecteurs à installation sans outil Panneau avant maillé amovible Pieds de boîtier 2 plateaux pour lecteurs compatibles HDD et SSD A G B H C I D J E K F a c b d x12 x16 x4 x12 Vis de ventilateur courtes Vis pour carte mère HDD Attaches rapides Vi...

Page 10: ...de votre carte mère pour plus d informations consultez le manuel d instructions de la carte mère Ensuite alignez la carte mère sur les entretoises préinstallées Utilisez les vis fournies pour fixer la carte mère sur le plateau Dévissez et retirez le panneau arrière de fixation du bloc d alimentation puis faites glisser le bloc vers l intérieur depuis l arrière du boîtier Ensuite fixez le panneau a...

Page 11: ...eur HDD sur les broches du plateau afin de le fixer puis insérez le plateau dans la cage Remarque Cette cage est également compatible avec les lecteurs SSD Vous pouvez donc installer un lecteur SSD 2 5 sur un plateau SSD Consultez le manuel de la carte mère pour plus d informations sur l emplacement des cavaliers et des broches de sortie du panneau avant 1 2 3 1 Raccordez le connecteur d alimentat...

Page 12: ...endre sur corsair force com et demandez une RMA Autorisation de retour de marchandise pour que nous puissions remplacer la ou les pièces endommagées 4 Où puis je monter un ventilateur 5 Comment retirer le panneau avant Pour retirer le panneau avant poussez les coins supérieurs du capot en plastique 6 Comment retirer le filtre anti poussière inférieur Pour retirer le filtre anti poussière inférieur...

Page 13: ...hite Series 380T racchiude in sé potenza e compattezza in un case portatile Mini ITX per PC Una maniglia integrata lo rende pratico e leggero da trasportare È facile realizzare il computer dei tuoi sogni che ti seguirà ovunque all interno di una struttura spaziosa con accesso facilitato e spazio sufficiente per una scheda grafica extra lunga Tenere tutto alla giusta temperatura di raffreddamento c...

Page 14: ...nità SSD senza viti Pannello I O con 2 porte USB 3 0 microfono e cuffie Filtro antipolvere per unità di alimentazione Vano per dischi senza viti Pannello frontale con grigia removibile Piedini case 2 vassoi per unità compatibili con HDD e SSD A G B H C I D J E K F a c b d x12 x16 x4 x12 Viti corte per ventola Viti per scheda madre HDD Fascette Viti per SSD ITALIANO B C J D E F G H I K A ...

Page 15: ... l I O shield della scheda madre per istruzioni vedere il manuale della scheda madre Quindi allineare la scheda madre ai distanziatori preinstallati e utilizzare le viti in dotazione per fissare la scheda madre al relativo vano Svitare e rimuovere la piastra posteriore di montaggio PSU quindi far scivolare il PSU dal retro del case Successivamente montare la piastra posteriore PSU nel case ed alli...

Page 16: ...tivo vano Successivamente allineare i fori dell unità ai perni del vassoio per fissare il vassoio dell unità di nuovo nel vano Nota Questo vano dischi è anche compatibile con unità SSD così da poter installare anche unità SSD da 2 5 pollici Per i piedini in uscita e la posizione dei connettori del pannello frontale consultare il manuale per la scheda madre ITALIANO 1 2 3 1 Collegare il connettore ...

Page 17: ... non funziona più Visitare il sito www corsair force com e richiedere un RMA in modo da permetterci di sostituire le parti danneggiate 4 Dopo è possibile montare una ventola 5 Come rimuovere il pannello frontale Per rimuovere il pannello frontale spingere gli angoli superiori della copertura di plastica 6 Come rimuovere il filtro antipolvere inferiore Per rimuovere il filtro antipolvere inferiore ...

Page 18: ...Wir danken Ihnen für den Kauf des tragbaren Mini ITX PC Gehäuses der Graphite Series 380T Die Graphite Series 380T spickt das tragbare Mini ITX PC Gehäuse mit Leistungspotenzial Ein integrierter Handgriff macht den Transport zum Kinderspiel Es ist leicht den Mitnehmcomputer Ihrer Träume in dem geräumigen leicht zugänglichen Inneren mit Platz für extra lange Grafikkarten zu bauen Mit Halterungen fü...

Page 19: ...er SSD Laufwerkkäfig I O Abdeckung mit 2 USB 3 0 Ports für Headphone und Mikrofon PSU Staubfilter Werkzeugloser Laufwerkkäfig Abnehmbarer Front Maschendrahtschirm Gehäusefüße 2 HDD und SSD kompatible Laufwerkschächte A G B H C I D J E K F a c b d x12 x16 x4 x12 Kurze Lüfterschrauben Mainboard HDD Schrauben Kabelbinder SSD Schrauben DEUTSCH B C J D E F G H I K A ...

Page 20: ...oards befolgen Sie die Anleitung des Mainboard Herstellers Richten Sie dann das Mainboard an den vorinstallierten Abstandshaltern aus und verwenden Sie die im Lieferumfang enthaltenen Schrauben um es am Mainboardschlitten zu sichern Entfernen Sie die Montageplatte der PSU durch Lösen der Schrauben und schieben Sie die PSU dann von hinten in das Gehäuse Richten Sie als Nächstes die Montageplatte an...

Page 21: ...öcher des HDD Laufwerks an den Einschubstiften aus und schieben Sie den Laufwerkeinschub wieder in den Käfig Hinweis Dieser Laufwerkkäfig ist auch SSD kompatibel sodass Sie ein 2 5 Zoll SSD im SSD Einschub installieren können Die Position der Frontplatten Header und die Pinbelegung finden Sie in der Anleitung Ihres Mainboards DEUTSCH 1 2 3 1 Schließen Sie den SATA Netzanschluss an das SATA Netztei...

Page 22: ...halten habe oder einer der Lüfter nicht mehr funktioniert Bitte besuchen Sie corsair force com und fordern Sie eine RMA an damit wir das die beschädigte n Teil e ersetzen können 4 Lüfter Einbaupunkte 5 Wie kann ich die Frontabdeckung entfernen Drücken Sie dazu die oberen Ecken der Kunststoffabdeckung 6 Wie kann ich den unten angebrachten Staubfilter entfernen Um den unteren Staubfilter zu entferne...

Page 23: ...adquirido el Chasis para PC portátil Mini ITX Graphite Series 380T El Graphite Series 380T lo tiene todo en un chasis para PC Mini ITX portátil Un asa integrada permite transportarlo con suma facilidad Es muy fácil ensamblar el equipo de sus sueños con este interior espacioso y de fácil acceso con espacio para una tarjeta gráfica extra larga Y para conservar la temperatura hay posiciones de montaj...

Page 24: ...herramientas Panel de E S con dos puertos USB 3 0 y puertos para auriculares y micrófono Filtro antipolvo de la PSU Bahías para unidades sin herramientas Panel frontal de rejilla extraíble Soportes del chasis Dos bandejas para unidades compatibles con HDD y SSD A G B H C I D J E K F a c b d x12 x16 x4 x12 Tornillos para ventilador cortos Tornillos placa base HDD Bridas Tornillos SSD B C J D E F G ...

Page 25: ...ca base consulte el manual de la placa base para obtener instrucciones A continuación alinee la placa base con los separadores preinstalados y utilice los tornillos suministrados para asegurar la placa base a la bandeja correspondiente Desatornille y retire la placa trasera de montaje de la PSU y a continuación deslice la PSU desde la parte trasera del chasis A continuación vuelva a montar la plac...

Page 26: ...respondiente A continuación alinee los orificios HDD con las clavijas de la bandeja para asegurarlos y vuelva a introducir la bandeja de la unidad en la bahía Nota Esta bahía para unidades también es compatible con las unidades SSD por tanto podrá instalar una SSD de 2 5 en la bandeja para SSD Consulte el manual de la placa base para obtener instrucciones sobre las ubicaciones de los cabezales del...

Page 27: ...ladores ya no funciona Vaya a corsair force com y solicite un RMA para que podamos reemplazar las piezas dañadas 4 Dónde puedo montar un ventilador 5 Cómo extraigo el panel frontal Para extraer el panel frontal empuje las esquinas superiores de la cubierta de plástico 6 Cómo extraigo el filtro antipolvo inferior Para extraer el filtro antipolvo inferior localice primero la pestaña que se encuentra...

Page 28: ... Series 380T мощный прорыв на рынке корпусов для переносных ПК на базе материнских плат форм фактора Mini ITX Встроенная ручка для переноски обеспечивает легкую транспортировку Этот корпус позволяет легко создать переносной компьютер Вашей мечты с большим легко доступным внутренним пространством и достаточным местом для очень длинной графической платы Охлаждение компонентов можно поддерживать благ...

Page 29: ...вода с 2 портами USB 3 0 портами наушников и микрофона Пылевой фильтр источника питания Безотверточный отсек для дисков Съемная передняя панель с сетчатым экраном Основание корпуса x2 дисковых отсека совместимых с жесткими и твердотельными дисками A G B H C I D J E K F a c b d x12 x16 x4 x12 Короткие винты для вентилятора Винты для материнской платы или жестких дисков Кабельные стяжки Винты для тв...

Page 30: ...нформацию см в руководстве по материнской плате Затем выровняйте материнскую плату с предварительно установленными опорными изолирующими винтами и используйте предоставленные винты для закрепления материнской платы в ее отсеке Отверните и снимите монтажную пластину блока питания затем выдвиньте блок питания из задней панели корпуса Затем установите монтажную пластину блока питания на корпус выровн...

Page 31: ... диск в лоток Затем чтобы закрепить устройство выровняйте отверстия на жестком диске со штырями лотка и вставьте лоток обратно в отсек Примечание Отсек для жестких дисков также совместим с твердотельными дисками поэтому можно установить 2 5 дюймовый твердотельный диск в его лоток 1 Подключите разъем питания SATA к разъему SATA на блоке питания 2 Подключите 3 или 4 контактный разъем вентилятора к р...

Page 32: ...е работает Перейдите на сайт corsair force com и запросите разрешение на возврат материалов RMA чтобы мы смогли заменить поврежденные части 4 Где можно установить вентилятор 5 Как снять переднюю панель Для снятия передней панели нажмите на верхние углы пластмассовой крышки 6 Как снять нижний пылевой фильтр Чтобы снять нижний пылевой фильтр сначала найдите язычок фиксатора под блоком питания затем ...

Page 33: ... 3 5 英寸 HDD 67 连接机箱风扇电源 68 连接前部 I O 连接器 68 常见问题 69 感谢您购买 Graphite 系列 380T Mini ITX 便携式 电脑机箱 Graphite 系列 380T 重磅推出 Mini ITX 便携式电脑机 箱 内置便携手柄方便搬运 内室宽敞 易于进入 可安 装超长显卡 组装随时携带上路的理想电脑十分轻松 最 多可安装五个风扇和一个方便的前面板三速风扇控制器 随时保持冷却 长度 393mm 宽度 292mm 高度 356mm 重量 5 4kg GPU 最大长度 顶槽 290mm GPU 最大长度 所有插槽 290mm CPU 散热器限高 150mm PSU 最大长度 160mm 356mm 292mm 393mm ...

Page 34: ...录 机箱特点 带有弹簧锁的窗式侧面板 机箱手柄 前饰板 120mm 大风量风扇 免工具 SSD 硬盘托架 I O 面板 配有 2 个 USB 3 0 耳机和麦克风端口 PSU 滤尘器 免工具硬盘托架 可拆卸滤网前面板 机箱支脚 2 个 HDD 和 SSD 兼容硬盘托盘 A G B H C I D J E K F a c b d x12 x16 x4 x12 风扇短螺丝 主板 HDD 螺丝 束线带 SSD 螺丝 中文 B C J D E F G H I K A ...

Page 35: ...板弹簧锁即可释放 侧面板 注 Corsair 建议在组装系统时拆下两 个侧面板并将其放在一边 以防止出现 意外损坏 两个侧面板都是可互换的 应当拆下避免出现混乱 首先 安装主板的 I O 防护罩 请 参阅主板手册的相关说明 然后 将主板与预安装的螺柱对 齐 使用配套的螺丝将主板固定到 主板托盘上 拧下螺丝并拆下 PSU 安装背板 然后从机箱的背面滑入 PSU 接 下来 将 PSU 背板装回机箱 然 后对齐安装孔 并用螺丝将 PSU 固定到背板 注 必须使风扇面向下安装 PSU 首先 拧下指旋螺丝和相应槽盖 然后 安装附加卡并用指旋螺丝 固定 中文 ...

Page 36: ...要从托架拆下 SSD 只需拉下舌片 即可释放 SSD 从硬盘托架拆下免工具 3 5 英寸 HDD 托盘 然后将 HDD 插入 HDD 托盘 接下来 将 HDD 孔 洞与托盘销对齐进行固定 再将托 盘装回硬盘托架 注 此硬盘托架还可兼容 SSD 所以 您也可以将 2 5 英寸 SSD 安装到 SSD 托盘 1 把 SATA 电源连接器连接到 PSU SATA 电源 2 将3或4脚风扇连接器连接至机 箱风扇头 3 按下机箱上的风扇速度选择器 按钮以切换风扇速度 请参阅主板手册确定前面板端板和 引脚的位置 中文 1 2 3 USB 3 0 HD AUDIO POWER SW RESET SW HDD LED POWER LED POWER LED ...

Page 37: ... I O 面板电源和重置接头 不 仅影响 LED 接头 3 如果我收到的机箱受损或其中一台风扇不再工作 我该与谁联系 请登录 corsair force com 申请 RMA 我们可以更换受损的部件 4 风扇可安装的位置 5 如何拆下前面板 要拆下前面板 请推动塑料罩盖的顶角 6 如何拆下底部滤尘器 要拆下底部滤尘器 首先找到 PSU 下方的拉出舌片 然后将底部滤尘器拉出 如需详细了解本机箱的信息 请登录 corsair com 访问产品页面 风扇安装位置 前面 2 x 120mm 1 x 140mm 1 x 200mm 顶部 x 后面 1 x 120mm 底部 x 侧面 2 x 120mm 中间 x 中文 ...

Reviews: