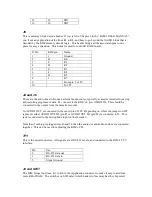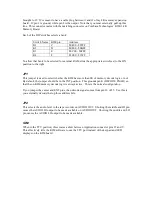
Next, you’ll want to find JP1 which is almost at the exact center of the board and has a label that
reads DECODE. There are two positions for the black jumper: EXT and INT. The jumper
should be on the INT (internal decode) setting, but if not, pull the black plug straight up and then
re-insert it so one side is on the INT pin and the other side is on the middle pin of JP1.
Make sure the board is not plugged into the KIM, then turn on your 5 volt power supply. The
LED right behind the power connector should be on. If not, double check to make sure your
power supply works and is connected properly. Do not go any further unless the LED comes on.
Turn off the power supply and make sure the LED goes out. You do not want to plug in the I/O
board with power on!
Now go ahead and plug the board into the Application connector, which is the lower of the two
connectors on the left hand side of the KIM. The connector should be snug, but make sure it is all
the way in and straight.
For our first test, let’s use the KIM’s default keyboard and LED displays. To make sure this is
enabled, locate SW2, the small red slid switch near the bottom right-hand side of the board. This
switch has two settings labeled TTY and KBD. Slide the switch up to the KBD setting.
Now it’s time to give it a test. Apply power and press the RS key on the keypad. Your KIM
should be displaying data on the LED displays above the keypad just like usual.
Connecting an RS-232 Terminal
By default, the KIM “talks” to the user via the keypad and LED display on the main board. To
force KIM to communicate via the TTY port, you need to connect a suitable device, set a switch,
and do some easy setup steps.
I use a PC for my terminal, using the Windows HyperTerm package. When you configure it,
make sure you set the proper COM port. The KIM will auto-baud detect, but I tend to stay at
2400 baud. Make sure you set Hyperterm to 8 data bits, no parity, two stop bits (that’s a bit
unusual, but important) and no flow control.
Run a cable from the PC’s COM port to J8 on the I/O board.
Now you’ll need to change the setting of SW2, the small red slide switch near the bottom right of
the I/O board. Slide the switch down to the TTY (teletype) position.
Once again, turn on your KIM and press the RS button. You won’t see anything on the LEDs,
but the KIM monitor is waiting to measure the baud rate. Press either the BACK SPACE or
RETURN key on your Hyperterm session, and the KIM should immediately respond.
If you’ve never used a terminal with your KIM, you should reference section 4.3 of the KIM-1
User Manual for a list of commands and examples for using it. The interface is not intuitive
initially, but is not hard to learn.


