background image

10

7.

Remove the headset from the base and press the Call Control
Button.  The HEADSET button on the 2705 should light, and you
should hear dial tone.

8.

Make a test call.  Verify that you can talk and listen on the headset.
You may need to make adjustments to the speaking or listening
volume as described in the Plantronics™ User Guide.

9.

Press the Call Control Button again.  The call should be disconnected.

10. Place a test call to the 2705 while wearing the headset.  You should

hear audible ringing indication on the headset.

11. Answer the call by pressing the Call Control Button.  Verify talking and

listening volume.  Press the Call Control Button again to disconnect.

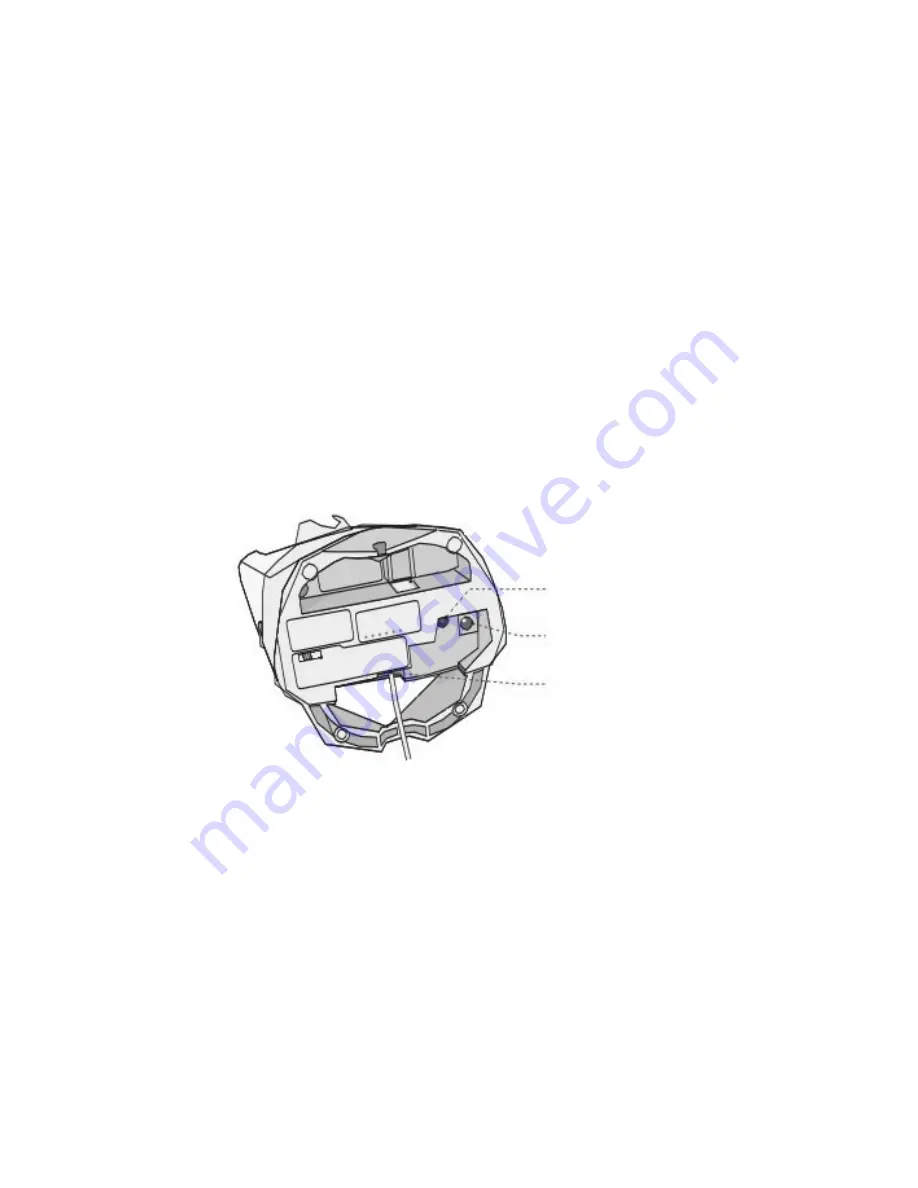
Plantronics™   Headset Base

Handset Lifter Jack

AC Charging Jack

Telephone Cord Jack

Summary of Contents for 2705

Page 1: ...1 OWNER S INSTRUCTION MANUAL CALLER ID TYPE II MULTI FEATURE TELEPHONE MODEL 2705 ...

Page 2: ...NE We want you to know all about your new Telephone how to install it the features it provides and the services you can expect from its use We have included this information in your Owner s Instruction Manual PLEASE READ BEFORE INSTALLING AND USING YOUR NEW TELEPHONE EQUIPMENT ...

Page 3: ...ONE CALL 13 PLACINGAPHONE CALL 13 PREDIAL 13 SPEAKER BUTTON 13 DURATION COUNTER 14 MUTE BUTTON 14 AUTOMATICMEMORY 14 VOLUME BUTTON 14 REDIAL BUTTON 14 PAUSE BUTTON 15 HOLD BUTTON 15 FLASH BUTTON 15 HEADSET BUTTON 15 CORDED HEADSET 15 DATAPORT 16 CONTRAST BUTTON 16 RELEASE BUTTON 16 VOICEMAIL BUTTON 16 DIRECTORY BUTTON 16 MESSAGE LIGHT 16 MESSAGE WAITING 16 CALLERIDFEATURES 18 CALLWAITING DISPLAY 1...

Page 4: ...11 BUTTON 19 MESSAGE ERROR 19 NO DATASENT 20 PRIVATE CALLS 20 UNKNOWN CALLS 20 USINGTHEDIRECTORY 21 TELEPHONESERVICEPROBLEMS 22 MAINTENANCEINFORMATION 23 TELEPHONEREPAIR 24 FCCINFORMATION 25 LIMITEDWARRANTY 26 ...

Page 5: ...line cord will be walked on 8 Do not block or cover ventilation slots and openings in the bottom of the telephone The openings should never be blocked by placing the telephone on a bed sofa rug or other similar surfaces The telephone should never be placed near or over a radiator or heat register The telephone should never be placed in a built in installation unless proper ventilation is provided ...

Page 6: ...ephone does not operate properly by following the operating instructions Adjust only those controls covered by the operating instructions Improper adjustment of other controls may result in damage and will often require extensive work by a qualified technician to restore the product to normal operation If the telephone has been dropped or the housing damaged If the telephone exhibits distinct chan...

Page 7: ...utton with LED 6 Multi AngleLCD 21 Hold Button with LED 7 Delete Button 22 Release Button 8 Contrast Button 23 Speaker Button with LED 9 DialButton 24 Pause Button 10 Voice Mail Button 25 Edit Button 11 Wireless Headset Jack 26 Volume Up Down Button 12 Review Up Down Button 27 Handset Jack 13 Directory Logo Strip 28 Speaker 14 Shift Button 29 Handset Hook 15 5Auto Memory Buttons 30 Hook Switch ...

Page 8: ...r adapter and the line cord See Steps 2 and 3 above 3 Rotate the handset hook into the wall mount position 4 Plug the coiled cord into the handset and then plug the other end of the cord into the base 5 Place the handset on the base ANSWERINGMACHINE 1 Connect the LINE jack of the answering machine to the wall telephone jack 2 Connect the LINE jack of the model 2705 phone unit to the PHONE jack of ...

Page 9: ...l make and receive calls in both handset and speaker phone modes 2 Unpack and configure the Plantronics headset as described in the Plantronics User Guide Note For correct operation the headset batteries must be fully charged 3 Note Be sure the Plantronics headset power adapter is connected to the wall outlet before continuing Plug the phone cable supplied with Plantronics headset into the telepho...

Page 10: ...listening volume as described in the Plantronics User Guide 9 Press the Call Control Button again The call should be disconnected 10 Place a test call to the 2705 while wearing the headset You should hear audible ringing indication on the headset 11 Answer the call by pressing the Call Control Button Verify talking and listening volume Press the Call Control Button again to disconnect Plantronics ...

Page 11: ...hen press MENU to confirm the selection 2 When ENTER AREA CODE appears enter the desired area code using the keypad Use REVIEW UP and REVIEW DOWN to skip a digit Press MENU to confirm area code Follow the same procedure for both area code settings To leave an area code blank press MENU without entering digits 3 When SET LDS CODE appears enter the desired LDS code using the keypad Press MENU to con...

Page 12: ... keypad maximum of 5 digits To delete a number or digit press REVIEW DOWN to erase the number s After the desired number has been entered press MENU to confirm selection 12 When HOLD MODE appears on the display Press REVIEW UP to select either NORMAL or PBX In NORMAL mode the HOLD button activates a local hold function This can be released at any parallel phone In PBX mode the HOLD button dials a ...

Page 13: ...Adapter must be used to ensure proper function 1 Receiving Incoming Calls a When the phone rings press and release SPEAKER and speak normally into the built in microphone from a distance of 5 6 inches b You can adjust the volume of the caller svoice by by pressing the Volume Button on the base of the telephone c After the conversation has finished press and release SPEAKER to hang up 2 Making A Ca...

Page 14: ...ess SAVE again 6 SET VIPRING will appear Use REVIEW UP and REVIEW DOWN to select the desired ring cadence Press SAVE again 7 MEMORY STORING will show briefly Note The memory locations can be chained together to store longer numbers Dialing A Number 1 Press the desired memory location M1 M5 or SHIFT M1 M5 2 The number will be displayed 3 To dial the number lift the handset press SPEAKER or press DI...

Page 15: ... PBX it may now be necessary to hang up the handset Note that HOLD will not light in this mode FLASHBUTTON This telephone provides a line break signal for accessing PABX service or for use of Call Waiting from your local telephone company If you have Call Waiting ser vice you can use the Call Waiting function per the following instructions 1 While having a conversation another party calls and you ...

Page 16: ...tion VOICEMAILBUTTON Press VOICEMAIL to dial the voicemail access number and pin See Unit Setup section for details DIRECTORYBUTTON DIRECTORY is used to store the name and number of up to 99 of your most frequently dialed contacts The names are sorted alphabetically MESSAGELIGHT If you have a voice mail service with your telephone company the large indicator at the top of the display will flash re...

Page 17: ...e MESSAGE indicator This delay is due to regulatory matters and does not indicate a problem with the unit This unit may not be activated or deactivated under certain conditions For ex ample when you retrieve messages from an outside phone not your own tele phone number the MESSAGE indicator may not be canceled when you return home If you experience this situation pick up the handset and hang up Th...

Page 18: ... or a button is pressed REVIEWINGCALLS 1 When in Standby Mode press REVIEW UP or REVIEW DOWN to see the stored calls This unit stores up to 99 calls 2 The NEW symbol will be removed from each call after it is reviewed 3 The reviewed number can be stored into any of the auto memory buttons a With the number displayed press SAVE b SAVE TO will appear Press M1 M5 or SHIFT M1 M5 Press SAVE again c The...

Page 19: ...phone number 11 digit long distance code 1 3 digit area code 7digit telephone number If a local call and its 7 digit number is displayed Pressing 7 10 11 once will change it to a 10 digit format your area code 7 digit number Pressing 7 10 11 twice will change it to an 11 digit number 1 your area code 7 digit telephone number Pressing 7 10 11 three times will go back to the original 7 digit telepho...

Page 20: ...will be displayed on the screen If the caller has exercised the option to block his name and number from being sent PRIVATE CALLER will be displayed on the screen UNKNOWNCALLS When the telephone company is unable to provide the caller s telephone number UNKNOWN CALLER and his name will alternately display on the screen When the telephone company is unable to provide the caller s name UNKNOWN NAME ...

Page 21: ... the down review arrow and start over All letters are upper case To enter a space when storing a name or number press the up review arrow Use the key to edit entries FINDINGITEMS PressDIRECTORYto entertheDirectoryReviewMode ThefirstentryintheDirectory is displayed The Down and Up Review Arrows may be used to scroll through the directory To leave the directory at any time press DIRECTORY To search ...

Page 22: ... the adapter is connected properly 2 Press the Contrast button to see if contrast level is set correctly CALLERSARENOTDISPLAYEDONTHESCREEN 1 Verify that you have subscribed to the appropriate service Caller ID and Call Waiting Caller ID from your telephone company If you only subscribed to Caller ID service the unit will not display call waiting caller ID information 2 Check if your answering mach...

Page 23: ...putting near heating appliances and devices that generate electrical noise for example motors and florescent lamps Clean your telephone equipment with a damp cloth Stains may be removed with a mild soap Do not use liquid or aerosol detergents or cleaning agents Do not expose to direct sunlight or moisture Retain the original package in case you need to ship it at a later date ...

Page 24: ... product If you return your telephone for repair the warranty period is not extended The original date of purchase continues to apply to your warranty OUT OF WARRANTY REPAIR We will repair this product for a nominal fee after the LIMITED WARRANTY has expired if you send it to us in a complete and undam aged condition The repaired unit will be shipped to you C O D freight collect RETURN FOR REPAIR ...

Page 25: ... the REN total is more than three RESTRICTIONS You must not connect your telephone to coin operated lines or party lines INSTALLATION This model telephone must be connected to the telephone com pany lines through a modular jack The required USOC for the modular jack is RJ11C for desk mounting and RJ11W for wall mounting The USOC number is printed on the label on the bottom of your telephone HEARIN...

Page 26: ...oduct is compatible with the type of equipment of any particular phone company or the services provided by it CORTELCO DISCLAIMS ANY IMPLIED WARRANTY INCLUDING THE WAR RANTY OF MERCHANTABILITYAND THE WARRANTY OF FITNESS FORA PARTICULAR PURPOSE AS OFTHE DATETWO YEARS FROMTHE ORIGI NAL PURCHASE OFTHE PRODUCT CORTELCO ASSUMES NO RESPON SIBILITY FOR ANY SPECIAL INCIDENTAL OR CONSEQUENTIAL DAM AGES THI...

Reviews: