22
| ASSEMBLY INSTRUCTIONS
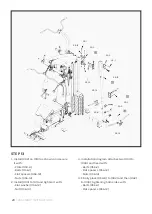
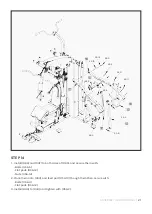
4. Install (#53-8) to (#44), and then install (#44) to (#45) with:
- Bolts (#56-3)
- Flat spacers (#56-12).
5. Similarly, install (#53-8) to (#43), and then install (#43) to (#42) with:
- Bolts (#56-3)
- Flat spacers (#56-12)
6. Install (#51) and (#52) on (#46) and (#47) and be tightened with:
- Bolts (#56-11)
- Flat spacers (#56-12)
Ensure to tighten all Nuts and Bolts with a wrench.
1. Your device is now fully assembled.
2. Check that all pulleys and wire ropes have been secured before proper correctly.
3. In the first stage of use, the wire rope should be adjusted according to the actual situation.
Summary of Contents for GS7
Page 27: ......
Page 28: ...WWW LIFESPANFITNESS COM AU ...


