background image

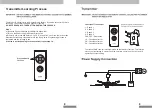
Function of Transmitter

9

1 - Speed 1
2 - Speed 2
3 - Speed 3
4 - Speed 4
FAN OFF - Stop the fan
1H - Fan stops after 1hr
3H - Fan stops after 3hr
6H - Fan stops after 6hr

8

The receiver & transmitter is pre-programmed in factory. If you wish to control 2 or more

fans using 1 transmitter, the below steps are required.

DO NOT PRESS ANY OTHER BUTTON DURING THIS PROCESS
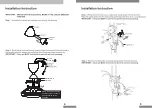
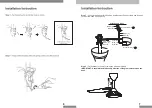
 

Step 1

a) Insert the 2 pcs of batteries (provided) into transmitter.

b) Turn on the power supply (wall switch) to the fan.

c) Within 10 sec, press and hold the “1” and “2” button for 3 sec. Once the receiver has 

detected the frequency, transmitter will “Beep Beep” twice. Programming process is 

completed and fan is ready to use.

If the fan is not responding to the transmitter, repeat Step 1b.

Press and hold

for 3 sec

Transmitter Learning Process

FAN OFF

2

1

3

4

6H

1H

3H

FAN OFF

2

1

3

4

6H

1H

3H

The transmitter & receiver is incorporated with last memory function. This function 

stores your last setting in memory and the next time you turn on the fan, fan will 

operate as the last setting.

Summary of Contents for Xpress-5B/54

Page 1: ...Ceiling Fan Xpress 5B 54 Xpress 5B 40 Instruction Manual Version 2019 V1 ...

Page 2: ...s the L and N wire will break leaving the fan remain earthed to prevent electrocution Tighten the blade firmly using a screw driver Blades that are detached from the unit during operation will cause serious injuries and property damages This appliance is not intended for use by persons including children with reduced physical sensory or mental capabilities or lack of experience and knowledge unles...

Page 3: ...bly shall effectively earthed Ensure that the unit s panel is closed after service or installation Unsecured panels will cause the unit to operate noisily Sharp edges and coil surfaces are potential locations which may cause injury hazards Avoid from being in contact with these places Before turning off the power supply set the remote controller s ON OFF switch to the OFF position If this is not d...

Page 4: ...4 Green Yellow E Washer Nut Clevis Pin Clamp the downrod with the 2 screws on the coupling to prevent shaking during operation 5 ...

Page 5: ...rom Motor Brown L Blue N Green Yellow E Step 7 Connect the Connectors from Fan and Receiver Connect the wires from the receiver to House s Supply Wire Step 5 Fix the blade to the motor suing the screws provided IMPORTANT Assemble the blades only after the ceiling fan is mounted on the hook 6 ...

Page 6: ...mitter b Turn on the power supply wall switch to the fan c Within 10 sec press and hold the 1 and 2 button for 3 sec Once the receiver has detected the frequency transmitter will Beep Beep twice Programming process is completed and fan is ready to use If the fan is not responding to the transmitter repeat Step 1b Press and hold for 3 sec Transmitter Learning Process FAN OFF 2 1 3 4 6H 1H 3H FAN OF...

Page 7: ...ellow Grey E L N Motor Thermal Fuse Inside Motor White Pink Motor Capacitor Model No of Blades Fan Width Motor RPM Voltage Wattage Nett Weight Xpress 5B 54 5 54 110 225 220 240V 50Hz 20W 80W 6 2kg Xpress 5B 40 5 40 110 230 220 240V 50Hz 20W 80W 6 3kg ...

Page 8: ...k 3 10 Taman Molek 81100 Johor Bahru Tel 07 353 4833 4933 Fax 07 355 4233 Melaka 19 19 1 19 2 Jalan KSB 11 Taman Kota Syahbandar 75200 Melaka Tel 06 292 6292 6293 Fax 06 292 6296 Ipoh 16 Jalan Tasek Timur Taman Tasek Indra 31400 Ipoh Perak Tel 05 545 2282 547 2282 Fax 05 547 6282 Penang 28 Jalan Icon City Icon City 14000 Bukit Mentajam Penang Tel 04 506 2366 2066 2566 Fax 04 506 2966 Pahang A131 T...

Reviews: