background image

- 11 -

Assembly Instruction

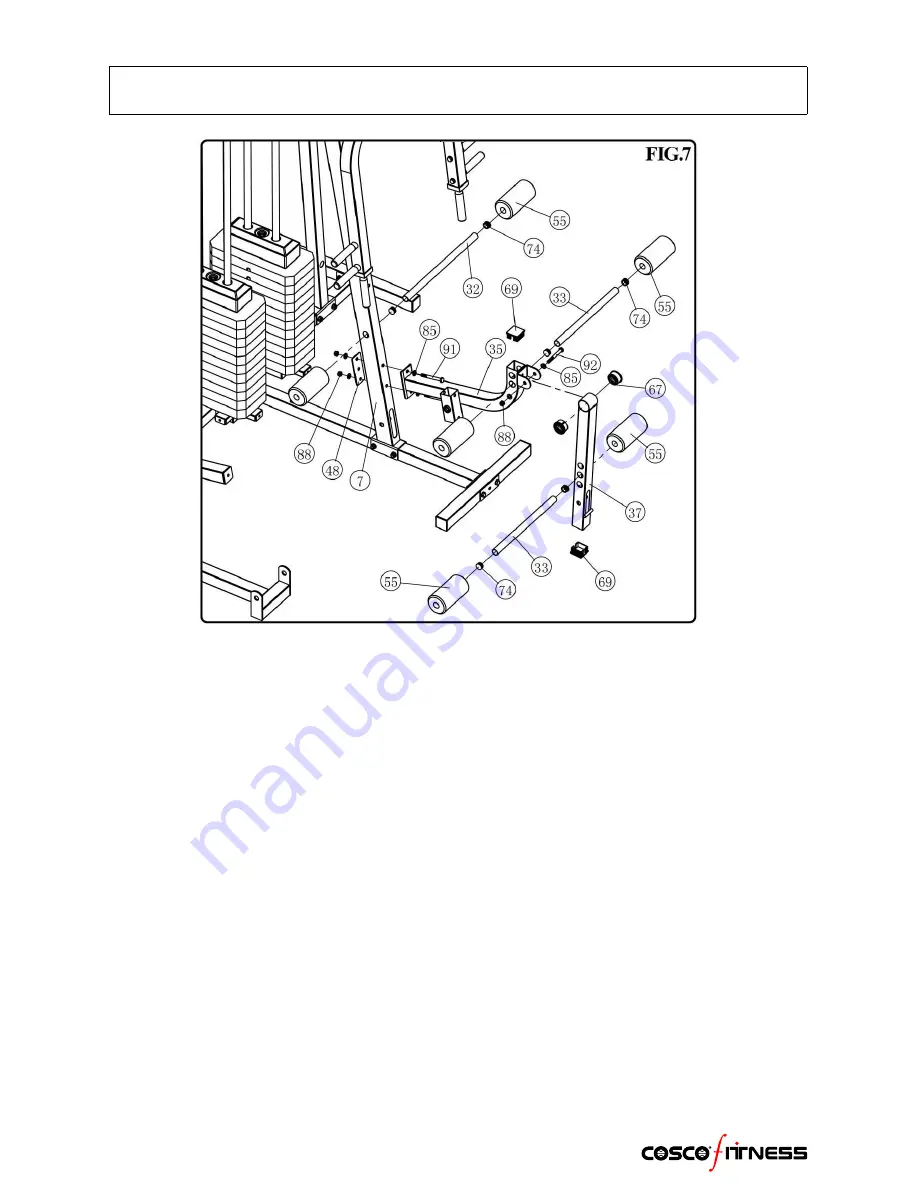
Fig.7

a. Insert the 50*50 Plug(#69) into the part(#35). Attach the part(#35) to the part(#7) using the Backplate(#48) and

(2)M10*90 Hex Bolts(#91).

b. Insert the 50*50 Plug(#69) into the part(#37). Attach the part(#37) to the part(#35) using (1)M10*85 Hex

Bolt(#92).

c. Insert the

φ

25 Plug(#74) into the end of parts(#32,#33). Insert the Long Foam Roller Tube(#32) through the

part(#7). Insert the Short Foam Roller Tube(#33) through the part(#35,#37).

d. Slide the Foam Roller(#55) onto the Tube(#32,#33).

Summary of Contents for CHG-402

Page 1: ......

Page 2: ...al and be sure all warning labels are legible and intact Replacement Owner s Manuals and labels are available from your local retailer 3 It is recommended that another person assist you with the assem...

Page 3: ...2 Part List...

Page 4: ...3 Part List...

Page 5: ...4 Part List...

Page 6: ...5 Part List...

Page 7: ...ect 3 Some parts may be pre assembled at the factory 4 Assembly requires the assistance of another person Fig 1 a Insert the 50 50 Plug 69 into the end of parts 2 3 4 25 b Attach the part 2 3 to the p...

Page 8: ...part 1 using 2 M10 75 Hex Bolts 93 b Attach the part 9 to the part 3 using 2 M10 75 Hex Bolts 93 Attach the part 21 to the part 9 25 using the Backplate 48 and 4 M10 75 Hex Bolts 93 c Insert the 50 50...

Page 9: ...Selector Bar 64 and attach it at the first hole of the Weight Selector Bar 64 using the Weight Pin 63 Insert the Bar 64 into the hole of Weight Stack 61 Slide the Top Weight Plate 60 onto the Weight S...

Page 10: ...9 Assembly Instruction Fig 4 a Insert the 70 50 Plug 68 into the part 10 Attach the part 10 to the part 8 9 using 2 M10 75 Hex Bolts 93 b Attach the part 5 to the part 10 using 4 M10 25 Hex Bolts 97...

Page 11: ...50 50 Plug 69 into the part 12 Use a mallet insert the Shaft 34 through the part 12 and through the part 11 until it is flush with both ends Attach the Shaft 34 to the part 12 using 2 M8 20 Hex Bolts...

Page 12: ...10 90 Hex Bolts 91 b Insert the 50 50 Plug 69 into the part 37 Attach the part 37 to the part 35 using 1 M10 85 Hex Bolt 92 c Insert the 25 Plug 74 into the end of parts 32 33 Insert the Long Foam Rol...

Page 13: ...ert the 50 50 Plug 69 into the part 22 Use a mallet insert the Shaft 24 through the part 25 22 Attach the Shaft 24 using 2 M10 16 Hex Bolts 98 and 2 10 Big Washers 84 Fig 9 a Use a mallet insert the S...

Page 14: ...0 Plug 69 into the end c Attach the part 41 to the part 6 using 2 M10 65 Hex Bolts 95 d Insert the 50 50 Plug 69 into the part 31 Attach the part 31 to the part 16 using 1 M16 Nylon Lock Nut 87 and 1...

Page 15: ...0 Hex Bolts 100 c Attach the part 45 to the part 28 29 using 4 M8 70 Hex Bolts 100 d Set the Comfort Grip 76 onto the part 15 and then attach the part 15 to the part 28 29 using 2 M10 25 Hex Bolts 97...

Page 16: ...part 18 through the sleeve adjust to desire length and release the Pin 54 to lock the part 18 in place Fig 15 a Insert the Sleeve 77 into the part 14 Screw the Locking Pin to the part 14 b Attach the...

Page 17: ...to the part 35 b Insert the 50 25 Plug 72 into the part 36 Attach the part 43 to the part 36 using 2 M8 45 Hex Bolts 101 c Insert the part 36 through the sleeve adjust to desire height and release the...

Page 18: ...Weight Plate and the Weight Stack If the Cable is slightly loose adjust it by tightening the Bolt at the top of the weight stack If the Cable is very loose adjust the Pulley to lower position on Pulle...

Page 19: ...hten all bolts and nuts Your Home Gym should now be fully assembled Please check that all bolts are tight and cables are seated correctly on all pulleys before use Adjustments to the cables may need t...

Page 20: ...or damage If there is a problem or replacement part which is necessary STOP USING THE EQUIPMENT and immediately contact your local retailer Replace parts using only genuine parts 5 As needed upholste...

Reviews: