background image


-6-

Assembly Instruction 

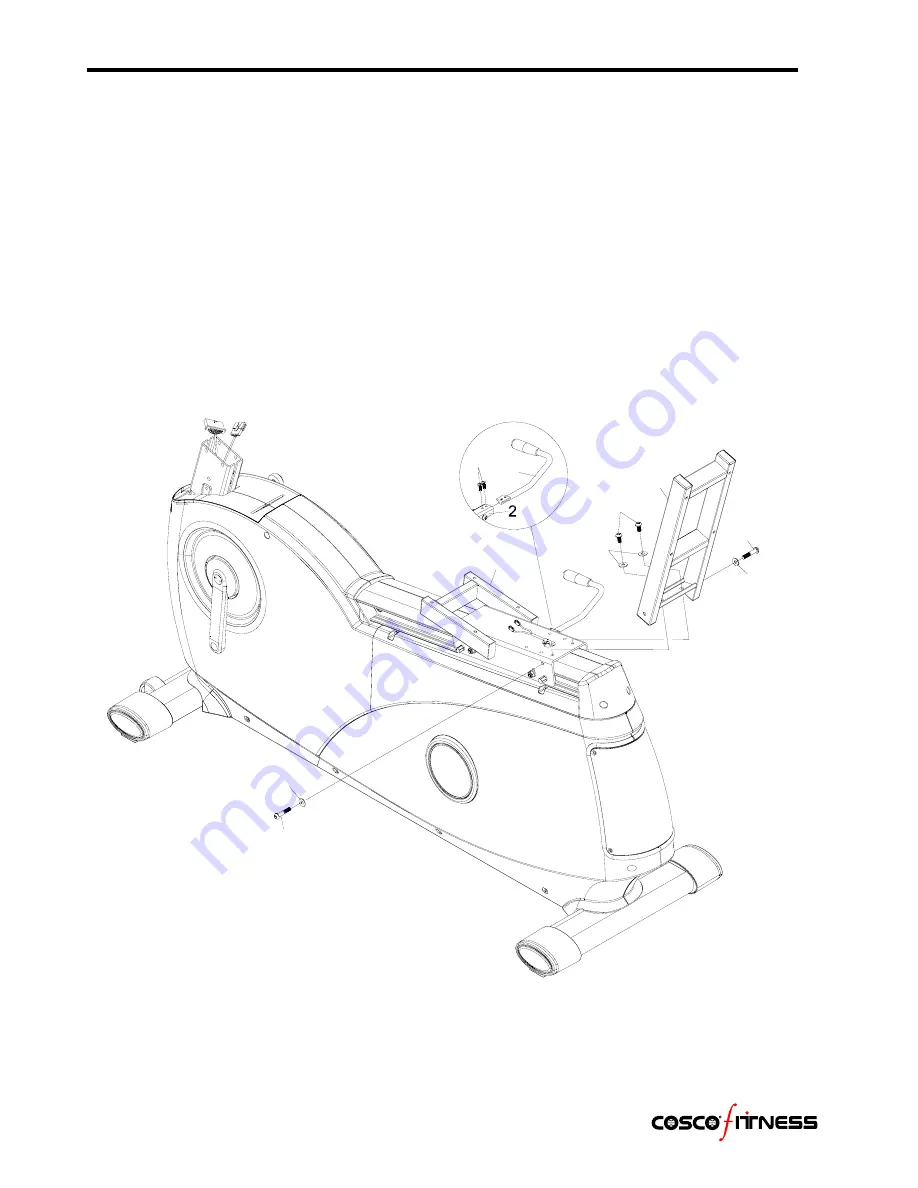
FIGURE 2 
 
Step 1: 
Install the Back Leaning Bracket (7) onto the Seat Carriage Slider (8) with four 
Screws (80) and four washers (101) as showed in diagram. 
 
Step 2: 
Insert the Locking Handle (19) into the bracket of Seat Carriage Fixer (2) and screw 
with two Phillips screws (71). 


FIGURE 2


80

80

80

101

101

101

8

7

19

71


Summary of Contents for C1000R-AT

Page 1: ...C1000R AT RECUMBENT BIKE OWNER S MANUAL H1 1225...

Page 2: ...Table of Contents 2013 08 UM6627 10 Important Safety Information 3 Before You Start 4 Assembly Instruction 5 15 Console Overview 16 18 Monitoring Your Heart Rate 19 21 Exploded View 22 Parts List 23...

Page 3: ...r be used while you are wet We recommend a mat be placed under the unit to protect floor or carpet and for easier cleaning 4 Wear comfortable good quality walking or running shoes and appropriate clot...

Page 4: ...ication consult your physician to see if the medication will affect your exercise heart rate If you have heart problems you are not active and or are over the age of 35 years do not use the pre set pr...

Page 5: ...ls and the Foot Cap Adjusters 38 under rear foot caps are assembled onto the front and rear Foot Tubes 5 6 B Make sure that the Foot Tubes 5 6 with four Foot Caps 32 are assembled onto the two sides o...

Page 6: ...ng Bracket 7 onto the Seat Carriage Slider 8 with four Screws 80 and four washers 101 as showed in diagram Step 2 Insert the Locking Handle 19 into the bracket of Seat Carriage Fixer 2 and screw with...

Page 7: ...eat Carriage Slider 8 and lock them together by four Washers 99 and four Hex Head Screws 78 Step2 Connect the Long Extension Pulse Wire 106 out from hole of the Seat Carriage Slider 8 with the Hand Pu...

Page 8: ...riage Slider 8 using four Washers 98 and Screws 68 Step2 Attach Back Pad 46 to the Back Leaning Bracket 7 then lock them together by using Washers 98 and Screws 68 Step3 Press the Back Pad Cover 47 in...

Page 9: ...k 18 then secure in place by turning it clockwise to tighten Note Right Pedal 34 is marked with an R Step 2 Thread the Left Pedal 33 into the hole of Left Crank 17 then secure in place by turning it c...

Page 10: ...to Gear Box Wire 110 and Long Extension Pulse Wire 106 respectively in the Main Frame 1 as shown in the diagram Step 3 Slide the Console Tube 11 onto the Main Frame 1 and secure using Screws 76 84 the...

Page 11: ...11 Assembly Instruction FIGURE 7 Attach the Front Handlebar 3 to Console Tube 11 using three Washers 101 and three Hex Head Screws 78 FIGURE 7 11 112 107 3 101 101 101 78 78 78...

Page 12: ...12 Assembly Instruction FIGURE 8 To change KM or ML please push the switch to select scale KM or ML...

Page 13: ...n Pulse Wires 107 and Extension Wire 112 to the wires from Monitor 114 Secure Monitor 114 to Console Tube 11 using four Screws 70 Note The four Screws 70 will already be installed into the back of Mon...

Page 14: ...bly Instruction FIGURE 10 The monitor only can be powered by using the AC adaptor input pls make sure the AC adapter has already been pluged into the adapter jack on the bottom housing as showed on th...

Page 15: ...15 Assembly Instruction Congratulations You have completed the assembly of your new Recumbent...

Page 16: ...motor system REVOLVING IRCLE BAR DISPLAY on Top of LCD screen USER see and follow up points of REVOLVING CIRC BAR DISPLAY step by step to operate this computer to finish inputting setting initial fun...

Page 17: ...s flashing WATTS CONSTANT User can default WATTS value at his her desire 10 350 watts between 10 350 watts by using the UP DOWN knob To fix WATTS constant value and then press ST STOP key Use WATTS co...

Page 18: ...ng the ENTER key until the desired program profile is flashing Press the ENTER key again for confirmation 3 When the Program and other protocols are entered press START STOP key and begin your workout...

Page 19: ...or against your wrist over the main artery After finding your pulse count the number of beats in 10 seconds Multiply the number of beats by six to determine your pulse rate per minute We recommend tak...

Page 20: ...h end or 75 of MHZ 30 year old THR Target Heart Rate would be 114 142 See Heart Rate Table on next page for additional calculations Fitness Safety The target heart rate chart indicates average rate zo...

Page 21: ...21 Monitoring Your Heart Rate...

Page 22: ...62 62 62 62 62 62 62 62 62 62 62 62 62 62 63 63 63 63 63 63 64 65 75 75 75 51 51 50 50 50 50 68 68 68 68 69 70 71 71 71 71 72 72 72 72 42A 42A 73 74 65 65 65 75 76 77 78 78 78 78 78 78 78 78 79 79 79...

Page 23: ...6004 Precise Bearing 46 1 Back Cushion 16 1 Pulley Axle With Plate 47 1 Back Cushion Cover 17 1 Left Crank 48 1 Wire Plug 18 1 Right Crank 49 1 Adjusting Plate 19 1 Locking Handle 50 4 Back Pad Conca...

Page 24: ...crew Black 102 2 10x19x2 0t Washer Black 76 2 M8x15mm Hex Head Screw Black Licotted 103 1 20x30x1 0t Washer Sliver 77 1 M8x20mm Hex Head Screw Silver Carbon 104 1 20x30x2 0t Washer Sliver 78 17 M8x 15...

Reviews: