background image


SH-7550S   

series


PART LIST    

S1- 1010726 


10-19 


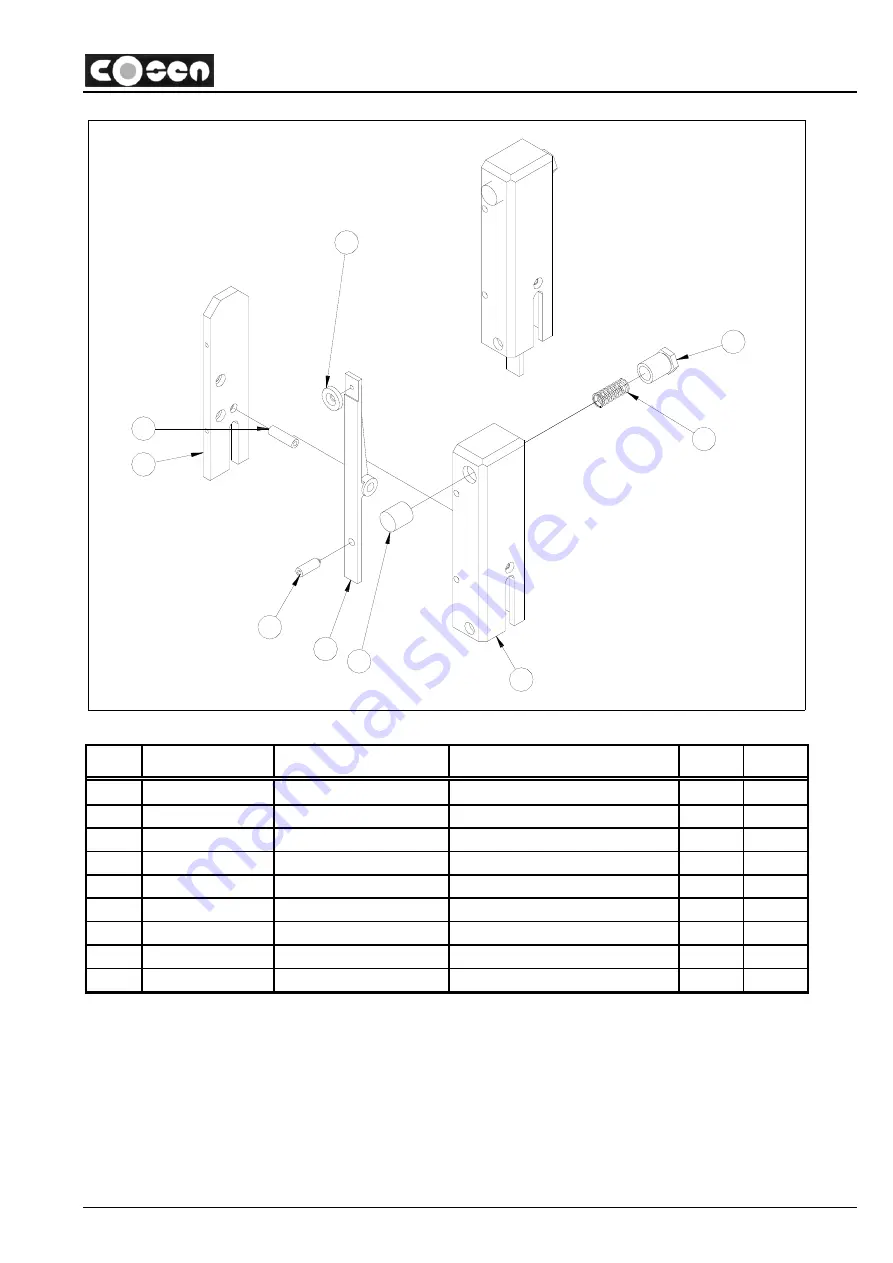
DEVIATION DETECTOR OPTIONAL

7

15

13

11

5

3

1

9

17

AHC-33010B


ITEM

PART NO.

PART NAME

PART NAME

QTY

UNIT

1

AHC-3301B

歪斜檢知本體

Deviation detector body

1

PCS

3

AHC-3302B

偵測底板

Detector plate

1

PCS

5

AHC-3304

偵測板轉軸

Detector plate shaft

1

PCS

7

AHC-3305B

歪斜檢知護蓋

Deviation detector cover

1

PCS

9

AHC-3006

偵測板

Detector plate

1

PCS

11

M3L-9-10

微動彈簧

Spring

1

PCS

13

NGG-3303

鎢鋼頂針

Tungsten steel push rod

1

PCS

15

NGG-3309

偵測彈簧座

Detecting spring seat

1

PCS

17

PP-90419

近接開關

Switch

1

PCS


Summary of Contents for SH-7550S

Page 1: ...COSEN SAWS SH 7550S Semi Automatic Heavy Duty Bandsaw Non CE model Instruction Manual The Pinnacle of Cutting Performance Cosen Mechatronics Co Ltd ...

Page 2: ......

Page 3: ...one 31 77 7600280 fax 31 77 7600288 For China email service cosensaws cn phone 86 152 50127815 Instruction Manual SH 7550S Semi Automatic Heavy Duty Bandsaw Ver 5 2017 1 23 2013 by COSEN MECHATRONICS CO LTD No part of this publication may be photocopied or otherwise reproduced without the prior written permission of COSEN Printed in Taiwan FROM THE MANUFACTURER Thank you for your purchase of COSEN...

Page 4: ...ials Never adjust the wire brush or remove chips while the saw blade is still running It is extremely dangerous if hands or clothing are caught by the running blade Never touch the running saw blade with gloves or not It is dangerous if your hands clothing or gloves are caught by the running blade Stop the saw blade before you clean the machine It is dangerous if hands or clothing are caught by th...

Page 5: ...ication 2 3 Floor Plan 2 4 Section 3 Moving Installation 3 1 Location Environment 3 1 Unpacking Inspecting 3 2 Lifting 3 3 Illustration Lifting Points 3 5 Removing Shipping Bracket 3 6 Cleaning 3 6 Installing 3 6 Supplying Hydraulic Oil 3 6 Supplying Coolant 3 7 Connecting Electric Power 3 7 Leveling Anchoring 3 8 Installing Roller Table Optional 3 9 Installing Fire Control Device 3 9 Relocating 3...

Page 6: ...g 4 27 Terminating a Cutting Operation 4 28 Section 5 Electrical System 5 1 Electrical Circuit Diagrams 5 1 Section 6 Hydraulic System 6 1 Hydraulic Diagrams 6 1 Section 7 Bandsaw Cutting A Practical Guide 7 1 Introduction 7 1 Saw Blade Selection 7 1 Some Sawing Practices 7 4 Saw Pitch Selection 7 4 Material Size and Saw Pitch 7 4 Section 8 Maintenance Service 8 1 Introduction 8 1 Basic Maintenanc...

Page 7: ...1 Precautions 9 2 General Troubles Solutions 9 2 Minor Troubles Solutions 9 3 Motor Troubles Solutions 9 3 Blade Troubles Solutions 9 4 Sawing Problems Solutions 9 5 Re Adjusting the Roller Table 9 6 Section 10 Parts 10 1 Spare Parts Recommendations 10 1 Part List 10 1 Section 11 Warranty 11 1 Warranty 11 1 ...

Page 8: ......

Page 9: ...he machine or part of its functions These important safety instructions do not cover all possible situations that might occur It is your responsibility to take caution and follow procedures stated in this manual when installing maintaining and operating your machine Cosen will not be liable for damages resulting from improper use SAFETY INSTRUCTIONS What the icons and signs in this user manual mea...

Page 10: ...rate while under the influence of drugs alcohol or medication All users must read it before performing any activity on the machine such as replacing the saw band or doing regular maintenance Some personal protective equipment is required for the safe use of the machine e g protection goggles Keep blade protection cover and wheel covers in place and in working order Use recommended accessories Impr...

Page 11: ... safeguard devices under any circumstances except when servicing the machine Even skilled service technicians should still take cautions when performing repairs or service on the machine with any of these protectors removed It is the responsibility of the user to make sure all these elements are not lost and damaged Take note of the following main moving parts on the machine prior to and during ma...

Page 12: ...o assure that the machine will stop whenever the wheel covers are open This device is to protect users from being cut by the running saw blades Among all these safety switches some of them are used to protect the users and some of them are used to prevent damage to saw blades the workpiece and the machine itself etc We have taken every precaution to prevent injury or damage and to provide safe and...

Page 13: ...1 5 Illustration Emergency Stop Emergency Stop Button of Control Panel without HMI Emergency Stop Button of Control Panel with HMI ...

Page 14: ...jury The arrow indicates direction of the blade WARNING Labels An orange and black WARNING label marks hazards or unsafe practices that can result in severe personal injury or damage to the machine Label Meaning Label Meaning Cutting Hazard KEEP COVER CLOSED while the blade is running Turn power off before opening cover Failure to follow the warning can result in severe injury Cutting Hazard KEEP ...

Page 15: ...ades or adjusting wire brush NOTICE Labels Blue and white NOTICE labels mean unsafe practices that could result in damage to products or property Label Meaning Replace the hydraulic oil every six months or every 1 200 hours of operation Oil specification Shell TELLUS 27 or Mobil DTE OIL LIGHT HYDRAULIC 28 To extend blade life always adjust the location of wire brush so that it is properly touching...

Page 16: ...wear gloves neckties jewelry or loose clothing while operating the machine 3 Always wear eye protection goggles 4 Check blade tension and adjust blade guide before starting to cut 5 Always clamp stock firmly in place before cutting 6 Do not remove jammed or cut off pieces until blade has stopped 7 Keep fingers out of path of blade 8 Blade guards should be in place and used at all times 9 Disconnec...

Page 17: ...1 9 Illustration Safety Labels ...

Page 18: ...he prescribed maintenance schedule Refer to Section 8 2 If maintenance does not seem to solve the problem follow the troubleshooting procedures under Section 9 CE COMPLIANCE Cosen s CE model is designed to satisfy regulations of the Council Directive on the approximation of the laws of the Member States relating to machinery 2006 42 EC Annex I Essential health and safety requirements relating to t...

Page 19: ...tically when the saw blade is broken protecting both the operator and the machine Convenience High Performance The machine is designed in the way that the operation and adjustment can be easily performed The machine will stop automatically when out of stock Dual valve system is designed to achieve optimal cutting performance with the simple setting of feed rate and perspective cutting pressure for...

Page 20: ... 040 x 54 x 1 6 mm 238 x 2 x 0 063 Tension Hydraulic with automatic blade breakage detection Guide Interchangeable tungsten carbide Cleaning Steel wire brush with flexible drive shaft driven by main motor Motor Output Saw Blade 7 5 HP 5 6 kW or 10HP Hydraulic 2 HP 1 5 kW Coolant Pump 1 4 HP 0 18 kW Tank Capacity Hydraulic 40 L 10 gal Coolant 85 L 21 25 gal Workbed Height 701 mm 27 5 Weight Net 2 0...

Page 21: ...3 MACHINE PARTS IDENTIFICATION Cross beam Shaft Saw bow Drive wheel Saw arm Idle wheel Hydraulic cylinder Movable vise Fixed vise Wire brush Chip conveyor Control panel Hydraulic tank Coolant sight gauge ...

Page 22: ...2 4 FLOOR PLAN Machine top view ...

Page 23: ...2 5 Machine front view ...

Page 24: ...2 6 Machine side view ...

Page 25: ...nd inspection Refer to Section 2 General Informattion for machine dimensions and floor space Environment Well lighted 500 lumen at minimum Floor kept dry at all times in order to prevent operators from slipping Away from direct exposure to the sunlight Room temperature between 5 C to 40 C Humidity level kept at 30 95 without condensation to avoid dew on electric installation and machine Away from ...

Page 26: ...attention to machine surface equipments furnished and the electrical and hydraulic systems for damaged cords hoses and fluid leaks In the event of damage caused during shipping please contact your dealer and consult about filing a damage claim with the carrier Your machine comes in with a set of tools for you to maintain the machine The accessories furnished are as follows 1 Tool box 1 pc 2 Grease...

Page 27: ...rform the job You must use tools and equipment with the proper tensile strength and use proper method when moving your machine Apply the wire rope sling to the lifting hooks on the four ends of the machine Refer to Illustration Lifting Points for exact locations Slowly lift the machine Be sure to protect the machine from impact or shock during this procedure Also watch out your own fingers and fee...

Page 28: ...y You must have a qualified forklift operator to perform the job You must apply proper forklift technique to avoid damage to the machine Make sure the forks are able to reach in at least 2 3 of the machine depth You must keep the machine balanced at all times Make sure the forks are centered before use Illustration only 3 Use rolling cylinders You can use rolling cylinders to move your machine in ...

Page 29: ...3 5 Illustration Lifting Points Please remove the cross beam before lifting the machine Minimum weight capacity for each wire rope 3 ton Total number of wire ropes required 4 ...

Page 30: ... surfaces that are prone to rust Do not remove the rust preventive grease with a metal scraper and do not wipe the painted surfaces with solvent as doing so would damage surface paint INSTALLING Cosen s bandsaw machine is relatively easy to install Follow these six easy steps to install your machine Supplying hydraulic oil Open the filler cap and fill the hydraulic oil tank to above 2 3 or full le...

Page 31: ...e power supply voltage is different from the transformer and motor connection voltage shown on the label attached to the electrical compartment of the machine contact COSEN or your agent immediately Connect to power supply independently and directly Avoid using the same power supply with electric spark machines such as electric welder Unstable electric tension may affect your machine s electric in...

Page 32: ...e control panel will come on 8 Pull to unlock the Emergency Stop button and press the hydraulic ON button to start the hydraulic motor 9 Make sure the sawing area is clear of any objects Start the blade and check the blade rotation If the electrical connections are made correctly the blade should run in a counterclockwise direction If not shut the hydraulics off turn off the machine as well as the...

Page 33: ...ling bolts Installing fire control device Install a fire extinguisher or any other fire control device in the shop in case a fire breaks out RELOCATING We recommend you follow these procedures when relocating or shipping your machine to other place 1 Descend the saw frame to its lowest position then turn off the power 2 Fix the saw frame using the shipping bracket that originally came with the mac...

Page 34: ......

Page 35: ...STANDARD ACCESSORIES OPTIONAL ACCESSORIES UNROLLING INSTALLING THE BLADE ADJUSTING WIRE BRUSH ADJUSTING SAW ARM ADJUSTING COOLANT FLOW ADJUSTING BLADE SPEED BREAKING IN THE BLADE TEST RUNNING THE MACHINE CUTTING OPERATION USING TOP CLAMP FOR BUNDLE CUTTING TERMINATING A CUTTING OPERATION ...

Page 36: ...material in place before cutting long workpieces Always make sure the material is clamped firmly in place before starting to cut Do not remove jammed or cut off pieces until the blade has come to a full stop Keep fingers away from the path of the blade Protection devices should be in place at all times For your own safety never remove these devices Disconnect machine from the power source before m...

Page 37: ...he material is flammable Never take your eyes off the machine while in operation Cutting fluid For cooling and lubrication purpose we recommend you use water soluble cutting fluids The following table lists out its pros and cons for your reference Pro Con Have a high cooling effect Not flammable Economical Does not require cleaning of the cut products Remove machine paint Lose its rust protection ...

Page 38: ...g the machine A Regular type without the optional HMI B Advanced type with the optional HMI No Name 1 Emergency stop button 2 Saw blade start button with built in lamp 3 Hydraulic on button with built in lamp 4 Power indicator lamp 5 Saw bow down button 6 Saw bow up button 7 Blade speed control knob 8 Blade speed indicator 9 Lift roller feed backward button optional 10 Lift roller feed forward but...

Page 39: ...amp is on it indicates the power to the machine is turned on 5 Saw bow down button When this button is pressed the saw bow descends until the operator lets go of the button Before lowering the saw bow the guide arm must be positioned outside the vise in order to avoid hitting the vise and causing damages 6 Saw bow up button When this button is pressed for less than 2 seconds the saw bow rises unti...

Page 40: ... speed selector This function is available only when the optional hydraulic lifting take in roller with power feeding table is equipped 11 Lift roller up down switch The lift roller is designed to help users save efforts feeding and adjusting material When switched to the right lift roller ascends to lift the material up When switched to the left lift roller descends to lower the material When the...

Page 41: ...s mode is selected the blade will automatically stop as it completes the current job and triggers the lower limit switch but the hydraulic system will remain ON This is used when the user intends to perform more cuts following the current one in hand 15 Carbide inserts clamp unclamp selector Switching to this mode to clamp both the right and left carbide inserts Switching to this mode to open the ...

Page 42: ...ise increases the blade descend speed Blade descend speed is a determining factor to a good cutting time and quality cutoff surface Set the blade descend speed in accordance with the cutting pressure control knob Also commonly known as the flow control valve Human machine interface HMI touch screen This HMI touch screen displays operation messages so that the operator is able to understand the sys...

Page 43: ...n After the power is turned on Cosen s logo will appear as the startup screen followed by the main operation menu Main control menu The main control menu includes some operating button that were used on the control panel of the earlier machines Some convenient functions are added to the page for the operator to better understand the features of the machine Setting the parameters shown on the scree...

Page 44: ...o press the saw blade stop or the emergency stop button to stop the blade first 3 Saw blade start When the work piece is clamped properly press this button to start cutting A solid yellow blade icon indicates the blade has been started The vise open clamp knob must be turned and held to clamp position for 3 seconds before the blade can start running 4 Saw blade stop Press this button to stop the b...

Page 45: ...urned on Press again to turn off the coolant pump A started blade will also start the coolant automatically 8 Carbide inserts clamp unclamp Press this button to clamp carbide inserts Press again to unclamp The carbide inserts are programmed to automatically clamp when the saw blade starts in order to protect the blade and the user 9 Blade speed setting Press this key to directly input your desired...

Page 46: ...y the manufacturer In order to prevent random change from being made to these parameters and affect cutting precision and machine life this function is protected with a set of password 17 Cutting parameter setting Press this button to display cutting related information e g blade height blade speed cutting rate and etc Blade deviation detector optional can be also configured in this setup page Ref...

Page 47: ... 275 fpm Not shown if the machine comes without this option Cut speed blade downfeed speed Cut rate Blade speed display Current in ampere optional Press to directly input your desired blade speed value according to the material being cut Press and hold to increase the blade speed Press and hold to decrease the blade speed The operator must make sure the pulley is at high or low gear Speed range 16...

Page 48: ...iation On Off Turn on or turn off the deviation detector if installed Blade Used Current blade life in hours Blade Life Reset Reset the blade life to zero Error message highlighted in yellow can be cleared by pressing down for 1 2 seconds Press Home to return to the main control menu Press PGUP to go back to the previous setup page Material cutting reference This 2 page reference chart lists out t...

Page 49: ...he errors and the time of occurrence Press Home to return to the main control menu Press Next to go to the troubleshooting support page Page 2 troubleshooting Provides suggestions on troubleshooting 6 pages in total Also refer to below table for error codes descriptions and solutions Press Home to return to the main control menu Press Next to go to the next page ...

Page 50: ...ks M313 OL1 abnormal Check if the blade motor overload relay has tripped M314 OL2 abnormal Check if the hydraulic motor overload relay has tripped M315 OL3 abnormal Check if the coolant pump motor overload relay has tripped M316 Saw bow upper limit abnormal Check the upper limit switch works M352 Front vise clamping error 1 Place new material 2 Check if the vise queen valve works 3 Check if the no...

Page 51: ... motion detector also functions as a safety device The speed motion detector protects operators and the machine by preventing blade overloads and consequent damages if a saw blade breaks or skids Once blade breakage or slippage is detected the drive wheel will stop in 10 seconds Inverter This inverter is installed in the control box It is used to control and stabilize the saw blade speed during cu...

Page 52: ...tly from the control panel to help you bring the material into the sawing area Press the lift roller up down button to bring the lift roller fully to the upper position or lower position Ratcheting take in roller The ratcheting take in roller can be used when fine adjustment is needed on cut off point alignment The take in roller is connected to a ratchet mechanism A ratchet wrench and a hexagonal...

Page 53: ...ard backward buttons to send the material to the desired position with aid of the two speed mode to select from Vise pressure regulator These regulators control the clamping pressure for the vises and the top clamps When cutting pipes or softer materials the clamping pressure of the vises and top clamps need to be adjusted to avoid damages to the material surfaces Adjust the clamping pressure acco...

Page 54: ...ation detected value and preset values are displayed on the HMI screen Before cutting please make sure if the deviation value is within 0 03 mm 0 0012 If not please calibrate the deviation detector before proceeding to cutting How to Check Adjust 1 Start the hydraulic motor Turn on the deviation function Start the saw blade and let it run for 1 2 minutes 2 Stop the saw blade Observe the deviation ...

Page 55: ...will hold the material tightly so as to avoid material sliding during cutting Use the adjustment valve to adjust its speed during clamping unclamping UNROLLING INSTALLING THE BLADE Always wear leather gloves and protection glasses when handling a blade Unrolling the blade Please follow the procedures illustrated below Unroll and roll the blade ...

Page 56: ...e Step 9 Place the new blade around the idle wheel and the drive wheel Step 10 Insert the blade into the left and right tungsten carbide inserts The back and the sides of the blade need to be touching the inserts as well as the adjacent rollers Step 11 Place the blade to the drive wheel and press the back of the blade against the flange of the drive wheel Step 12 Make sure the back of the blade is...

Page 57: ...tration Step 3 Tighten the lock lever and close the drive wheel cover Proper Improper ADJUSTING SAW ARM Adjust the blade guide guide arm position based on the size of your workpiece Step 1 Loosen the inserts by switching the carbide insert selector to unclamp position Step 2 Loosen the blade guide lock handle Then adjust the guide arm to a position suitable for your workpiece size Step 3 After adj...

Page 58: ...wing changes to the chips generated from cutting If the chips are sharp and curved increase the coolant flow amount If the chips are granulated decrease the coolant flow amount Before pressing the blade drive button insert the cleaning hose nozzle into the wire brush case to clean the brush ADJUSTING BLADE SPEED Step 1 Set the flow control to 0 position Step 2 Press the saw blade start button to s...

Page 59: ...p 4 After the break in operation is completed set all parameters back to normal settings TEST RUNNING THE MACHINE Test running this machine can ensure good machine performance in the future We suggest you run the following tests on the machine before first use Testing machine performance Turn on the power and run a basic performance test after you finish installing the machine Follow these steps t...

Page 60: ... see if it can be elevated and lowered smoothly Step 2 Elevate the hydraulic lifting take in roller Step 3 Place your workpiece onto the workbed manually or by using a lifting tool e g a crane Before loading make sure the vises are opened wide enough and the blade is raised high enough to allow enough clearance for the workpiece When loading take extra care not to have the workpiece bump into the ...

Page 61: ...ol knob clockwise to speed up and counterclockwise to slow down The blade speed is displayed in the HMI touch screen Step 12 Select the proper cutting condition according to different material Step 13 After the entire cutting job is completed elevate the saw bow to the top and open the vises to remove the workpiece Step 14 Clean the workbed by removing chips and cutting fluids Step 15 Lower the sa...

Page 62: ...nd automatic operation TERMINATING A CUTTING OPERATION STOP To terminate a cutting operation press either the saw bow up button or the emergency stop button The saw blade will stop running when the saw bow up button is pressed Both the saw blade and hydraulic pump motors will stop running when the emergency stop button is pressed The machine will stop automatically when an error occurs ...

Page 63: ... DIAGRAMS The following are electrical circuit diagrams of the system without HMI 5 2 Control panel layout 5 3 Circuit board layout 5 4 Power supply layout 5 5 PLC I O layout The following are electrical circuit diagrams of the system with HMI 5 6 5 9 ...

Page 64: ...5 2 1000525 張 鴻 昌 ...

Page 65: ...5 3 1000525 張 鴻 昌 ...

Page 66: ...5 4 1000525 張 鴻 昌 ...

Page 67: ...5 5 1000525 張 鴻 昌 ...

Page 68: ...5 6 ...

Page 69: ...5 7 ...

Page 70: ...5 8 ...

Page 71: ...5 9 ...

Page 72: ......

Page 73: ...6 1 Section 6 HYDRAULIC SYSTEM HYDRAULIC CIRCUIT DIAGRAM ...

Page 74: ...6 2 ...

Page 75: ...s Your machine has all these features to provide a better service for you The saw blade is guided through the cutting area by roller guides to keep it straight as it comes off the driving wheels The precision carbide inserted guides then hold the blade securely and accurately throughout the sawing process The tension of the saw blade is adjusted through the tensioning device on the strong saw bow ...

Page 76: ...g is determined by the hardness of the material and its thickness in cross section Tooth set prevents the blade from binding in the cut It may be either a regular set also called a raker set or a wavy set The regular or raker set is most common and consists of a pattern of one tooth to the left one tooth to the right and one which is straight or unset This type of set is generally used where the m...

Page 77: ...recognize for example that rollers are considered as a pivotal contact Whereas carbide faces could be considered as anchored supports A more complete deviation including band tension and guide design is included in Roark s handbook Formula for stress and strain Blade selection There are different types of blades available Please contact a bandsaw blade manufacturer for advice Blade speed and feed ...

Page 78: ...have at least three teeth in contact with the material being cut Material Size and Saw Pitch Anytime during the cutting operation at least three teeth must be in contact with the material being cut Figure 7 4 shows some sawing practices SAWING PRACTICES CORRECT INCORRECT several teeth contact work teeth strike sharp edge Coarse teeth clear chips freely Teeth too fine for large solids Three or more...

Page 79: ... 1 4 100 250mm 4 10 8 10 TPI Teeth per inch 6 8 TPI 3 4 TPI Structurals STYLE up to 10 mm 3 8 10 20mm 3 8 3 4 above 20mm 3 4 10 8 TPI 8 10 TPI 6 8 TPI Solid Bundle STYLE up to 20 mm 3 4 20 80mm 3 4 3 1 4 above 80mm 3 1 4 8 10 TPI 2 8 TPI 4 6 TPI ...

Page 80: ......

Page 81: ...e and longer life of the band saw machine a maintenance schedule is necessary Some of the daily maintenance usually takes just a little time but will give remarkable results for the efficient and proper operation of cutting BASIC MAINTENANCE It is always easy and takes just a little effort to do the basic maintenance But it always turns out to be a very essential process to assure the long life an...

Page 82: ...lade is properly clamped by the left and right inserts 5 Please check the wire brush for proper contact with the saw blade Replace the wire brush if it is worn out After ending a day s work Please remove saw chips and clean the machine with discharging the cutting fluid when work has been completed Do not discharge cutting fluid while the saw blade is operating because it will cause severe injury ...

Page 83: ...wer 2 Ambient temperature 5 40 3 Relative humidity 30 95 without condensation 4 Atmosphere use a plastic canvas to cover machine to avoid excessive dust acid fume corrosive gases and salt 5 Avoid exposing to direct sunlight or heat rays which can change the environmental temperature 6 Avoid exposing to abnormal vibration 7 Must be connected to earth TERMINATING THE USE OF THE MACHINE Waste disposa...

Page 84: ... of using Change it every year Regularly Omala oil HD220 Mobil Gear 630 Hydraulic system Inspect half a year Change oil every year Regularly Shell Tellus 32 Mobil DTE oil Light Hydraulic 24 Bearing Inserts Oil with lubricant but not excess Daily Shell R2 Band wheel Oil with lubricant but not excess Weekly Cylinder Oil with lubricant but not excess 6 Monthly Wire brush Oil with lubricant but not ex...

Page 85: ...ble the machine from operating Generally speaking the system troubles in this machine model can be classified into three types namely GENERAL TROUBLES MOTOR TROUBLES and BLADE TROUBLES Although you may have other troubles which can not be recognized in advance such as malfunctions due to the limited life span of mechanical electric or hydraulic parts of the machine COSEN has accumulated enough exp...

Page 86: ...er to Operating Instructions Adjusting Feed Excessive blade speed Refer to Operating Instructions Speed Selection Improper blade selection Refer to Operating Instructions Blade Selection Cannot make square cut Dull blade Replace blade Guide rollers not adjusted properly Refer to Adjustments Rear vise jaw not adjusted properly Set fixed vise jaw 90 to blade Excessive head pressure Reduce head press...

Page 87: ... Install correct fuses or circuit breakers Motor fail to develop full power Power output of motor decreases rapidly with decrease in voltage at motor terminals Power line overloaded with lights appliances and other motors Reduce the load on the power line Undersize wires or circuit too long Increase wire sizes or reduce length of wiring General overloading of power company s facilities Request a v...

Page 88: ...n drive wheel while cutting Wheels out of line Adjust wheels Blade line Run out or Run in Guides out of line For a straight and true cut realign guides check bearings for wear Excessive pressure Conservative pressure assures long blade life and clean straight cuts Support of blade insufficient Move saw guides as close to work as possible Material not properly secured in vise Clamp material in vise...

Page 89: ...lamped workpiece Check and correct Excessively hard material surface Soften material surface Excessive cutting rate Reduce cutting rate Non annealed workpiece Replace with suitable workpiece Insufficient or lean cutting fluid Add fluid or replace Vibration near machine Relocate machine Non water soluble cutting fluid used Replace Air in cylinder Bleed air Broken back up roller Replace Use of non s...

Page 90: ...to attain the horizontal balance leveling between the roller table and the machine frame 2 Ensure that the machine frame is not struck by the loaded material on the feeding table 3 Check the leveling by the measuring tool 4 After finished the adjusting fix the roller table If the feeding table and the machine frame are not positioned under the horizontal balance the loaded material may be going up...

Page 91: ...owing table lists the common spare parts we suggest you purchase in advance Part Name Part Name Saw blade Coolant tank filter Wire brush Steel plates Carbide inserts Rollers Bearings Belt Hydraulic tank leak proof asbestos Duster seal Rubber washer Oil seal O ring Snap ring Drive wheel Idle wheel ...

Page 92: ...S1 1010726 10 1 3 1 5 7 SH 7550 ITEM PART NO PART NAME PART NAME QTY UNIT 1 底座組 Base Assembly 1 PCS 3 鋸弓組 Saw bow assembly 1 PCS 5 S7550 20400 上浮組 Lifting roller device assembly 1 PCS 7 AGF C001 除屑機組 Chip conveyor assembly 1 PCS ...

Page 93: ...SH 7550S series PART LIST S1 1010726 10 2 55 53 41 43 33 29 27 13 3 25 23 21 11 9 7 1 65 49 5 35 37 39 45 73 61 77 67 31 71 15 59 51 17 75 47 69 63 57 19 Base Assembly ...

Page 94: ...de fence right 1 PCS 33 SGG 1038A 托架側板 Side fence left 1 PCS 35 AHN 1922 CE 擋水板附件 Splash shield 1 PCS 37 AHN 1916A 水槽護蓋 Coolant cover 1 PCS 39 AHN 1914 護蓋 Cover 1 PCS 41 SGG 1055 大油缸護蓋 Main cylinder cover 1 PCS 43 SGG 1040 油泵護蓋 Pump cover 1 PCS 45 AHN 1908 座板 電器箱 Control box base plate 1 PCS 47 AGB 70801 控制箱 Control box 1 PCS 49 OPR 5001D 滾輪 Roller 1 PCS 51 PP 14280 軸承 6305 ZZ Bearing 6305ZZ 2 PCS...

Page 95: ...SH 7550S series PART LIST S1 1010726 10 4 11 7 21 19 41 17 15 5 3 39 1 29 37 25 27 23 35 33 31 13 9 43 Saw bow assembly ...

Page 96: ... PCS 15 AGI 3121 上輪 Idle wheel 1 PCS 17 AGI 3126 下輪 Drive wheel 1 PCS 19 NGG 3141 上輪軸 Idle wheel shaft 1 PCS 21 SDM 1019 上輪軸承墊圈 Washer 1 PCS 23 PP 14705 軸承 33013 Bearing 33013 2 PCS 25 PP 14963 止動環 Stop ring 1 PCS 27 PP 14913 有槽螺母 AN13 Slotted nut AN13 1 PCS 29 SDM 1037B 上輪軸承蓋 Bearing cover 1 PCS 31 SDM 10280 右導輪座組 Right guide roller assembly 1 PCS 33 SDM 10290 左導輪座組 Left guide roller assembly 1 P...

Page 97: ...SH 7550S series PART LIST S1 1010726 10 6 3 1 23 35 19 17 25 41 21 39 15 5 37 27 13 7 9 11 31 43 45 33 29 Lifting roller device assembly S7550 20400 ...

Page 98: ...G 1026W 上浮施力板 Lifting leverage plate 1 PCS 21 SGG 1028 上浮擋水環 Seal 1 PCS 23 SGG 1030 上浮馬達座 Lifting device motor seat 1 PCS 25 SGG 1031 上浮鏈條護蓋 Lifting device chain cover 1 PCS 27 S5542 2051 1 上浮施力板固定座 2合1 Lifting leverage plate seat 2 in 1 PCS 29 PP 13108 乾式軸承 MB2025 DU bushing MB2025 1 PCS 31 PP 91308 等高螺絲 Cap screw 1 PCS 33 PP 13265 自潤軸承 LFB 7040 Oiless bearing LFB 7040 1 PCS 35 AHB 0211B 施力板插銷 一 ...

Page 99: ...SH 7550S series PART LIST S1 1010726 10 8 21 19 17 13 15 11 9 1 3 7 5 31 29 27 25 23 Chip conveyor assembly AGF C001 ...

Page 100: ...iral shaft 1 PCS 11 AHA 2043 除屑機固定片 Fixed plate 1 PCS 13 AHB 2019B 傳動鍊輪 小 Driving chain wheel 2 1 PCS 15 AHB 2019A 傳動鏈輪 大 Driving chain wheel 1 1 PCS 17 AHB 2020B 軸承座 Bearing seat 1 PCS 19 AHB 2023A 鏈輪軸 Chain wheel shaft 1 PCS 21 AHB 2026 泵連接板 Connecting plate 1 PCS 23 PP 14003 軸承 6202VV Bearing 6202VV 2 PCS 25 PP 31640 1 油壓馬達 Hydraulic motor 1 PCS 27 PP 43117 流量閥 Flow vlave 1 PCS 29 PP 52097 扣環 S...

Page 101: ... PART NAME QTY UNIT 1 AHA 1202 鋼刷皮帶輪 Belt wheel 1 PCS 2 AHA 1207 皮帶輪軸 鋼刷 Belt wheel shaft 1 PCS 3 AHA 1211 軸承座 Bearing seat 1 PCS 4 PP 58109 扣環 R32 Snap ring R32 1 PCS 5 PP 14272 軸承 6201V Bearing 6201V 1 PCS 6 PUC 020 油嘴 1 4 28UNF Oil nipple 1 PCS 7 銷ψ3 25L Pin 1 PCS ...

Page 102: ...SH 7550S series PART LIST S1 1010726 10 11 27 3 11 1 15 13 23 17 5 19 25 33 21 31 7 9 29 Blade motor assembly ...

Page 103: ...S 11 AHB 0304 馬達活動軸 Motor movable shaft 1 PCS 13 AHB 0305 馬達定位板 Motor postion plate 1 PCS 15 AHB 0613 上輪鎖緊墊圈 Motor pulley lock washer 2 PCS 17 AHB 1201 鋼刷普利護蓋 Pulley cover 1 PCS 19 AHG 0306 馬達調整板 Motor adjusting plate 1 PCS 21 AHG 0403 鋼刷普利護蓋 二 Wire brush pulley cover 2 1 PCS 23 AHK 3634 1 普利護蓋組 Pulley cover 1 PCS 25 AHK 3634 2 普利護蓋組 Pulley cover 1 PCS 27 SJM 4032 S1 普利護蓋固定板 Pulley cover bracket 2...

Page 104: ...insert 1 PCS 7 AHA 0704A 下壓座 EU79用 Clamping seat 1 PCS 9 AGB 70410A 下壓軸承座銷 Pin 1 PCS 11 AGB 70416 鎢鋼片 回程 彈簧 Locked pistion 1 PCS 13 AGB 70716 鎢鋼片鎖緊活塞 Spring 1 PCS 15 PP 59070 O型環 P 14 O Ring 1 PCS 17 AGB 70715 鎢鋼片油缸 Cylinder 1 PCS 19 PBA 5 30 內六角螺絲 Bolt 2 PCS 21 AHA 0707C 導輪軸 三 Guide shaft 3 1 PCS 23 SDM 1034 導輪軸 長 Guide shaft long 1 PCS 25 PP 14270 軸承 6200 Bearing 6200 4 PCS 27 SDM 1035 導輪墊圈 Wash...

Page 105: ...rt 1 PCS 7 AHA 0704A 下壓座 EU79用 Clamping seat 1 PCS 9 AGB 70410A 下壓軸承座銷 Pin 1 PCS 11 AGB 70416 鎢鋼片 回程 彈簧 Locked pistion 1 PCS 13 AGB 70716 鎢鋼片鎖緊活塞 Spring 1 PCS 15 PP 59070 O型環 P 14 O Ring 1 PCS 17 AGB 70715 鎢鋼片油缸 Cylinder 1 PCS 19 PBA 5 30 內六角螺絲 Bolt 2 PCS 21 AHA 0707D 導輪軸 三 Guide shaft 3 1 PCS 23 SDM 1034A 導輪軸 長 Guide shaft long 1 PCS 25 PP 14270B 軸承 6200DDU Bearing 6200DDU 4 PCS 27 SDM 1035 導輪墊圈 ...

Page 106: ...SH 7550S series PART LIST S1 1010726 10 15 5 61 59 39 41 31 11 9 7 13 51 27 25 17 15 47 45 43 33 53 29 23 21 19 37 35 49 3 1 55 57 ...

Page 107: ...shaft 1 PCS 27 AHB 0532 鋼刷護蓋活動板 Movable plate 1 PCS 29 AGB 70220 銷螺絲 Water pipe fixed bracket 1 PCS 31 SGG 1005W 前活動虎鉗 Front movable vise 1 PCS 33 AGB 70378 下限定位支桿 Lower limit positioning rod 2 PCS 35 AGB 70425B 冷卻水噴嘴 Spray nozzle 2 PCS 37 AGB 70431 水路板 Coolant hydraulic connector un 2 PCS 39 AGB 70804 開關固定板 Switch fixed plate 1 PCS 41 AHA 0140 NC 上限開關固定座 Upper limit switch seat 1 PCS 43 AHA 0672 ...

Page 108: ...SH 7550S series PART LIST S1 1010726 10 17 VIBRATION DAMPER 3 41 5 17 23 11 29 9 35 7 25 33 27 37 39 13 15 31 21 19 1 AGB 33010 ...

Page 109: ...asher 1 PCS 15 AGB 3307 牛油擋 Grease cover 1 PCS 17 PUC 020 油嘴 Oil nipple 1 PCS 19 AGB 3303R 防震座 Vibration damper seat 1 PCS 21 AGB 3305 固定導輪軸 Shaft 1 PCS 23 PPA 16 平面華司 Washer 1 PCS 25 PP 14267 軸承 62032R Bearing 62032R 4 PCS 27 PLA 10 16 外六角螺絲 Hexagon bolt 1 PCS 29 PP 91366 直銷 Pin 1 PCS 31 AGB 3306N 防震彈簧座 Spring holder 1 PCS 33 POA 16 螺母 Nut 1 PCS 35 PP 57403 彈簧 TH 1625 Spring TB 1625 1 PCS 37 PBA ...

Page 110: ... 歪斜檢知本體 Deviation detector body 1 PCS 3 AHC 3302B 偵測底板 Detector plate 1 PCS 5 AHC 3304 偵測板轉軸 Detector plate shaft 1 PCS 7 AHC 3305B 歪斜檢知護蓋 Deviation detector cover 1 PCS 9 AHC 3006 偵測板 Detector plate 1 PCS 11 M3L 9 10 微動彈簧 Spring 1 PCS 13 NGG 3303 鎢鋼頂針 Tungsten steel push rod 1 PCS 15 NGG 3309 偵測彈簧座 Detecting spring seat 1 PCS 17 PP 90419 近接開關 Switch 1 PCS ...

Page 111: ... AGB 707270 ITEM PART NO PART NAME PART NAME QTY UNIT 1 AGB 70727 濾油器本體 Oil filter body 1 PCS 3 AGB 70730 濾油器蕊 Filter 1 PCS 5 PP 59531 O 形環 G 45 O Ring G 45 1 PCS 7 AGB 70729 濾油器彈簧 Filter spring 1 PCS 9 AGB 70728 濾油器蓋 Filter cap 1 PCS 11 PQA 6 彈簧華司 公 spring washer 3 PCS 13 PBA 6 25 有頭內六角螺絲 公 bolt 3 PCS ...

Page 112: ... 6 VHULHV 3 57 67 9 21 41 3 57 5 2 66 0 3 57 12 SH 7550S series PART LIST S1 1010726 COSEN C C C C CO O O O OS S S S SE E E E EN N N N N 10 21 ...

Page 113: ...ʳ ʳ ʳ 3 6 33 RLO VHDO ई ʳ 3 6 33 WDSHU UROOHU EHDULQJ ၗࢭʳ 6 3 6 33 VQDS ULQJ ڬ ᛩʳ ʳ 5 3 6 33 WDSHU UROOHU EHDULQJ ዞᙗၗࢭʳ ʳ 6 3 6 33 RLO VHDO ई ʳ ʳ 3 6 EHDULQJ FDVH ၗࢭஆʳ ʳ 3 6 3 EROW ڶ ᙰփքߡᝅ ʳ 0 3 6 6 ZLUH EUXVK SXOOH ᙓࠧཏ ܓ ʳ ʳ 3 6 3 VHW VFUHZ ַ ב ᝅ ʳ 0 3 6 33 EHDULQJ ၗࢭʳ ʳ 6 3 6 SDFNLQJ ᓛථ ጹ ف ʳ ʳ 3 6 ZRUP FDS ᓛථ ʻদʼʳ ʳ ʳ 3 6 3 EROW ڶ ᙰփքߡᝅ ʳ 0 3 6 3 փքߡႾᙰʳ 37 ϛ 3 6 SOXJ ຘ Ⴞᙰʳ ʳ ʳ 3 6 3 VHW VFUHZ ַ...

Page 114: ......

Page 115: ...d normally acceptable practices This warranty does not apply if the machine has been altered or modified without our prior written consent In the case of components or units purchased by Seller including work holding devices tool holders motors and controls the warranty shall not exceed that received by Seller from the supplier of such components or units Seller will not assume responsibility for ...

Page 116: ......

Page 117: ......

Page 118: ... Vertical Plate Saws Horizontal Billet Saws NC CNC Band Saws Structural Miter Cutting Saws Automatic Band Saws Industry 4 0 Cosen Predictive Computing Visit our website at www cosen com COSEN MECHATRONICS CO LTD ...

Reviews: