background image

31 

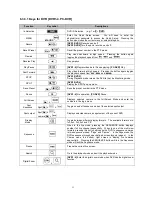
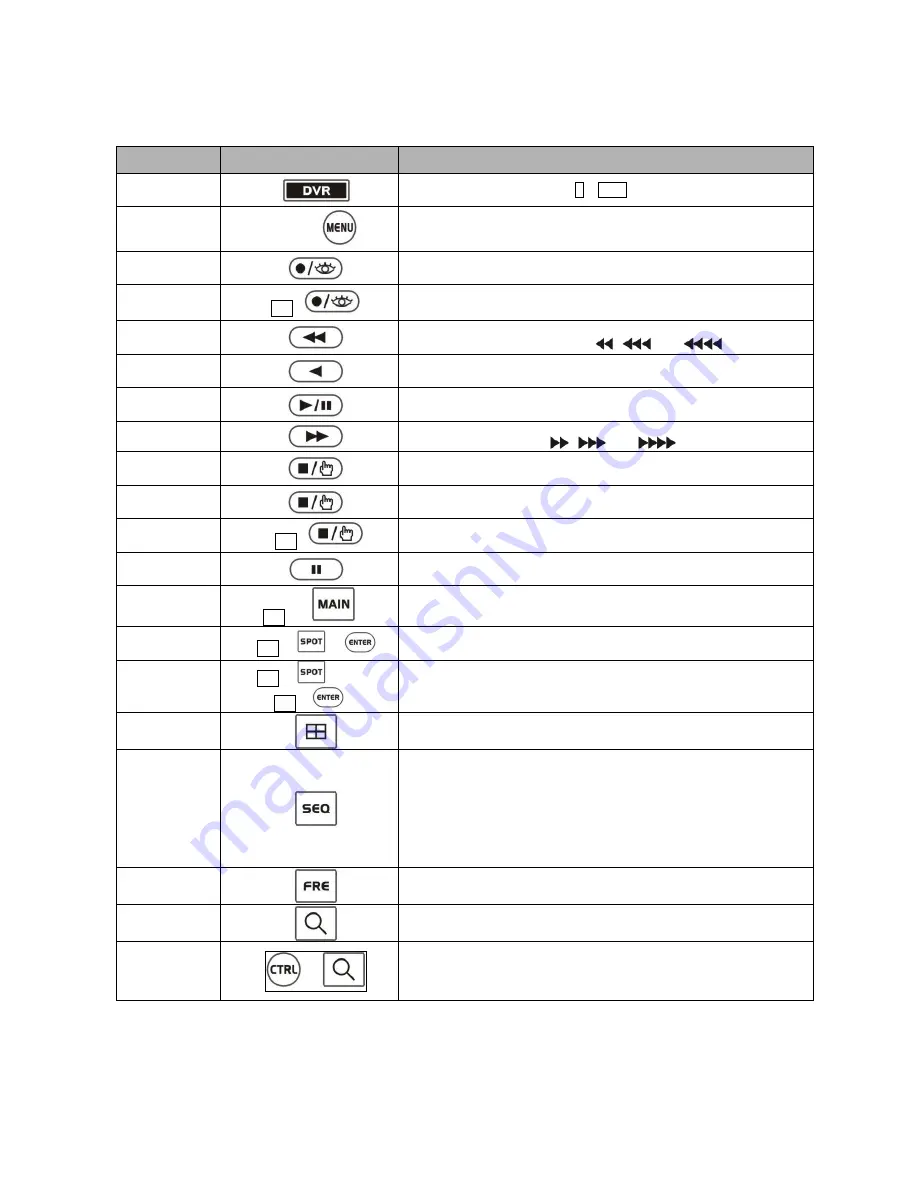
6.3.3.1 Keys for DVR [DVR1-4, PC-DVR] 

Function 

Key Label 

Descriptions 

Id Selection 


DVR ID Selection.    (e.g.:1 or 

2

 + 

DVR

). 

MENU 

MACRO


Enter  the  Quick  Setup  screen.    You  will  need  to  enter  the 
administrator  password  to  access  the  Quick  Setup.    Pressing  the 
button also closes the current menu or setup dialog box. 

Record 


[DVR1,DVR3]

 Record on and off.   

[DVR2,DVR4]

 Turn the panic record on and off. 

Recall Preset 

No. +


Recall the preset number in the PTZ mode. 

Rewind 


Play  video  backward  at  high  speed.    Pressing  the  button  again 
toggles the playback speed from 

  and 

Reverse Play 


No operation 

Play/Pause 


[DVR1- 4]

Play recorded data / Pause playing. 

[PC-DVR] 

Play 

Fast Forward 


Play  video  forward  at  high speed.    Pressing the button  again  toggles 
the playback speed from 

  and 

STOP 


[DVR1,DVR2] 

During Playback mode returns the DVR to the Live Monitoring mode. 

SPOT 


[DVR3,DVR4] 

Display the SPOT pop-up menu.   

Save Preset 


No. +


Save the preset number in the PTZ mode. 

Pause 


[DVR1- 4] 

No operation, 

[PC-DVR] 

Pause 

Full Screen 

No.    + 


Displays  selected  camera  in  the  full-Screen  Mode  and  enter  the 
numbers in the login menu. 

Spot 

Sequence 

Spot 

No. + 

  + 


Toggle on and off sequence mode of the selected spot output. 

Spot output 

Spot 

No. + 

+   

camera 

No. + 


Displays selected camera as spot output of the current DVR . 

Display 

Mode 


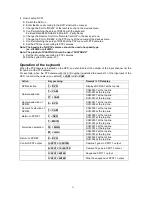
Toggle  between  different  display  formats.    The  available  formats  are: 
full, 4x4, 3x3, 2x2 and PIP. 

Sequence 


When  in  the  live  mode,  pressing  the  SEQUENCE  button  displays 
another  full  live  channel  sequentially.    When  in  one  of  the  multi-view 
formats, pressing this button will cause the DVR to sequence cameras 
in two sequence modes: 

“Page” and “Cameo”.    In the Page mode, the 

DVR sequences through user-defined screen layouts (pages).    In  the 
Cameo  mode,  the  bottom,  right  screen  to  display  live  cameras 
sequentially.    Pressing the SEQUENCE button while in the Sequence 
mode will exit the Sequence mode. 

Freeze 


Freeze the current live screen. 

Search 


Go to the playback mode and exit the playback mode.   

Digital Zoom 

  + 


[DVR1- 4] 

Enter the digital zoom mode when DVR has the digital zoom 

function. 


Summary of Contents for CDC2500LX

Page 1: ...ram preset positions from the selected dome camera Master keyboard can be connected to up to 3 slave keyboards of the same type Controls up to 99 DCR systems remotely at each controller Controls up to 254 dome cameras including 64 cameras with alarm mode Downloads up to 2 dome cameras programmed data to non volatile memory and later uploads the data to the new dome camera Scan range of 32 254 or 3...

Page 2: ...h with arrowhead symbol within an equilateral triangle is intended to alert the user to the presence of uninsulated dangerous voltage within the product s enclosure that may be of sufficient magnitude to constitute a risk of electric shock to persons The exclamation point within an equilateral triangle is intended to alert the user to the presence of important operating and maintenance servicing i...

Page 3: ...ENCE TO RADIO COMMUNICATIONS OPERATION OF THIS EQUIPMENT IN A RESIDENTIAL AREA IS LIKELY TO CAUSE HARMFUL INTERFERENCE IN WHICH CASE THE USER WILL BE REQUIRED TO CORRECT THE INTERFERENCE AT HIS OWN EXPENSE Set Baud Rate DOME1 9600 DOME2 9600 RS 232 9600 CAUTION CHANGES OR MODIFICATIONS NOT EXPRESSLY APPROVED BY THE PARTY RESPONSIBLE FOR COMPLIANCE COULD VOID THE USER S AUTHORITY TO OPERATE THE EQU...

Page 4: ...cement of the obsolete outlet 10 Protect the power cord from being walked on or pinched particularly at plugs convenience receptacles and the point where they exit from the apparatus 11 Only use attachments accessories specified by the manufacturer 12 Unplug this apparatus during lightning storms or when unused for long periods of time 13 Refer all servicing to qualified service personnel Servicin...

Page 5: ... 6 Dip Switch Settings 10 2 7 Multiplexer Configuration 10 Chapter 3 Keyboard Setup 12 3 1 Configuration 12 Change User Password 12 Change Administrator Password 13 3 2 Network 13 Set Port 13 Set Baud Rate 13 Com Ports 14 MUX Config Multiplexer Configuration 14 Set Slave Kbd 17 Slave KBD Unit 17 3 3 Camera 17 3 4 Time Date 18 3 5 ALARM 18 3 6 LCD 19 3 7 DATA BANK 19 3 8 INITIALIZATION 20 3 9 HOLD ...

Page 6: ... 3 Summary of Keyboard Controls 28 6 3 1 Keys for Dome camera 29 6 3 2 Keys for Multiplexer 30 6 3 3 1 Keys for DVR DVR1 4 PC DVR 31 6 3 3 2 Example of Key operation in PC DVR 33 6 4 DVR5 protocol for the DVR for the version 3 1 0 and over 34 Appendix A Short Cut Key 39 Appendix B Trouble Shooting 41 Appendix C OPTIONAL JUNCTION BOX 41 Appendix D SPECIFICATION 42 ...

Page 7: ...o levels of password are supported for higher security administrator and user Up to 254 dome cameras controllable including 64 dome cameras with Alarm mode Multiplexers Max 255 and DVR system Max 99 can be controlled remotely at each KBD controller regardless Master or Slave Using 3 5 multiplexers and 4 Keyboard controllers 32 64x4 matrix system can be configured Up to 3 slave of the same type key...

Page 8: ...red to install the KBD controller Refer to the installation manuals for the other items that make up part of your system 1 4 Connectors DOME2 DOME1 DATA2 DATA1 DC12V RS232 G G CONNECTOR USAGE RS232 RS232 DVR UPGRADE DOME2 RS485 DOME DVR MULTIPLEXER SLAVE KEYBOARD DOME1 RS485 DOME DATA2 FOR JUNCTION BOX ONLY DATA1 FOR JUNCTION BOX ONLY DC12V FOR POWER SUPPLY NOTE DON T CONNECT THE DATA1 PORT AND DC...

Page 9: ...3 Chapter 2 Installation and Configuration 2 1 Basic Configuration of Fastrax Dome System Figure 2 Basic installation diagram ...

Page 10: ...4 2 2 Configuration with DVR Figure 3 installation diagram with DVR ...

Page 11: ...5 2 3 Configuration with MUX Figure 4 installation diagram with MUX ...

Page 12: ...ion of Master and Slave Keyboards Figure 5 Master and Slave keyboard connection Note Connect the DOME1 port of all slave keyboards to the DOME2 port of the master keyboard and set the DIP SW 1 and 2 as the figure above ...

Page 13: ...7 Without J BOX Master Keyboard Setting Slave Keyboard Setting 1 1 Dip switch the of S1 is ON 2 2 3 4 th 8 ...

Page 14: ...8 With J BOX Master Keyboard Setting Slave Keyboard Setting 1 1 Dip switch the of S1 is ON 2 2 3 4 th 8 ...

Page 15: ...e the data line terminated by setting the DIP switch Without proper termination there is potential for control signal errors Total length of the cable for communication should not exceed 4000ft 1 2Km Refer to Figure 6 for setting the dome camera and keyboard controller termination Figure 6 Termination ...

Page 16: ...tatus of your multiplexer by pressing the Menu key of the multiplexer and then selecting item 9 If you see the Protocol option line in the Communication Setup menu your multiplexer has the new ROM and you do not need to replace the ROM If your multiplexer has the old ROM version contact your distributor on how to get new a ROM CAUTION Before opening the multiplexer make certain you are working on ...

Page 17: ...this line the multiplexer has the new ROM The old ROM version does not show Protocol selection option Multiplexer alarm inputs will function normally but the Dome controller has no way of knowing about alarms wired to the Multiplexer If a Dome preset is required for such an alarm you must connect the same alarm input to both the multiplexer and Dome Triplex setup Unit setup Network Type RS 485 Bau...

Page 18: ...er elapsed setup time keyboard locks automatically User needs the login password to operate the Keyboard again 3 S Range 32 Scan Range 32 254 3999 scan dome cameras up to setting number 4 Chg User PW Enters the change user password submenu 5 Chg Admin PW Enters the change administrator password submenu 6 Rescan dome Rescan the connected dome cameras Save and exit Save the changed settings and retu...

Page 19: ...connected unit s protocol 3 MUX Config Set the multiplexer configuration 4 Set Slave KBD Select to use the slave keyboard or not Save and exit Save the changed settings and return to the previous menu Set Port Set Baud Rate Enters the Baud Rate setup submenu Com Ports Enters the Communications Ports setup submenu Exit Return to the previous menu Set Baud Rate J BOX OFF J BOX ON Current PW XXXX NEW...

Page 20: ...ort displays the same DVR only To change the DVR number at the other port first change the current DVR number to none Note JBOX is an optional device that is not included with the KBD JBOX menu has to be set to OFF in the menu if you do not have this optional JBOX MUX Config Multiplexer Configuration This screen allows you to set multiplexer switching settings when you select the camera by pressin...

Page 21: ...olumn by the joystick 2 Twist the joystick handle to change the value 3 Move the cursor on the MUX column by the joystick 4 Twist the joystick handle to change the value 5 Move the cursor on the In column by the joystick 6 Twist the joystick handle to change the value 7 Press CTRL or ESC to exit 8 To save data move the joystick right on Save and Exit row in MUX Config Press OFF to delete the camer...

Page 22: ... 1 Cam 5 18 Cam 2 Cam 6 19 Cam 3 Cam 7 Dome ID Mux 03 Cam 4 Cam 8 Cam 1 Cam 5 Cam 9 Cam 2 Cam 6 Cam 10 Cam 3 Cam 7 Cam 11 Cam 4 Cam 8 Cam 12 Cam 5 Cam 9 Cam 13 Cam 6 Cam 10 Cam 14 Cam 7 Cam 11 Cam 15 Cam 8 Cam 12 Cam 16 1 2 3 4 5 6 7 8 9 10 11 12 13 14 15 16 Mux 04 Cam 9 Cam 13 Aux 1 Cam 1 Cam 10 Cam 14 Aux 2 Cam 2 Cam 11 Cam 15 Aux 3 Cam 3 Cam 12 Cam 16 Aux 4 Cam 4 Cam 13 Aux 1 Cam 5 Cam 14 Aux 2...

Page 23: ... and exit Save the changed settings and return to the previous menu Slave KBD Unit This setup allows you set up the slave keyboard how many slave keyboards To use the slave keyboard set ON 3 3 Camera Cam Camera ID PR Protocol F2 F2E P D PELCO D P P PELCO P PT Port D1 DOME1 D2 DOME2 BR Baud rate This camera setup is listed up to 64 cameras and the camera ID has up to 3999 When the keyboard has that...

Page 24: ...to exit without saving Note The baud rate of the F2E is according to the value of the set baud rate menu When the keyboard has that the alarm check option is OFF the camera setup displays the blank value after the first power on At this time set all cameras according to the procedure above 3 4 Time Date Set the KBD controllers Time Date 3 5 ALARM 1 Alarm Check When set to ON the KBD controller wil...

Page 25: ...ading if success press ENTER After downloading if fail press ENTER After downloading it displays as the right figure To upload select the upload and push the joystick to the right To clear the saved data select the clear data and push the joystick to the right LCD 1 Bright 03 2 Backlight ON Save and Exit Data Bank 1 Download 2 Download Exit ESC Data Bank 1 0001E 2 Download Data Bank 1 Upload Clear...

Page 26: ...ol the dome the slave keyboard and the unit from the AUX IN mode dome2 port cannot control the dome INF Infinite Slave Keyboard user never has the right to control the dome which is selected by master Keyboard users 1 200 second After select hold time the slave keyboard can control the dome When the dome ID of the master keyboard is not the same as the slave keyboard or the one from AUX IN mode do...

Page 27: ... If you setup all connection correctly and turn on slave keyboard you should see following screen Current Device ID 1 Default setting is 9 9 9 9 for administrator 1 1 1 1 for user means that the controller is not connected to master keyboard 3 Press CTRL MENU Set the Slave ID to 01 Ver x x Slave1 Password xxxx Not connected MAIN MENU 1 Configuration 2 Network 3 LCD 4 Initialization Exit ESC Config...

Page 28: ...s connection enables DVR control remotely from KBD controller 2 How to setup the KBD controller A Turn the Keyboard ON B Input password Factory setting is 9 9 9 9 C Open the menu of the KBD controller by pressing CTRL MENU Key D Set as below in Network menu 3 How to setup DVR A Press OK and the below screen will be appeared Set Baud Rate DOME1 9600 DOME2 9600 RS232 9600 Com Ports DOME1 Dome DOME2 ...

Page 29: ...ice menu Unit ID should be 1 up to 99 Unit ID is not allowed number 0 D Set PTZ Device and ID of the dome camera Select RS232 RS485 after PTZ is installed and then set up as below table RS232 RS485 Baud Rate Parity Data Stop Usage RS232 9600 None 8 1 Remote Control RS485 9600 None 8 1 PTZ Control ...

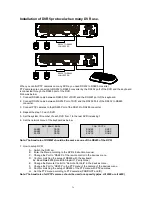
Page 30: ...PC DVR please proceed as the following order Figure 11 PC DVR Connection Diagram 1 Connect RS 232C cable between RS 232C Port of PC DVR and RS 232C port of the Keyboard This connection enables PC DVR control remotely from KBD controller 2 Plug the RS 232C TO RS 485 converter in the RS 232C Port of PC DVR Connect wires between the TX of converter and DOME2 of Keyboard This connection enables PC DVR...

Page 31: ...t camera input number that dome camera connected Then install as below to select set up PTZ after checking PTZ box D If PTZ is not necessary for PC DVR cable and installation here is not needed PC DVR is able to be controlled remotely and there s no PTZ function Port COM1 RX Device Fastrax Baud Rate 9600 Data 8 Parity None Stop Bit 1 ...

Page 32: ... box please install as below to select Setup remote control Device ID is not allowed number 0 C Make sure if any change is appeared on screen to press QUAD Next Screen button of a controller for basic testing If there s no change appeared check cable connection and installation again Port COM2 Baud Rate 9600 Date 8 Parity None Stop Bit 1 Device ID XX ...

Page 33: ...ameras and regular cameras can be mixed The keys PIP 2x2 3x3 4x4 ZOOM SET etc are keys that are used to operate the multiplexer 6 2 1 Selecting Multiplexer Duplexer Press MACRO MENU key to enter Multiplexer set up menu and hold down the ENTER Key while navigating using the joystick ENTER Joystick Triplexer Push the Joystick upward with the ENTER pressed ENTER Joystick will show the Mux menu It wil...

Page 34: ...ultiplexer Example 1 MUX 2 SPOT 12 ENTER will switch camera 12 on multiplexer 1 to the spot output 2 of multiplexer 1 2 MUX 1 SPOT 16 ENTER will switch camera 16 on multiplexer 2 to the spot output 1 of multiplexer 2 6 3 Summary of Keyboard Controls Key operation example CTRL MENU Press and hold down CTRL Key and press MENU Key 1 CAM Press 1 Key CAM Key sequentially CTRL JOYSTICK Press and hold do...

Page 35: ...directly Recalls programmed presets or functions sequentially e g 1 TOUR Pattern Pressing PTRN will bring up the pattern programming menu directly Repeats the selected pattern of the current dome camera e g 1 PTRN Auto Scan Pressing Scan will bring up the Auto Scan programming menu Calls Auto panning function e g 2 SCAN repeats Auto Scan 2 Configurati on Enters programming menu CTRL MENU will invo...

Page 36: ...CRO Same as Menu key in the Duplexer model Same as Macro key in the Triplexer model Select or Alarm SEL Same as Select key in the Duplexer model Same as Alarm key in the Triplexer model Freeze Freeze the video from the currently selected camera Digital Zoom ZOOM Enter the Zoom Mode Sequence Put the multiplexer in the Sequence Mode VCR VCR Switch the multiplexer into VCR playback mode SET SET This ...

Page 37: ...in the PTZ mode Pause DVR1 4 No operation PC DVR Pause Full Screen No Displays selected camera in the full Screen Mode and enter the numbers in the login menu Spot Sequence Spot No Toggle on and off sequence mode of the selected spot output Spot output Spot No camera No Displays selected camera as spot output of the current DVR Display Mode Toggle between different display formats The available fo...

Page 38: ...ode Go last PC DVR Go last Go last PC DVR Go last X times Forward play 1 9 PC DVR Fast play at x No times speed X times Backward play 1 9 PC DVR Fast rewind at x No times speed PTZ DVR1 4 Open a Pan Tilt Zoom screen which allows you to control properly configured PTZ cameras Manual Focus When a PTZ camera is connected to the DVR it can control the focus Moving the Zoom handle reactivates Auto Focu...

Page 39: ...se NO ACTION Play Fast Forward NO ACTION Forward one image X times Forward play 1 9 NO ACTION Fast play at x No times speed STOP NO ACTION Go to Guard mode Save Preset No Save Preset Pause NO ACTION Pause in playing Full Screen No NO ACTION Spot Sequence Spot No Operate according to the model or not Spot output Spot No camera No Operate according to the model or not Display Mode Change Display Mod...

Page 40: ...etween RS 232 Port of DVR and DVR port of the J box This connection enables DVR control remotely from KBD controller 2 Connect RS485 cables between the DVR and PTZ cameras 3 Connect the power jack to the power port of the keyboard A Input password Factory setting is 9 9 9 9 B Open the menu of the KBD controller by pressing CTRL MENU Key C Set as below in Network menu Note The baud rate of DVR AUX ...

Page 41: ...ber of the PTZ camera For example when the PTZ camera with the 5 ID number is installed the number 1 of the input jack of the DVR to control the camera you select 1 CAM not 5 CAM Action Key pressing Remark LCD display DVR selection 1 DVR Displays DVR 001 at the top line Camera selection 1 CAM CAM 0001 at the top line DVR 001 at the top line 17 CAM CAM 0017 at the top line DVR 001 at the top line C...

Page 42: ... last DVR increasing 1 6 Set the network menu of the keyboard as below Note The baud rate of DOME1 should be the same as one of the RS485 of the DVR 7 How to setup DVR A Switch the DVR on B Enter the Menu according to the DVR s instruction manual C Change the Port to RS485 of the remote control in the devices menu D Confirm matching the setup of RS485 with the keyboard Ex Baud Rate 9600 Data Bit 8...

Page 43: ...ats Auto Scan 2 Configuration MENU Enters programming menu CTRL MENU will invoke Keyboard set up menu Program CTRL No CTRL PRST will store current view as a preset directly No CTRL TOUR will open programming menu No CTRL SCAN will open programming menu Control CTRL CTRL Joystick In a programming mode Preset Pattern Scan Privacy the joystick operates as if in the normal control mode While pressing ...

Page 44: ...rrent live screen Zoom Display the digital zoom screen Sequence Sequence Display Mode Toggle between different display formats The available formats are full 4x4 3x3 2x2 and PIP Display Mode 1 2 3 4 QUAD PIP 1 Quad 2x2 2 Quad 3x3 3 Quad and 4x4 4 Quad Enter Select a highlighted item or completes an entry that you have made Spot Sequence Spot No SPOT ENTER Toggle on and off sequence mode of the sel...

Page 45: ...hange AE to AUTO 8 OFF Change AE to manual 9 ON Change Night Shot to AUTO 10 ON Night Shot on go to the manual mode 10 OFF Night Shot off go to the manual mode 11 ON BLC on AE auto mode 11 OFF BLC off AE auto mode 12 ON Digital Zoom on According to digital zoom setting 12 OFF Digital Zoom off 13 ON Dome OSD on 13 OFF Dome OSD off 14 ON Dome Area Title Display on 14 OFF Dome Area Title Display off ...

Page 46: ...e normal speed mode 154 ON Display System Information 155 ON Flip the camera in the 180 area horizontally 250 PRESET Set the dome ID up to 3999 888 ENTER Night Shot on in the global mode only 999 ENTER Night Shot off in the global mode only For Keyboard controller 777 ENTER Lock the keyboard controller To unlock the keyboard enter the password of the Keyboard Some function may not operate accordin...

Page 47: ...e BNC cable into the proper input of the multiplexer Forgot password Consult your supplier distributor or service Center Multiplexer DVR can t work with the Joystick controller Check that the data cable for the multiplexer has the correct Pin configuration 1 1 2 2 3 3 8 8 Check the communication menu of Multiplexer Appendix C OPTIONAL JUNCTION BOX Description Q ty Junction box J box 1 3m 8pin cabl...

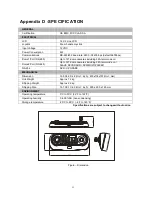
Page 48: ... Port RS 485 Up to 127 dome cameras including 32 Alarm mode on SLAVE KEYBOARD DVR MULTIPLEXER RS 232 DVR UPGRADE MECHANICAL Dimension 15 9 X6 9 X 4 2 Unit inch 405x176x107 Unit mm Unit Weight Approx 1 2 kg Shipping Weight Approx 2 2 kg Shipping Size 19 7 X9 1 X 6 3 Unit inch 500 x 230 x 160 mm ENVIRONMENT Operating temperature 0 C to 50 C 32 F to 122 F Operating humidity 0 to 90 RH non condensing ...

Page 49: ...MEMO ...

Page 50: ......

Page 51: ...50302196D PRINTED IN KOREA I n s t r u c t i o n M A N U A L Keyboard Controller ...

Reviews: