Part 1 – Introduction
12
•
Check the wall or ceiling to see if it needs to be
reinforced. The camera may fall off if the wall or
ceiling is not strong enough to support its weight.
•
Install the camera in a shaded area. If the camera
is installed in direct sunlight, it may be affected
adversely.
Manual Iris Lens
1
Remove the protective cover from the camera.
2
Turn the lens in clockwise direction and mount it on
the camera.
3
Rotate the lens' iris ring to open up the iris and then
adjust accordingly.
DC Type/P Type Auto Iris Lens
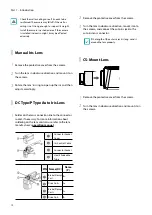
1
Solder on the lens connection line to the connector
socket, if necessary. For more information about
soldering on the lens control wire, refer to the lens
manufacturer's
operation manual
.
1
Connector Socket
Cover
2
Iris Control Cable
3
Connector Socket
4
Heat-Shrinkable
Tube
PIN Name (DC)
Name
(P)
1
Brake (Damp)
Coil -
B+
2
Drive Coil +
A+
3
Brake (Damp)
Coil +
A-
4
Drive Coil -
B-
2
Remove the protective cover from the camera.
3
Turn the lens in clockwise direction, mount it on to
the camera, and connect the auto iris jack to the
auto iris lens connector.
If the length of the auto iris jack is long, wind it
around the lens properly.
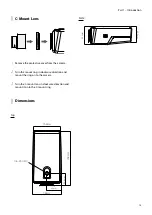
CS-Mount Lens
1
Remove the protective cover from the camera.
2
Turn the lens in clockwise direction and mount it on
the camera.


