background image

• Outdoor use only. DO NOT use the grill indoors or in an enclosed or non-ventilated 

area.

• Keep a fire extinguisher near this product at all times.

• For household use only. DO NOT operate this grill for other than its intended use.

• Some parts of this grill have been re-oiled at the factory. Please burn off the oils before 

cooking

• Do not wear loose clothing when using the grill or allow hair to come in contact with the 

grill.

• Never use the grill on a wooden surface or other flammable surfaces. Use the grill only 

on a hard, stable surface that can support the grill weight.

• Keep 3M of clearance between grill and any combustible materials when grill is in use 

(including, but not limited to bushes, shrubs, trees, leaves, grass, wooden decks or 

fences, buildings, etc. )

• Keep the grill away from gasoline and/ or other flammable liquids, gases, vapors, or 

areas where these may be present. Do not store or use the grill in these areas.

• In windy conditions, place it in an outdoor area that is sheltered from the wind.

• Keep out of the reach of children and pets, store out of the reach of children when not 

in use.

• When moving or lifting the grill, use it cautiously to avoid back strains or injuries.

• Do not try to move the grill while it is in use.

• Don't place goods over 10 KG on each side shelf. Do not use gasoline, kerosene, or 

alcohol to light charcoal. Using any of these products or similar products could cause a 

flare up, a flash fire or an explosion. Severe bodily injuries can be a potential result.

• If using a lighter fluid to start a fire, leave the roll top hood open until briquettes area 

has shed over and lighter fluid has burned off. Closing the hood too soon could cause

fumes from the lighter fluid to accumulate inside the grill.This could cause a flare up or 

an explosion when the hood is opened.

• Do not add a lighter fluid to warm or hot coals. A flash fire may result, which could 

cause bodily injuries.

• Do not add instant light charcoal briquettes to the existing fire. A flash fire may result, 

which could cause bodily injuries.

• Do not light and operate the grill without the slide-out ash pan in place.

• Do not leave grill or hot coals and ashes unattended.

• Do not remove or empty slide-out ash pan until coals and ashes have completely 

cooled.

• Allow the unit to cool completely before conducting any routine cleaning or maintaining.

• “WARNING! This barbecue grill will become very hot, do not move it during 

operation""Do not use indoors!”

•  “WARNING! Do not use spirit or petrol for lighting or re-lighting! Use only firelighters 

complying to EN1860-3!"

WARNINGS

EN

02

03

Summary of Contents for 86152049

Page 1: ...LEBNIS GUTE PRODUKTE und EFFIZIENTEN SERVICE zu bieten Avec votre valuation inspirante COSTWAY continuera fournir une EXP RIENCE D ACHAT PRATIQUE des PRODUITS DE QUALIT et un SERVICE EFFICACE Con su c...

Page 2: ...s Do not try to move the grill while it is in use Don t place goods over 10 KG on each side shelf Do not use gasoline kerosene or alcohol to light charcoal Using any of these products or similar produ...

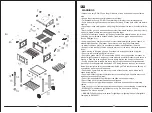
Page 3: ...Parts List Parts List Lid handle K 04 05...

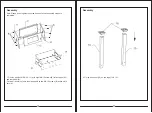
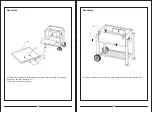
Page 4: ...bly steps are completed 1 Fix side panels LH RH 10 11 with eight M6 12 screws B to front panel 13 and rear panel 9 Fix two air doors 24 onto the side panels by two M6 12 screws B and two M6 nuts A 2 F...

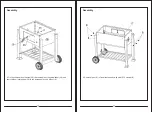
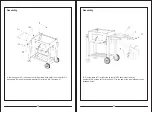
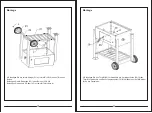
Page 5: ...ide panel Fix the two remaining legs 25 26 to the right side panel with four M6 12 screws B 4 Fix bottom shelf 21 to the legs with four M6 12 screws B Fix the wheel axle 22 into the legs 25 26 Then fi...

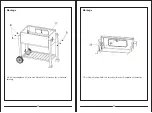
Page 6: ...rcoal door handle 28 the charcoal door handle washer 29 and charcoal door locking part 30 to the front panel by one M6 nut A 6 Charcoal pan 17 is fixed into the body with six M6 12 screws B Assembly A...

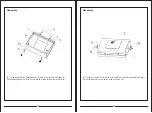
Page 7: ...13 with two M6 12 screws B 8 The lever handle 31 goes thru the front panel hole One M6 20 shoulder screw H goes thru charcoal tray connecting bar hole from inside then fixed with lever handle thread h...

Page 8: ...dle 20 and two washers 3 to Decorating strip 19 and ash tray 18 by two M6 16 screws D Then fix the ash tray to the body 10 Lower hingers 8 are fixed to the back panel 9 with four M6 40 screws C Assemb...

Page 9: ...screws B Fix side handle 34 and side handle washer 35 with two M6 70 screws I 12 Fix side table 27 to right side by four M6 20 shoulder screws H Use four M4 8 screws K to fix the hook 7 to the end of...

Page 10: ...y two M6 40 screws C Fix the upper hinges 33 to lid by four M6 40 screws C and four M6 nuts A 14 Fix the 2 air doors 24 to the lid by two M6 12 screws B and two M6 nuts A Fix the thermometer 2 on the...

Page 11: ...and lower hinges with 2 pins F and 2 R clips G Assembly 16 Fix the warming grid 5 into the lid and body See details for fixing into the body Put the cooking grids 6 on and ready for cooking Tighten al...

Page 12: ...fflammen ein Blitzfeuer oder eine Explosion verursachen Schwere K rperverletzungen k nnen eine m gliche Folge sein Wenn Sie ein Feuerzeugbenzin verwenden um ein Feuer zu entfachen lassen Sie die Rollh...

Page 13: ...an der Frontplatte 13 und der R ckwand 9 Befestigen Sie zwei Luftt ren 24 mit zwei M6 12 Schrauben B und zwei M6 Muttern A an den Seitenw nden Montage Teileliste A B C D F M6 Mutter M6 12 Schraube M6...

Page 14: ...n zwei Beinen 14 und 15 Montage 3 Befestigen Sie zwei Beine 14 und 15 mit M6 12 Schrauben B an der linken Seitenwand Befestigen Sie die beiden verbleibenden Beine 25 und 26 mit 4 St ck M6 12 Schrauben...

Page 15: ...e Radachse 22 in den Beinen 25 26 Befestigen Sie dann die 2 R der 23 mit zwei M10 Muttern J Montage 5 Befestigen Sie den T rgriff 28 f r Holzkohle die Unterlegscheibe 29 f r den T rgriff f r Holzkohle...

Page 16: ...6 Die Holzkohlepfanne 17 wird mit 6 St ck M6 12 Schrauben B im Geh use befestigt Montage 7 Der Griff 32 wird mit M6 12 Schrauben B an der Frontplatte 13 befestigt Montage 30 31...

Page 17: ...bindungsloch der Holzkohleschale und wird dann mit dem Gewindeloch des Hebelgriffs am oberen Ende befestigt Montage H 9 Befestigen Sie den Aschenbechergriff 20 und die Unterlegscheiben 3 mit M6 16 Sch...

Page 18: ...en mit M6 40 Schrauben C an der R ckwand 9 befestigt Montage 11 Der Flaschen ffner 12 wird mit M6 12 Schrauben B am linken Vorderbein befestigt Seitengriff 34 und Seitengriffscheibe 35 mit M6 70 Schra...

Page 19: ...7 mit M4 8 Schrauben K am Ende des Beistelltisches der bereits Gewindebohrungen aufweist Montage 13 Befestigen Sie den Deckelgriff 4 und die Unterlegscheibe 3 mit vier M6 40 Schrauben C am Deckel 1 B...

Page 20: ...B und M6 Muttern A am Deckel Befestigen Sie das Thermometer 2 mit einer eigenen Mutter oben am Deckel Montage 15 Der Deckel wird am K rper befestigt indem das obere und untere Scharnier mit 2 Stiften...

Page 21: ...isez le avec pr caution pour viter les tensions ou les blessures au dos N essayez pas de d placer le produit lorsqu il est en service Ne placez pas de marchandises de plus de 10 kg sur chaque tag re l...

Page 22: ...rative Poign e du cendrier Description tag re inf rieure Arbre de roue Roue Porte air Pied avant droit Pied arri re droit Table lat rale N Nr Image Qt Image Qt Rondelle de la poign e de porte au charb...

Page 23: ...s 1 Fixez les panneaux lat raux LH RH 10 11 avec huit vis M6 12 B au panneau avant 13 et au panneau arri re 9 Fixez deux portes d a ration 24 sur les panneaux lat raux l aide de deux vis M6 12 B et de...

Page 24: ...ixez les deux autres pieds 25 et 26 au panneau lat ral droit l aide de quatre vis M6 12 B 4 Fixez l tag re inf rieure 21 aux pieds avec quatre vis M6 12 B Fixez l axe de roue 22 dans les pieds 25 26 F...

Page 25: ...rondelle de la poign e de la porte charbon 29 et la pi ce de verrouillage de la porte charbon 30 sur le panneau avant l aide d un crou M6 A 6 Le plateau de charbon de bois 17 est fix dans le corps ave...

Page 26: ...B 8 La poign e levier 31 passe par le trou du panneau avant Une vis paulement M6 20 H passe travers le trou de la barre de connexion du bac charbon de l int rieur puis fixez avec le trou filet de la...

Page 27: ...ux rondelles 3 la bande d corative 19 et au cendrier 18 l aide de deux vis M6 16 D Fixez ensuite le cendrier au corps 10 Les charni res inf rieures 8 sont fix es au panneau arri re 9 l aide de quatre...

Page 28: ...rale 34 et la rondelle de la poign e lat rale 35 avec deux vis M6 70 I 12 Fixez la table lat rale 27 sur le c t droit l aide de quatre vis paulement M6 20 H Utilisez quatre vis M4 8 K pour fixer le c...

Page 29: ...C Fixez les charni res sup rieures 33 au couvercle l aide de quatre vis M6 40 C et de quatre crous M6 A 14 Fixez les 2 portes d a ration 24 au couvercle l aide de deux vis M6 12 B et de deux crous M6...

Page 30: ...les F et 2 clips R G Assemblage 16 Fixez la grille de r chauffement 5 dans le couvercle et le corps Veuillez voir les d tails pour la fixation dans le corps Mettez les grilles de cuisson 6 en place et...

Page 31: ...con precauci n para evitar tensiones o lesiones en la espalda No intente mover el producto mientras est en uso No coloque art culos de m s de 10 KG en cada estante lateral No utilice gasolina querosen...

Page 32: ...frontal 13 y al panel trasero 9 Fije las dos puertas de aire 24 en los paneles laterales con dos tornillos M6 12 B y dos tuercas M6 A Montaje Lista de Piezas A B C D F Tuerca M6 Tornillo M6 12 Tornil...

Page 33: ...de pata 16 en las dos patas 14 y 15 Montaje 3 Fije las dos patas 14 y 15 con cuatro tornillos M6 12 B al panel lateral izquierdo Fije las dos patas restantes 25 y 26 al panel lateral derecho con cuatr...

Page 34: ...de rueda 22 en las patas 25 y 26 Luego fije las 2 ruedas 23 con dos tuercas M10 J Montaje 5 Fije la manija de la puerta de carb n 28 la arandela de la manija de la puerta de carb n 29 y la pieza de bl...

Page 35: ...6 Fije la bandeja de carb n 17 al cuerpo con seis tornillos M6 12 B Montaje 7 Fije el agarre de manija 32 al panel frontal 13 con dos tornillos M6 12 B Montaje 68 69...

Page 36: ...de la barra de conexi n de la bandeja de carb n desde el interior luego fije con el orificio roscado de la manija de palanca en el extremo superior Montaje H 9 Fije la manija del cenicero 20 y dos ara...

Page 37: ...l posterior 9 con cuatro tornillos M6 40 C Montaje 11 El abrebotellas 12 se fija en la pata delantera izquierda con dos tornillos M6 12 B Fije la manija lateral 34 y la arandela de la manija lateral 3...

Page 38: ...los M4 8 K para fijar el gancho 7 al extremo de la mesa lateral que tiene orificios roscados Montaje 13 Fije la manija de la tapa 4 la arandela de la manija 3 a la tapa 1 con dos tornillos M6 40 C Fij...

Page 39: ...dos tornillos M6 12 B y dos tuercas M6 A Fije el term metro 2 en la parte superior de la tapa con su propia tuerca Montaje 15 La tapa se fija al cuerpo bloqueando las bisagras superior e inferior con...

Page 40: ...arla con cautela per evitare stiramenti o lesioni alla schiena Non tentare di spostare la griglia mentre in uso Non posizionare merci superiori a 10 kg su ogni ripiano laterale Non utilizzare benzina...

Page 41: ...Tavolino laterale N N Immagine Quantit Immagine Quantit Rondella della maniglia della porta del carbone Gamba parte posteriore sinistra Gamba davanti sinistra Copertura dell estremit delle gambe Manig...

Page 42: ...Fissare i pannelli laterali LH RH 10 11 con otto viti M6 12 B al pannello davanti 13 e al pannello posteriore 9 Fissare due porte d aria 24 sui pannelli laterali con due viti M6 12 B e due dadi M6 A 2...

Page 43: ...Fissare le due gambe rimanenti 25 e 26 al pannello laterale destro con quattro viti M6 12 B 4 Fissare il ripiano inferiore 21 alle gambe con 4 viti M6 12 B Fissare l asse della ruota 22 nelle gambe 25...

Page 44: ...e 28 la rondella della maniglia della porta del carbone 29 e la parte di bloccaggio della porta del carbone 30 al pannello davanti con un dado M6 A 6 Il vassoio di carbone 17 fissata al corpo con sei...

Page 45: ...leva 31 passa attraverso il foro del pannello davanti Una vite a spalla M6 20 H passa attraverso il foro della barra di collegamento del vassoio del carbone dall interno e poi fissata con il foro file...

Page 46: ...e due rondelle 3 alla striscia decorativa 19 e al portacenere 18 con due viti M6 16 D E poi fissare il portacenere al corpo 10 Fissare i cardini inferiori 8 al pannello posteriore 9 con quattro viti...

Page 47: ...ia laterale 34 e la rondella della maniglia laterale 35 con due viti M6 70 I 12 Fissare il tavolino laterale 27 al lato destro con quattro viti a spalla M6 20 H Utilizzare quattro viti M4 8 K per fiss...

Page 48: ...ti M6 40 C Fissare i cardini superiori 33 al coperchio con quattro viti M6 40 C e quattro dadi M6 A 14 Fissare le 2 porte d aria 24 al coperchio con due viti M6 12 B e due dadi M6 A Fissare il termome...

Page 49: ...erni F e 2 clips R G Assemblaggio 16 Fissare la griglia di riscaldamento 5 nel coperchio e nel corpo Vedere i dettagli per il fissaggio nel corpo Posizionare le griglie di cottura 6 e pronte per la co...

Page 50: ...wiatrem Przechowuj produkt poza zasi giem dzieci i zwierz t zw aszcza gdy nie jest u ywany Podczas przenoszenia lub podnoszenia produktu b d nale ycie ostro ny aby unikn nadwyr enia lub uraz w kr gos...

Page 51: ...lu przedniego 13 i panelu tylnego 9 Zamocuj dwoje drzwi wentylacyjnych 24 do paneli bocznych za pomoc dw ch rub M6 12 B i dw ch nakr tek M6 A MONTA LISTA CZ CI A B C D F Nakr tka M6 ruba M6 12 ruba M6...

Page 52: ...n g 16 do dw ch n g 14 i 15 MONTA 3 Przymocuj dwie stopy 14 i 15 czterema rubami M6 12 B do lewego panelu bocznego Przymocuj pozosta e dwie n ki 25 i 26 do prawego panelu bocznego za pomoc czterech ru...

Page 53: ...ubami M6 12 B Zamocuj o ko a 22 w stopach 25 i 26 Nast pnie zabezpiecz 2 ko a 23 za pomoc dw ch nakr tek M10 J MONTA 5 Zamocuj grafitow klamk drzwi 28 grafitow podk adk 29 i klamk 30 do panelu przedni...

Page 54: ...6 Taca na w giel drzewny 17 jest zabezpieczona w korpusie sze cioma rubami M6 12 B MONTA 7 Uchwyt 32 jest przymocowany do panelu przedniego 13 za pomoc dw ch rub M6 12 B MONTA 106 107...

Page 55: ...istwie przy czeniowej pojemnika na w giel a nast pnie zabezpiecza go gwintowanym otworem w uchwycie d wigni na g rnym ko cu MONTA H 9 Przymocuj uchwyt popielniczki 20 i dwie podk adki 3 do paska ozdob...

Page 56: ...panelu tylnego 9 czterema rubami M6 40 C MONTA 11 Przymocuj otwieracz do butelek 12 do przedniej lewej nogi za pomoc dw ch rub M6 12 B Zabezpiecz uchwyt boczny 34 i podk adk uchwytu bocznego 35 za po...

Page 57: ...czterech rub M4 8 K przymocuj hak 7 do ko ca stolika bocznego kt ry ma gwintowane otwory MONTA 13 Przymocuj uchwyt pokrywy 4 podk adk uchwytu 3 do pokrywy 1 za pomoc dw ch rub M6 40 C Przymocuj g rne...

Page 58: ...krywy za pomoc dw ch rub M6 12 B i dw ch nakr tek M6 A Przymocuj termometr 2 do g rnej cz ci pokrywy za pomoc w asnej nakr tki MONTA 15 Przymocuj os on do korpusu blokuj c g rne i dolne zawiasy za pom...

Page 59: ...o podgrzewania 5 w pokrywie i korpusie Zobacz szczeg y dotycz ce mocowania w korpusie Umie kratki do gotowania 6 na miejscu i przygotuj do gotowania Przed u yciem dokr wszystkie ruby Produkt gotowy do...

Reviews: