background image

B1

B2

B2

B3 B4

B5

B6 B7 B8

B9 B10

B11

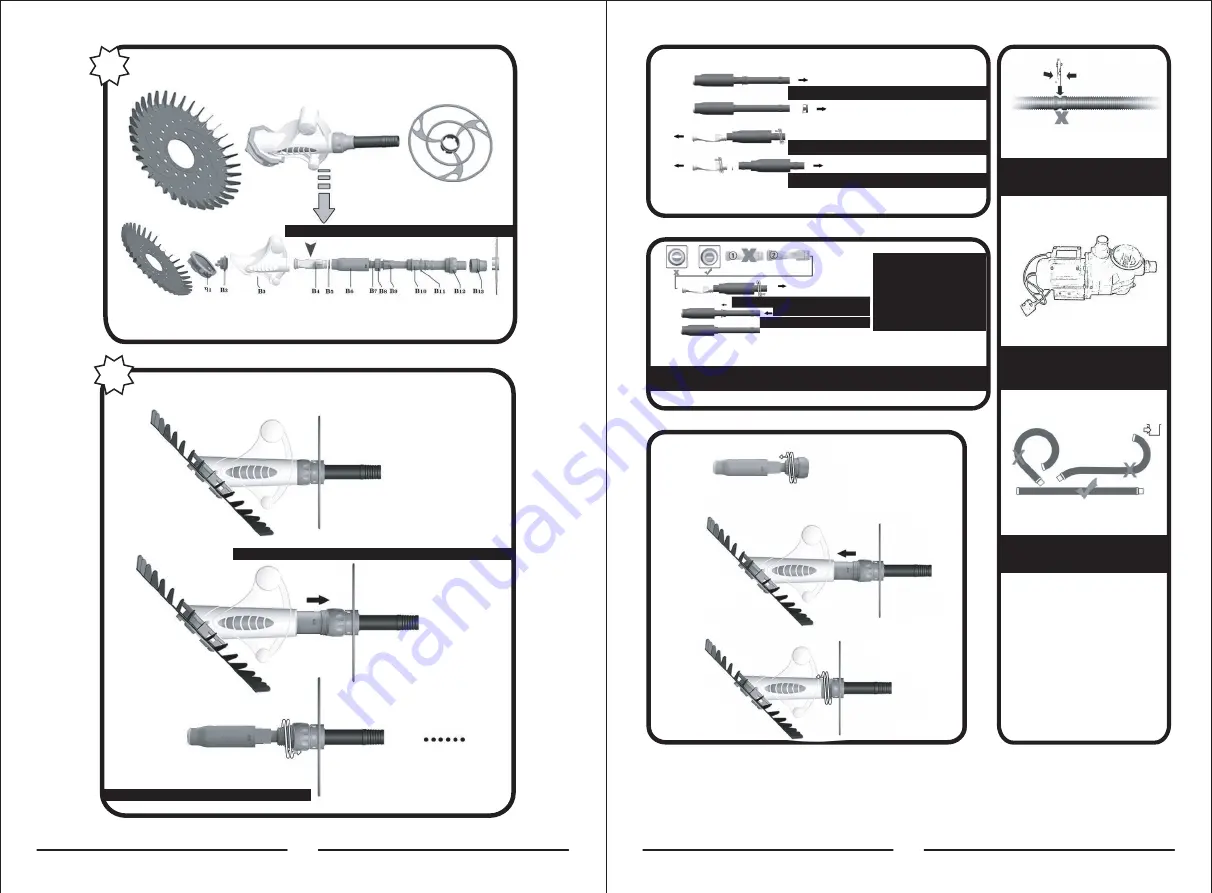
Nehmen Sie „B11“ heraus

Nehmen Sie das Zubehör heraus

a

b

c

Ändern Sie die Membran wie folgt:

A

B

Komponentenliste „B“

12

13

d

e

f

g

h

Tauschen Sie die neue Membrane „B3“ aus, der Montageschritt ist der gleiche 

wie oben.

Beachtung:

Komponente „B5“ darf 

NICHT zu  

fest drehen. 

Andernfalls öffnet  

sich die 

Membran weit, was sich 

übermäßig negativ auf ihre 

Leistung auswirkt.  


An der Rohrverbindung darf keine 

Undichtigkeit auftreten 

Halten Sie den Schlauch bei 

der Lagerung immer gerade.

Die Pumpe für den Reiniger sollte 

eine Mindestleistung von 

0,5 PS / 3,8m /H haben.  

Mindestens 0,5 PS oder 3,8m3/ H

Setzen Sie „B5“ in „B6“ 

und drehen Sie „B5“ fest

Setzen Sie „B8“ ein

Nehmen Sie „B8“ heraus

„B5“ drehen und herausnehmen

„B3“ herausziehen

3

Summary of Contents for CL11840

Page 1: ...um Ihnen EIN SCHÖNES EINKAUFSERLEBNIS GUTE PRODUKTE und EFFIZIENTEN SERVICE zu bieten Avec votre évaluation inspirante COSTWAY continuera à fournir une EXPÉRIENCE D ACHAT PRATIQUE des PRODUITS DE QUALITÉ et un SERVICE EFFICACE Con su calificación inspiradora COSTWAY será más consistente para ofrecerle EXPERIENCIA DE COMPRA FÁCIL BUENOS PRODUCTOS y SERVICIO EFICIENTE Con la tua valutazione incoragg...

Page 2: ...emble the two elbow connectors F to the regulator G lnsert the attachment H facing downward and then the regulator Take care the arrow under the regulator is pointing into the skimmer 6 Connect one end of hose D to the tube opening on the top of B and then connect the other end to another D and finish with all hoses D and then E 7 Replace the eyelet of your return inlet by part l ensuring that the...

Page 3: ...he weight J onto the third hose section and slide click it backward or forward to adjust the buoyancy of the hoses and angle of cleaner in use 8 Adjust your filtration system to the vacuum setting A pump of at least 1 2 horsepower 3785 L h is required Turn on the pump and relax as your cleaner cleans your pool You can adjust the power of your cleaner by turning the knob of the regulator G as shown...

Page 4: ... the assembling step is same as above Attention Component B5 must NOT be rotated tightly Otherwise the diaphragm opens widely which has excessively negative effect on its performance Pull B3 out No leak is allowed at the joint of the pipes Always keep the hose straight when storage Pump for the cleaner should have a minimum power of 373W 3785 L Min 373W 3785 L Put B5 in B6 and rotate B5 tight Put ...

Page 5: ...auf B und verbinden Sie das andere Ende mit einem anderen D Wenn Sie mit allen Schläuchen D fertig sind ist das Ende E 7 Ersetzen Sie die Öse Ihres Rücklaufeinlasses durch Teil l und achten Sie darauf dass die Öffnung nach unten zeigt um den Betrieb des Staubsaugers nicht zu beeinträchtigen Befolgen Sie die Anweisungen unter Punkt 6 wenn Ihr Pool mit einem Vakuumstopfen ausgestattet ist 5 Schalten...

Page 6: ...cht J auf den dritten Schlauchabschnitt und schieben Sie es nach hinten oder vorne um den Auftrieb der Schläuche und den Winkel des verwendeten Reinigers einzustellen 8 Stellen Sie Ihr Filtersystem auf die Vakuumeinstellung ein Eine Pumpe mit mindestens 1 2 PS 3 8m3 H ist erforderlich Schalten Sie die Pumpe ein und entspannen Sie sich während Ihr Reiniger Ihren Pool reinigt Sie können die Leistung...

Page 7: ... B5 darf NICHT zu fest drehen Andernfalls öffnet sich die Membran weit was sich übermäßig negativ auf ihre Leistung auswirkt An der Rohrverbindung darf keine Undichtigkeit auftreten Halten Sie den Schlauch bei der Lagerung immer gerade Die Pumpe für den Reiniger sollte eine Mindestleistung von 0 5 PS 3 8m H haben Mindestens 0 5 PS oder 3 8m3 H Setzen Sie B5 in B6 und drehen Sie B5 fest Setzen Sie ...

Page 8: ...écumoire 6 Connectez une extrémité du tuyau D à l ouverture du tube au sommet de B puis connectez l autre extrémité à un autre D et terminez avec tous les tuyaux D puis E 7 Remplacez l oeillet de votre entrée de refoulement par la pièce I en veillant à ce que l ouverture soit orientée vers le bas afin de ne pas gêner le fonctionnement de l aspirateur Si votre piscine est équipée d une prise d aspi...

Page 9: ...le poids J sur la troisième section de tuyau et faites le glisser vers l arrière ou vers l avant pour régler la flottabilité des tuyaux et l angle de l aspirateur pendant l utilisation 8 Réglez votre système de filtration sur le réglage du vide Une pompe d au moins 1 2 HP 3 79 m3 h est nécessaire Allumez la pompe et détendez vous pendant que votre nettoyeur nettoie votre piscine Vous pouvez régler...

Page 10: ...ces Aucune fuite n est autorisée au joint des tuyaux Gardez toujours le tuyau bien droit lors du stockage La pompe du nettoyeur doit avoir une puissance minimale de 0 5HP 3 79 m3 h Min 0 5HP 3 79 m3 h Mettez B5 dans B6 et serrez B5 Insérez B8 Sortez B8 Faites pivoter B5 et retirez le Tirez B3 B1 B2 B2 B3 B4 B5 B6 B7 B8 B9 B10 B11 Sortez B11 Sortez les accessoires a b c Changez le diaphragme comme ...

Page 11: ...egulador apunte hacia el skimmer Conecte un extremo de la manguera D a la abertura del tubo en la parte superior de B y luego conecte el otro extremo a otra D y termine con todas las mangueras D y luego E Conecte la pieza H en su enchufe de vacío Conecte el regulador G en la pieza H Asegúrese de que la flecha debajo del regulador apunte hacia el enchufe de vacío Apague la bomba de su piscina 4 b I...

Page 12: ...egulador está conectado a un skimmer de pared pase la manguera a través de la boca del skimmer y conéctela al regulador a través del codo F 12 13 14 15 Ajuste su sistema de filtración a la configuración de vacío Se requiere una bomba de al menos 1 2 caballo de fuerza 3785 L h Encienda la bomba y relájese mientras su limpiafondos limpia su piscina Puede ajustar la potencia de su limpiafondos girand...

Page 13: ...NO debe girarse con demasiada fuerza De lo contrario el diafragma se abre ampliamente lo que tiene un efecto excesivamente negativo en su rendimiento No se permiten fugas en la unión de las tuberías Mantenga siempre la manguera recta cuando la almacene La bomba para el limpiafondos debe tener una potencia mínima de 373W 3785 L Mínimo 373W 3785 L Ponga B5 en B6 y gire B5 firmemente Ponga B8 adentro...

Page 14: ...tto il regolatore sia rivolta verso lo schiumatoio Collegare un estremità del tubo D all apertura del tubo nella parte superiore di B quindi collegare l altra estremità a un altra D e finire con tutti i tubi D e poi E Collegare la parte H alla presa di aspirazione Collegare il regolatore G alla parte H Assicurarsi che la freccia sotto il regolatore sia puntata verso la presa di aspirazione Spegni ...

Page 15: ... il vostro regolatore è collegato ad uno schiumatoio a muro fate passare il tubo attraverso la bocca dello schiumatoio e collegatelo al regolatore tramite il gomito F Regolare il tuo sistema di filtrazione sull impostazione del vuoto È necessaria una pompa di almeno 1 2 potenza 3785 L h Accendere la pompa e rilassati mentre il pulitore pulisce la piscina Puoi regolare la potenza del tuo pulitore r...

Page 16: ...stazioni Non devono esserci perdite dai giunti dei tubi Tenere sempre il tubo diritto durante lo stoccaggio La pompa per il pulitore dovrebbe avere una potenza minima di 373W 3785 L Min 373W 3785 L Mettere B5 in B6 e ruotare B5 strettamente Mettere B8 in Tirare fuori B8 Ruotare B5 ed tirare fuori Estrarre B3 B1 B2 B2 B3 B4 B5 B6 B7 B8 B9 B10 B11 Tirare fuori B11 Tirare fuori gli accessori a b c Ca...

Page 17: ... regulatorem wskazuje na skimmer filtr powierzchniowy basenowy Podłącz jeden koniec rurki D do otworu rurki na górze B a następnie podłącz drugi koniec do kolejnej części D Zakończ montaż rurek D mocując E Podłącz część H do końcówki ssącej Podłącz regulator G do części H Upewnij się że strzałka pod regulatorem wskazuje wlot Wyłącz pompę basenową 4 b Zamontuj koło zamachowe upewnij się że jest zab...

Page 18: ...odłączony do wylotu podłącz wąż E bezpośrednio do regulatora G Jeśli odkurzacz jest podłączony do odpieniacza przepuść rurkę przez wylot skimmera i podłącz go do regulatora przez kolanko F 12 13 14 15 Dostosuj system filtracji do ustawień Wymagana jest pompa o co najmniej 1 2 mocy 1000 g h Włącz pompę i pozwól sobie na chwilę relaksu podczas gdy odkurzacz czyści Twój basen Możesz regulować moc odk...

Page 19: ...j Uwaga Elementu B5 NIE WOLNO mocno dokręcać W przeciwnym razie membrana otwiera się szeroko co ma negatywny wpływ na jej działanie Nie może być żadnych wycieków z połączeń rurowych Podczas przechowywania rurki nie należy zwijać skręcać zginać Pompa do odkurzacza powinna mieć minimalną moc 373W 3785 L Min 373 W 3785 L Umieść B5 w B6 i obróć B5 Włóż B8 Wyciągnij B8 Obróć B5 i wyciągnij Wyjmij B3 36...

Reviews: