background image

8

www.costway.com

9

www.costway.com

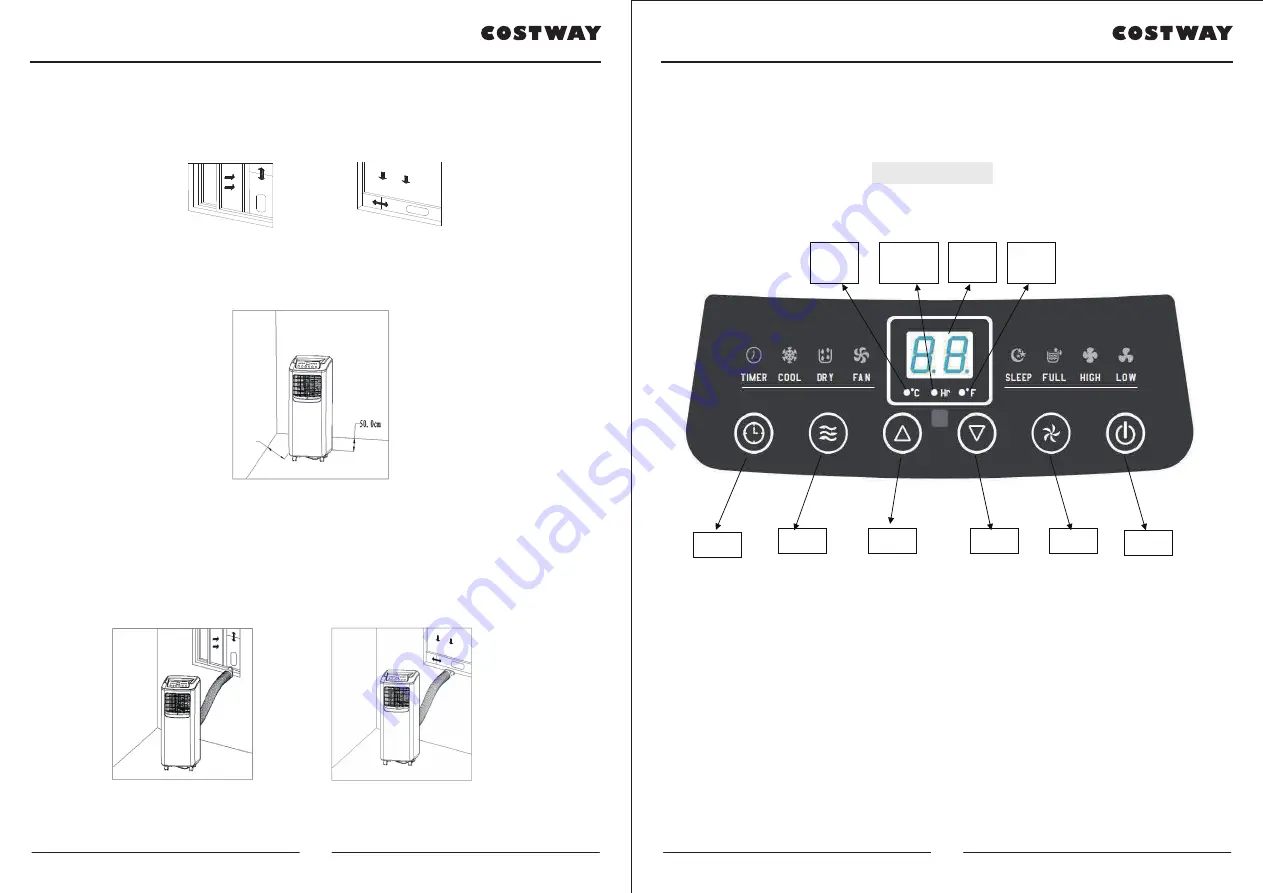
either vertically or horizontally (as shown in Figure 5 and 6). 

3). Pull apart the parts of the window sealing board assembly, adjust the distance of the 

window sealing board assembly pulled apart so that the two ends of the assembly 

come into contact with the window frame, and fasten the parts of the assembly with 

copper screws. 


Figure 5                         Figure 6 


1.4 Installation of the unit                          

1). Move the machine with the heat exhaust hose assembly installed before the window 

and keep the unit at least 20in away from the walls or other objects. (As shown in   

Figure 7). 


Figure 7 


2). Snap the flat end of the heat exhaust hose short connector into the elliptical hole of 

the window sealing board assembly (as shown in Figure 8 and 9). 

    Note: 1. The flat end of the heat exhaust hose short connector must be snapped into 

place. 

2. The heat exhaust hose may not be bent and shall be free from significant 

(greater than 45°) flexure, and the heat exhaust hose shall be ventilated properly.   


Figure 8                             Figure 9 


Important notes:


The exhaust hose is 11in-59in long and this length is determined based on the 

20in

20in


specification  of  the  air-conditioner  (s).  Do  not  use  prolonged  hose  or  replace  with  other 

different hoses as this may affect the functions of the air-conditioner. The exhaust must be 

smooth and the air-conditioner may overheat if the exhaust is obstructed. 


Control Setting 

One. Operation instructions of the control panel


  1. Select the operation interface depending on the models and functions. The operation 

interfaces is as follows: 


Functions Setting 

This portable air conditioner has three functions: cooling, dehumidifying and fan. Fan 

has two speeds: high speed and low speed, setting temperature is 16--30

60

86

℉)

, 24 hours timer, sensor and water-level protective function.   


Buttons

:

There have six keys on the control panel: POWER

Mode

Fan Speed, Timer, Up key 

and Down key . 

a). 

POWER Key:

 Press the key to start the unit ,and press this key again to turn unit off.   

b). 

Mode Key:

 Set the    Cooling , Dehumidifying    and Fan Mode    when unit is working or 

Timer-On Situation. 

c).

Fan  Speed:

  From  pressing  the  button  ,  fan  speed    change  by  low  -  high  -  low  loop 

manner, but not available in dehumidifying mode. 

d)

Timer Key:

 Can set the Timer-Off function in unit working situation, when setting the 

time, the regular time indicator will illumine; can adjust the time again while the regular 
time indicator will illumine; then it will display the room temperature again in the Off mode. 
Can also set in the Timer-On function, same as above setting. 

Fan 

button

Double  8 

display 

area 

Mode 

button

Regular 

time   

indicator

Celsius

degree

indicator

Fahrenheit 

degree 

indicator 

ON/OFF 

button

Down 

button

Up button 

Timer 

button

Summary of Contents for EP23048

Page 1: ... KEEP FOR FUTURE REFERENCE Visit us www costway com Follow Costway Please give us a chance to make it right and do better Contact our friendly customer service department for help first Replacements for missing or damaged parts will be shipped ASAP USER S MANUAL Portable Air Conditioner EP23048 ...

Page 2: ...ce Seperate and count all parts and hardware Read through each step carefully and follow the proper order We recommend that where possible all items are assembled near to the area in which they will be placed in use to avoid moving the product unnecessarily once assembled Always place the product on a flat steady and stable surface Keep all small parts and packaging materials for this product away...

Page 3: ...bathroom or other wet environments Do not allow the children to play with this machine Closely supervise the children or disabled people when this unit is in use Do not turn off this unit by removing the plug Do not place such objects as cups on the unit to prevent water or other liquids from spilling into the air conditioner Do not use pest control aerosol or other flammable substances near the a...

Page 4: ...exhaust hose snap has been slided into place 3 Rotate the C shape buckle of the heat exhaust hose that is sided into place counterclockwise to clip the snap joint of the C shape buckle of the back shell successfully through the guide of the slide way of the back shell as shown in Figure 2 Note 1 Do not rotate the C shape buckle of the heat exhaust hose if it is not sided into place as this may dam...

Page 5: ...nctions of the air conditioner The exhaust must be smooth and the air conditioner may overheat if the exhaust is obstructed Control Setting One Operation instructions of the control panel 1 Select the operation interface depending on the models and functions The operation interfaces is as follows Functions Setting This portable air conditioner has three functions cooling dehumidifying and fan Fan ...

Page 6: ...to turn on off the unit 2 Timer button upon shutdown press this button to set timed start upon start press this button to set timed shutdown 3 High button press this button to allow the unit to operate in the high fan speed state except in the dry and sleep modes 4 Low button press this button to allow this unit to operate in the low fan speed state 5 Up button press this button to increase the te...

Page 7: ... the air conditioner may decrease 2 1 Cleaning of the filter frame and filter mesh 1 Grip the gripping position of the evaporator filter frame and the condenser filter frame and take out the filter frame gently in the direction shown by the arrow as shown in Figure 13 2 Grip the gripping position of the evaporator filter mesh and condenser filter mesh and take out the filter mesh gently in the dir...

Page 8: ...then take out the heat exhaust hose assembly 5 Pack the air conditioner properly with soft plastic bag put the unit in a dry place take appropriate dust proof measures and keep the unit out of the reach of children 6 Take out the batteries of the remote control and keep it properly Note ensure that the unit is put in a dry place All accessories of the unit shall be protected properly Troubleshooti...

Page 9: ...g rating COSTWAY will be more consistent to offer you EASY SHOPPING EXPERIENCE GOOD PRODUCTS and EFFICIENT SERVICE US office Fontana California UK office Ipswich www costway com 16 www costway com Display E4 Anti freeze protection Restore the functions automatically once defrozen Full water indicator illuminates The water in the base plate of the unit reaches the full water level Drain the water i...

Reviews: