15
ENG
LI
SH
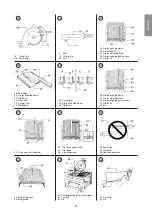
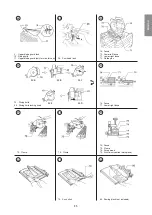
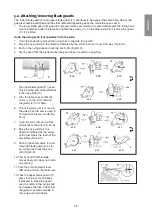
5.2. Attaching/removing blade guards
The lower blade guard (8) and upper blade guard (11) are never to be used at the same time. One of the
guards should be attached and the other removed depending upon the mode the saw is set in:
• The lower blade guard (8) (used in compound mitre saw mode) is mounted underneath the table, hook
onto the catches under the table and tighten the screws (17) on the other side. First, remove the guard
(11) if it is fitted.
Undo the riving knife (10) and attach it to the side:
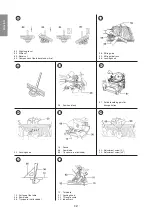
1. Undo the knob (43) and pull the riving knife to the side (Fig. 50-B).
2. Move the riving knife in the direction indicated by the arrow to move it out of the way (Fig. 50-C).
3. Push in the riving knife and lock the knob (43) (Fig.50-D).
4. Test by hand that the blade moves freely and does not catch on anything.
• The upper blade guard (11) (used
only in circular saw mode) attaches
to the riving knife (10).
5. Turn the table over so that the
motor is on top. First, remove
the guard (8) if it is fitted.
6. The riving knife (10) is moved to
the side when the saw is used in
compound mitre saw mode (Fig
43-A).
7. Undo the knob (43) and pull the
riving knife to the side (Fig. 43-B).
8. Move the riving knife in the
direction indicated by the arrow
until it just clears the teeth of the
saw blade (Fig. 43-C).
9. Push in the safety catch (3) and
raise the blade guard (6) as far
as it will go and lock the knob
(43) (Fig.43-E).
10. Test by hand that the blade
moves freely and does not catch
on anything.
11. Push the control/selector lever
(68) down and turn the table over.
12. Take the upper blade guard (11),
press in the lock (9) and keep
it pressed in, place the guard
over the notch in the riving knife
and release the lock. Check that
the guard is secure and able to
move up and down freely.
8
50 A
50 B
50 C
50 D
50 E
43 A
43 B
43 C
43 F
43 E
43 D
Summary of Contents for 2502W
Page 107: ......

