

Page 2 of 2
1.20.17
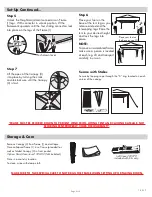
Set-Up Continued...
Step 6
Place your foot on the
base of the tent leg as you
release and extend the
telescoping legs. Raise the
tent to your desired height
and lock the legs into
place.
Step 7
Lift the apex of the Canopy (3)
into place by turning the crank
counterclockwise until the Canopy
(3) is taut.
Place your foot on
the base as you lift
Storage & Care
Remove Canopy (3) from Frame (1) and collapse.
Store collapsed Frame (1) in soft case (provided) as
well as folded Canopy (3) in front pocket.
Option: Hard Case item # 220150 (Not Included.)
Store in a cool dry location.
To clean, wipe with damp cloth.
Soft Case 220079
included with Kits only.
Step 5
Unlock the Height Adjustment connectors on Frame
(1) legs. With connector in unlock position, lift the
framework upwards until the four sliding connectors lock
into place on the legs of the Frame (1).
Push down lever
MAKE SURE TO TAKE SPECIAL CARE TO NOT DRAG THE FRAME WHEN SETTING UP OR TAKING DOWN.
*FRAME MUST BE SECURED DOWN TO PREVENT WIND FROM LIFTING TENT AND CAUSING DAMAGE. NOT
SECURING TENT PROPERLY VOIDS THE WARRANTY.
NOTE:
To move an assembled frame,
make sure a person is located
at each leg. Lift and transport
carefully in unison.
Secure with Stakes
Secure by looping rope through the “D” ring located on each
corner of the canopy.


