background image

18 

OPERATION

Burning Coal

Your furnace is capable of burning both Bituminous and 
Anthracite coal.  Anthracite is perhaps the best coal fuel 
because its long even burn time, high heat output, and 
cleanliness make it a good choice for the home.  However, 
keep in mind it is a much more dif

fi

 cult fuel to use, requires 

more care and patience, is not so widely available, and is 
usually much more expensive than bituminous.

Size Of Coal

Most sizes of Bituminous Coal will work in your New 
Furnace, for best results we recommend large nut coal 
to small egg coal (1-3/4” dia. to 4” dia.).  When burning 
Anthracite, use egg or broken with sizes between 2-5/16” 
thru 4-3/8”.  Note that it is important to the long life of your 
furnace to buy coal which has been sized and cleaned.  
Cleaning insures removal of rocks and other materials.  
Never use coal smaller than 1” or larger than 5” in diam-
eter.  Small sized coal will smother the 

fi

 re.  Too large a 

size of coal will not burn well.

Stove Operation

All coal 

fi

 res should be started with wood which will allow 

the 

fi

 re to get hot enough to ignite the coal.  The best 

ignition 

fi

 res utilize dry pine or other resinous soft woods 

as kindling, with hard wood (oak, hickory, ash) added to 
increase the heat prior to addition of the coal.

Burning Bituminous

 Once your kindling and wood 

fi

 re has produced a bed of 

well established coals, start adding coal in layers allow-
ing each to ignite before adding more.  Bituminous has 
a high volatile content and, as a result, should be 

fi

 red 

with the “conical method” - with the highest portion of your 

fi

 rebed in the center of the 

fi

 rebox.  The 

fi

 rst 

fl

 ames will be 

long and generally orange or yellow and produce quite a 
bit of smoke.  As the gases burn off the 

fl

 ames become 

shorter, change colorand produce less smoke.  Once the 

fi

 re is WELL ESTABLISHED add coal to the center of the 

fi

 rebox forming the cone.  Burning in this fashion allows 

heat to drive off the volatile gases, and turbulence created 
increases the burn ef

fi

 ciency.  You will have to experiment 

with your particular setup as no two chimney’s or installa-
tions are going to be the same.  Just remember to allow 
enough secondary air to enter the 

fi

 rebox and keep your 

stove pipe damper open so that volatiles are properly 
burned.  Before refueling, take the time to break up the 
cone a little with a poker, especially if it has caked over or 
formed a crust.  But, be careful not to mix the coal as this 
increases the chances of forming clinkers.  When shaking 
the grate(s) be gentle.  Just a few short movements is 
better than a lot of agitation.  The objective is to remove 
a small amount of the ashes without disturbing the 

fi

 re.  

Stop when you see a glow in the ashes or the 

fi

 rst red 

coals fall into the ash pan.  Excessive shaking wastes fuel 

and can expose the grate(s) to very high temperatures 
which can cause warpage or burnout.

For overnight operation (long duration burn time) shake 
the 

fi

 re and add coal, retaining your center cone.  Once 

the volatiles are burned off, close the feed door and adjust 
your stove pipe damper.  Then adjust your thermostat to 
the desired heat level.
You will have more MAINTENANCE with bituminous than 
with anthracite coal as more soot will collect on heating 
surfaces and in pipes, requiring more frequent cleaning.

Anthracite

 Before starting the 

fi

 re open - the stove pipe damper, open 

the ash pit door and feed door, place newspaper, 

fi

 nely 

split kindling on the grate, and light the paper.  Add larger 
hard wood after kindling is burning brightly. 

 CAUTION:  

Never use gasoline, lantern fuel, kerosene, charcoal 
lighter 

fl

 uid, or other 

fl

 ammable liquids to start or 

freshen up a 

fi

 re in this heater. 

 Place the larger pieces 

of wood on the 

fi

 re so that they are slightly separated and 

form a level for the addition of coal.  It will take 10 to 20 
minutes before this wood is thoroughly ignited.  Adding 
coal too soon will cut the air supply and smother the 

fi

 re.

Add a thin layer of coal (preferably smaller chunks) to the 
wood 

fi

 re, being careful not to disturb it too much or cut 

off the draft.  Then, add a second heavier layer after the 
coal is ignited and burning well.  If necessary, add a third 
layer to bring the coal up to the top of the front liner (not 
above!).  Be sure you have closed your ash door.
Before adding further fuel, be sure you leave a red spot of 
glowing coals in the center of the 

fi

 rebox to insure that you 

have not smothered the 

fi

 re and to help ignite thegases 

given off by the new charge.  A deep charge will give a 
more even heat and a longer 

fi

 re, but it may take one to 

two hours before the whole bed is fully ignited.
When the 

fi

 re is well established and the room is becom-

ing warm, partially close the dampers.  You will have to 
experiment with your particular setting of the damper and 
controls as your chimney provides the draft necessary to 
not only exhaust the smoke, but to pull combustion air 
into the heater as well - and no two chimney’s perform the 
same.  Leave the ash pit damper at least partially open 
to prevent the 

fi

 re from going out.  Adjust the stove pipe 

damper to reduce the draft on the 

fi

 re.  With anthracite you 

will see short blue 

fl

 ames above the coal, except when 

the 

fi

 re is started or a new charge is added.  If, however, 

there is no 

fl

 ame then the 

fi

 re needs more air from the 

bottom (unless it is near the end of its burn cycle and 
needs to be recharged).
Only when the coal is burned down to half its original 
depth is it time to add fresh coal.  When doing so, open 
your stove pipe damper, which will allow the 

fi

 re to burn 

off any accumulated gases.  Open the feed door, and with 
a small rake, hoe or hooked poker pull the glowing coals 

Summary of Contents for 24A

Page 1: ...allations must be made in accordance with local and state codes which may differ from this manual Wood Coal Burning Furnace Owners Manual Models 24A 30A TESTED TO UL 391 Report 215 S 17 4 LISTED BY PORTLAND OREGON USA U S Environmental Protection Agency Certified to comply with 2015 particulate emissions standards ...

Page 2: ...o and a flue pipe run of no more than 6 feet horizontally Also the flue pipe should contain a 1 2 rise per foot and NEVER be installed closer than 18 from combustibles WOOD BURNING Install a manual flue pipe draft damper at a safe convenient location between your furnace and chimney COAL BURNING Install a barometric damper set at 05 Water Column AIR FLOW Solid Fuel furnaces produce much hotter air...

Page 3: ...herwise they are useless Always store ashes in a metal container with a lid Ashes are a good thermal insulator and will keep enough oxygen away so embers will not burn out Never never let ashes accumulate up to grate level this will greatly reduce the life span of your grate Coal produces much more ash than wood Keep your chimney and flue pipe clean check monthly Smoke detectors and fire extinguis...

Page 4: ...or efficient and safe operation Do not leave the ash door open when the fire is burning Do not let ashes build up closer than 2 to the grate With new steel there is a small amount of oil or dirt on the metal You may smell an odor This is normal during the first operation You should assemble the furnace out of doors and build a small fire in it to burn off this dirt and oil before installing the un...

Page 5: ...plenum as practical Chimney location is also critical The furnace must be placed as close as possible to the chimney You want the chimney connector smoke pipe to have a minimum of elbows two 2 or less Also the chimney connec tor should not have to run more than six 6 feet to the chimney CAUTION The warm air supply outlet of the Furnace should not be connected to the cold air return inlet of the ce...

Page 6: ...clearances to combustible material The clearances are printed on the label located on the back of the furnace The chart on this page also states these minimum clear ances Make sure you follow these when choosing your furnace location Any hot air plenum connection to a furnace must be con structed of metal Clearance to Combustibles Furnace to back wall 30 Furnace to side wall 12 Pipe to back wall 1...

Page 7: ...se a rectangular chimney the mini mum area it may be is 39 square inches ClassA chimneys are those made from tile lined masonry brick or block or an independent laboratory approved all fuel factory built chimney CAUTION Only a ClassA all fuel chimney intend ed for use with solid fuel should be used FLUE RECOMMENDATIONS ...

Page 8: ...ime A good indicator if wood is ready to burn is to check the piece ends If there are cracks radiating in all directions from the center then the wood should be dry enough to burn If your wood sizzles in the fire even though the surface is dry it may not be fully cured and should be seasoned longer Importance Of Proper Draft Draft is the force which moves air from the appliance up through the chim...

Page 9: ...res which encourages creosote build up and poor chimney draft Connecting Stove Pipe To A Metal Chimney When using a metal chimney part of the installation package should include a stove pipe connector Follow the instructions provided with the chimney and its parts Chimney Draft Regulators Optional Baro metric Damper These devices are used to help maintain adequate chimney draft automatically They ...

Page 10: ...prewired all that is re quired is the wiring of the distribution fan see wiring diagram page 18 and the wiring to wall the thermostat 4 After mounting the three 3 fans proceed to the fan control center NOTE The best maintenance for fan motors is to keep them clean exceptionally clean Oiling with 20W N detergent once a season will also help but cleanliness is what prolongs motors life The distribut...

Page 11: ...lack rheostat knob Attach box to left side facing feed door with four 4 self threading screws One screw in each corner NOTE Furnace control center is designed for left side attachment Should space prohibit such reversing shrouds for right side instal lation is possible however control wires from box will have to be extended Next attach the 4x4 junction box below the control center box using 2 self...

Page 12: ...llar to top To install hot air attaching collar simply bend all tabs right angle under shroud This may be possible with thumbs if not remove top and use small hammer CAUTION Any hot air plenum connection to a furnace must be constructed of metal Installing Grates Install grates together slip shaker lug into hole and place grates into frame Grate arch faces upward Check out grate rotation by placin...

Page 13: ...shers First line up the top holes and tighten bolts Secondly line up the holes in the rear baffle and the heat plate with the firebox and attach by using two 2 5 16 bolts nuts washers Tighten all four 4 bolts NOTE to reach rear bolts you may find it easier to put your arm through the flue outlet rather than to reach through the feed door 15 Installing smoke damper rod to sliding smoke damper First...

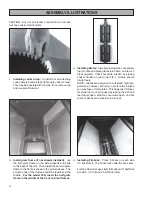
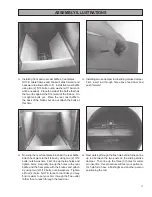
Page 14: ... To install Feed Door handle insert handle into the door then attach with the 1 2 13 nut and washer provided Tighten nut against the backside of the door then back it off approx 1 4 turn or until handle moves freely Follow these instructions for ash door handle installation ASSEMBLY ILLUSTRATIONS 18 Find the Feed Door Latch shown in the parts box Install with the 1 4 20 bolts and nuts provided Adj...

Page 15: ...5 140 see illustration for location Draft fan small fan that activates fire increasing fire temperature Wall mounted thermostat requests heat electrical contact occurs 1 Current is sent through relay rheostat 170 degrees thermo limit disk to activate draft fan 2 Upon firebox temperature rise due to air from draft fan current passes thru the top right thermodisc to activate the left distribution fa...

Page 16: ...enter dial setting The draft fan cover also requires experimenting with Start with a 20 opening 9 Set the furnace thermostat for comfort Set the other thermostat 10 degrees lower 10 Use caution when opening loading door Avoid open ing loading door rapidly This could cause flames to flash out the door This occurs when there is unburned fuel and a large amount of gases on the top of the firebox When...

Page 17: ...e burn with ash door open for a maximum of fifteen minutes while in attendance This will help minimize creosote buildup Also placing a surface magnetic thermometer on flue pipe is helpful to keep temperatures at 300 to 400 degrees Duct tempera tures should be 115 to 125 degrees at 12 above furnace Over Firing Attempts to achieve heat output rates that exceed heater design specifications can result...

Page 18: ...l into the ash pan Excessive shaking wastes fuel and can expose the grate s to very high temperatures which can cause warpage or burnout For overnight operation long duration burn time shake the fire and add coal retaining your center cone Once the volatiles are burned off close the feed door and adjust your stove pipe damper Then adjust your thermostat to the desired heat level You will have more...

Page 19: ...om shaking the rocker grates will occur if short choppy strokes are used rather than long even strokes The amount of shaking is critical Too little or too much of both can result in the extinguishing of a fire due to blocked air flow The proper amount normally oc curs when red coals first start to drop through onto the bed of ashes No furnace ever should be poled from the top This can lead to clin...

Page 20: ...ad a history of back drafting or flow reversal Also coal furnaces should not be installed in any chimney having an excessively large flue These conditions can cause improper draft resulting in carbon monoxide entering the house rather than being drawn up the chimney Remem ber coal gases are toxic Sulfur dioxide sulfur trioxide and other ions released from coal burning may corrode stainless and mas...

Page 21: ...mney cap is not too close to the top of the chimney D Check chimney draft Make sure chimney flue pipe is clean and chimney is of adequate height E Make sure you are not suffocating the fire with excess amounts of unburned fuel 4 Problem Distribution blower vibrating Solution A Tighten Allen Screw on squirrel cage B Check for bad fan bearings C Also oil 3 4 drops of 20w non detergent oil 5 Problem ...

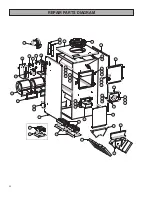
Page 22: ...22 REPAIR PARTS DIAGRAM ...

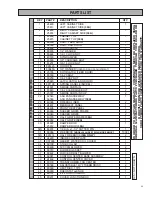
Page 23: ...RONT HEAT PANEL 1 26 40369 SHAKER GRATE FRAME 2 27 40349 SHAKER GRATE 2 28 40376 HALF GRATE FRAME 30A 1 29 40350 HALF GRATE 30A 1 30 24828 DAMPER ROD 1 25612 DAMPER ROD 30A N S 83874 1 8 DIA x 1 1 2 COTTER PIN 1 31 89066 FIREBRICK MODEL 30A USES TWO 2 MORE BRICK 10 2 N S 891414 HALF FIREBRICK 30A ONLY 2 32 24220 INSIDE COVER PLATE 1 33 C97999 GASKET WATER COIL COVER 1 34 89799 STUB COLLAR 1 35 804...

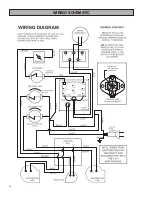
Page 24: ...24 WIRING SCHEMATIC ...

Page 25: ...25 NOTES ...

Page 26: ...26 NOTES ...

Page 27: ...27 NOTES ...

Page 28: ...WRITING ALWAYS GIVE THE FULL MODEL NUMBER WHICH IS ON THE NAME PLATE ATTACHED TO THE HEATER WHEN ORDERING REPAIR PARTS ALWAYS GIVE THE FOLLOWING IN FORMATION AS SHOWN IN THIS LIST 1 THE PART NUMBER 2 THE PART DESCRIPTION 3 THE MODEL NUMBER 24A 30A 4 THE SERIAL NUMBER ____________________ UNITED STATES STOVE COMPANY 227 INDUSTRIAL PARK ROAD PO BOX 151 SOUTH PITTSBURG TN 37380 800 750 2723 www USSTO...

Reviews: