background image

Instalación 

13

5.   Fuente de alimentación: Esta bomba requiere un 

ramal individual de 115 V., 60 Hz., 15 amperios. 

El circuito debe estar puesto a tierra y debe estar 

dedicado a la bomba de sumidero. La bomba viene 

provista de un juego de cordón trifilar con ficha con 

un hilo a tierra. Enchufe el interruptor directamente 

en el tomacorriente y enchufe la bomba en el 

extremo opuesto de la ficha del interruptor.


Peligro de choque eléctrico. Siempre 

conecte la bomba a tierra por medio de una masa 

eléctrica adecuada, como una tubería de agua 

conectada a tierra, una canalización metálica 

debidamente conectada a tierra, o un sistema de 

cable a tierra. No corte la punta redonda de conexión 

a tierra.

6.   Después de haber instalado la tubería, la válvula de 

retención y el interruptor de flotador, la bomba estará 

lista para funcionar. 


Inspeccione la bomba llenando el sumidero de 

agua y observando su funcionamiento por un ciclo 

completo. Para obtener información sobre las 

graduaciones del interruptor, consulte el cuadro de 

Especificaciones Eléctricas y del Interruptor.


Peligro de inundación. Si no se 

realiza esta inspección del funcionamiento, existe el 

riesgo de un funcionamiento inadecuado, fallas 

prematuras e inundación.

6205 0410

6206 0410

Summary of Contents for CLZT7450

Page 1: ...n sobre el funcionamiento instalación o mantenimiento de la bomba Llame al 800 535 4950 Español Paginas 11 19 2014 Pentair Ltd All Rights Reserved CL965 06 16 14 Models CLZT7450 6764 0213 OWNER S MANUAL Submersible Plastic Sump Pumps MANUAL DEL USUARIO Bomba sumergibles para sumideros 293 Wright Street Delavan WI 53115 Phone 800 535 4950 Fax 800 526 3757 www tractorsupply com ...

Page 2: ... electric company or hydro authority to shut off service to the house or call your local fire department for instructions After turning off the power remove the pump for service C Protect the electrical cords from sharp objects hot surfaces oil and chemicals Avoid kinking the cords Replace damaged or worn cords D Do not lift the pump by the power cord Risk of fire Plastic pipe glue is extremely fl...

Page 3: ...rews into the pump discharge Install the check valve above this hole but keep it as close to the pump as possible Be sure the hole is below the waterline and below the check valve 2D To reduce noise and vibration cut the discharge pipe near the pump and fasten a short length of rubber hose 1 7 8 48 mm I D e g radiator hose into it with hose clamps 3 Place the pump in the sump make sure that nothin...

Page 4: ...pump to a suitable electrical ground such as a grounded water pipe a properly grounded metallic raceway or a ground wire system Do not cut off the round ground pin 6 After you have installed the piping check valve and float switch the pump is ready for operation Check the pump by filling the sump with water and observing the pump s operation through one complete cycle For switch settings see Elect...

Page 5: ...e water in the sump see off switch setting below If you are running the pump manually and water stops coming out of the discharge the pump has probably run dry Shut it off immediately and check the water level Figure 7 LIFT The vertical distance the pump actually lifts water The higher the lift the lower the flow NOTICE The friction caused by water running through the pipe will also on longer pipe...

Page 6: ... Assembly 1 PS17 54 2 Impeller1 1 PS5 34P 3 Vertical Float Switch Assembly 1 FPS17 66 P2 NOTICE If motor fails replace entire pump 1 See Page 8 for impeller replacement instructions All fasteners are 8 32 x 1 2 stainless steel Purchase locally 6763 0213 2 1 6621 0812 3 4 ...

Page 7: ...the switch after first checking that switch is functional Restricted discharge obstacle or ice in the piping Unplug the pump remove it from the sump and clean the pump and piping Restricted intake screen Unplug the pump remove it from the sump and clean the intake screen and impeller Pump operates but delivers little or no water Low line voltage If the voltage is below 110 volts check the size of ...

Page 8: ...oosens to the right Step 3 Thread the new impeller onto the motor shaft as shown left hand thread tightens to the left Step 4 With the pump upside down reinstall lower volute ensuring arrows and rib indicators are aligned Re mount the motor on the base Be sure to mount it so that the switch is clear of the discharge and all other obstructions in the sump Last Run the pump through one complete cycl...

Page 9: ...commercial rental applications Sewage Pumps DO NOT return a sewage pump that has been installed to your retail store Contact CountyLine Customer Service Sewage pumps that have seen service and been removed carry a contamination hazard with them If your sewage pump has failed Wear rubber gloves when handling the pump For warranty purposes return the pump s cord tag and original receipt of purchase ...

Page 10: ...this page intentionally left blank ...

Page 11: ...o llame a su empresa o autoridad de servicio eléctrico para que corte el servicio a la casa o llame a su departamento local de bomberos para obtener instrucciones al respecto Después de desconectar la corriente eléctrica saque la bomba para realizar los trabajos de reparación o mantenimiento C Proteja los cordones eléctricos de objetos filosos superficies calientes aceite y sustancias químicas Evi...

Page 12: ...e retención 2D Para reducir el ruido y las vibraciones corte la tubería de descarga cerca de la bomba y fije un tramo de manguera de caucho corto 1 7 8 48 mm de diámetro interior por ejemplo una manguera de radiador en la misma con abrazaderas para manguera 3 Coloque la bomba en el sumidero verifique que nada interfiera con el funcionamiento del interruptor Para modelos de interruptores anclado el...

Page 13: ...una tubería de agua conectada a tierra una canalización metálica debidamente conectada a tierra o un sistema de cable a tierra No corte la punta redonda de conexión a tierra 6 Después de haber instalado la tubería la válvula de retención y el interruptor de flotador la bomba estará lista para funcionar Inspeccione la bomba llenando el sumidero de agua y observando su funcionamiento por un ciclo co...

Page 14: ...rga es probable que la bomba esté seca consulte las graduaciones de apagado del interruptor abajo Apáguela inmediatamente y verifique el nivel del agua LEVANTE ALTURA El levante la altura es la distancia vertical efectiva a la cual la bomba levanta el agua Cuanto más alto sea el levante menor será el flujo AVISO La fricción provocada por el agua que corre a través de la tubería también reducirá el...

Page 15: ...3P 3 Unidad del interruptor de flotador vertical 1 FPS17 66 P2 AVISO Si falla el motor reemplace toda la bomba Consulte la página 24 para obtener las instrucciones sobre cómo reemplazar el impulsor Todas las fijaciones son 8 32 x 1 2 de acero inoxidable En venta localmente CLZT7450 6763 0213 2 1 6621 0812 3 4 ...

Page 16: ...dor La bomba no se apaga Interruptor de flotador defectuoso Reemplace el interruptor de flotador Descarga restringida obstáculo o hielo en la tubería Desenchufe la bomba sáquela del sumidero y limpie la bomba y la tubería Flotador obstruido Mueva la bomba en el sumidero o elimine la obstrucción Malla de admisión restringida Desenchufe la bomba sáquela del sumidero y limpie la malla de admisión y e...

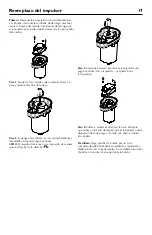
Page 17: ...gún se ilustra AVISO El impulsor tiene una rosca izquierda de manera que se afloja hacia la derecha Paso 3 Enrosque el nuevo impulsor en el eje del motor según se ilustra rosca izquierda se aprieta hacia la izquierda Paso 4 Vuelva a montar el motor en la base Verifique que se haya colocado de manera que el interruptor quede despejado de la descarga y de toda otra obstrucción en el sumidero Por últ...

Page 18: ...caciones comerciales o de alquiler Bombas cloacales NO devuelva una bomba cloacal que se haya instalado a su tienda minorista Comuníquese con el Departamento de Atención al Cliente de CountyLine Las bombas cloacales que hayan estado en servicio y se hayan removido pueden representar un peligro de contaminación Si su bomba cloacal ha fallado Use guantes de caucho cuando manipule la bomba Para los f...

Page 19: ...this page intentionally left blank ...

Page 20: ......

Reviews: