background image

4. The following accessories are authorized for use with this product. Use of accessories other than 

those (listed in the instruction) specified may result in RF exposure levels exceed the FCC 

requirements for wireless RF exposure. 


To ensure that your expose to RF electromagnetic energy is within 

the FCC allowable limits for occupational use, always adhere to the following guidelines: 

1. DO NOT operate the radio without a proper antenna attached, as this may damaged the radio 

and may also cause you to exceed FCC RF exposure limits. A proper antenna is the antenna 

supplied with this radio by the manufacturer or antenna specifically authorized by the 

manufacturer for use with this radio. 

2. DO NOT transmits for more than 50% of total radio use time (“50% duty cycle”). Transmitting 

more than 50% of the time can cause FCC RF exposure compliance requirements to be exceeded. 

The radio is transmitting when the “TX indicator” lights red. You can cause the radio to transmit 

by pressing the “PTT” switch. 

3. ALWAYS keep the antenna at least 2.5 cm (1 inch) away from the body when transmitting and 

only use the COVALUE belt-clip which is listed in instructions when attaching the radio to your 

belt, etc., to ensure FCC RF exposure compliance requirements are not exceeded. To provide the 

recipients of your transmission the best sound quality, hold the antenna at least 5 cm (2 inches) 

from your mouth, and slightly off to one side.   

The information listed above provides the user with the information needed to make him or her 

aware of RF exposure, and what to do to as*sure that this radio operates with the FCC RF 

exposure limits of this radio. Electromagnetic Interference/Compatibility During transmissions, 

your COVALUE radio generates RF energy that can possibly cause interference with other devices 

or systems. To avoid such interference, turn off the radio in areas where signs are posted to do so. 

DO NOT operate the transmitter in areas that are sensitive to electromagnetic radiation such as 

hospitals, aircraft, and blasting sites. 

Occupational/Controlled Use The radio transmitter is used in situations in which persons are 

exposed as consequence of their employment provided those persons are fully aware of the 

potential for exposure and can exercise control over their exposure. 


SHENZHEN COVALUE COMMUNICATIONS CO., LTD. 


IC RF exposure statement:
The device meets the exemption from the rout ine evaluation limits in section 2.5 of RSS 102
RF exposure,users can obtain Canadian information on RF exposure and compliance.

IC RF exposure statement:

IC RF exposure statement:

IC RF exposure statement:

Summary of Contents for CU780

Page 1: ...e radios do not disassemble the radio by yourself to avoid damages Warning Your radio generates RF electromagnetic energy during transmit mode This radio is designed for and classified as ccupational...

Page 2: ...nsure FCC RF exposure compliance requirements are not exceeded To provide the recipients of your transmission the best sound quality hold the antenna at least 5 cm 2 inches from your mouth and slightl...

Page 3: ...ling the Optional Speaker Microphone Installing Removing the Belt Clip Radio Overview Basic Operations Programmable Button Function VOX Voice Operated Transmission Radio Setting TOT Time out Timer Bat...

Page 4: ...the package box carefully We recommend checking the radio and the supplied accessories in the following table carefully If any article is missing or damaged please contact your reseller without delay...

Page 5: ...ger enters a protective state and no more charge is delivered to the battery Please stop charging in such situation and remove the battery from the charger Notice The new battery is not fully charged...

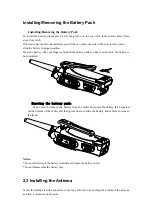
Page 6: ...push the battery until you hear a latch click the battery is now installed Removing the battery pack If you want to remove the battery from the radio first press the battery latch located on the bott...

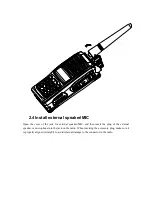
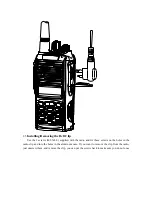
Page 7: ...e jack for external speaker MIC and then insert the plug of the external speaker or microphone into the jack on the radio When inserting the accessory plug make sure it is properly aligned straight to...

Page 8: ...8 0 supplied with the radio and fix these screws on the holes in the radio clip and into the holes in the aluminum case If you want to remove the clip from the radio just unscrew them and remove the c...

Page 9: ...T PUSH TO TALK Button To make a call press and hold the PTT button then speak into the microphone in normal voice Release the PTT button to receive signals Side Button 1 Programmable Button Side Butto...

Page 10: ...Button Programmable Button Channel Selector Rotate to select channel 1 512 Power Volume Knob Turn clockwise to switch on the radio Turn counterclockwise till a click is heard to switch off the radio R...

Page 11: ...if the dealer has set it The radio is now in Rx mode 2 Adjust Volume Rotate the Power Volume knob to adjust the volume with the monitor key pressed Turn clockwise to increase the volume and countercl...

Page 12: ...ieve optimal voice quality 5 Receive a Call Release the PTT button and adjust the volume at the proper position to receive calls The dealer can set CTCSS DCS 5 Tone or 2 Tone DTMF or MDC on your radio...

Page 13: ...to enter the Squelch Level Adjustment Mode first and then press the button to adjust the level Press the O button to save the selected squelch level and quit this mode Key lock To toggle between lock...

Page 14: ...one to your partners or the system the detail setting is programmed by your dealer Cancel Emergency Call Press the top button set as Cancel Emergency Call to cancel Emergency function Man down Press t...

Page 15: ...G Press C button to return to the previous operation 1 2 Receive Selective Call Receiving a selective call you will hear the alert tone and the LED indicator will blink orange Icon flashes and the cal...

Page 16: ...nd or repeater mode through talkaround button 8 Utilities The item can help you customize some setups of the radio The operating steps go as follows A Press the Menu Selection Enter button to enter th...

Page 17: ...o disable the scan function 9 2 Nuisance Delete If a channel continuously generates noise or interference press the button to remove this channel from the scan list temporarily Note the priority chann...

Page 18: ...each channel even if the channel is changed or the radio is shut down In the OST state P2 icon will display Press OST button again to return to normal operation 11 GPS Information View If the radio st...

Page 19: ...smitting the radio sounds pre alert tone b After the alarm tone if the transmitting time is longer than the preset time limit the time out timer will be activated 4 TOT Reset a TOT Reset is the delay...

Page 20: ...speaker will be activated when the selective signaling matched 3 CTCSS DCS Squelch The speaker will be activated when CTCSS DCS matched 4 Carrier Squelch The speaker will be activated when carrier wav...

Page 21: ...ing succeeds When receiving proper 5 tone signaling squelch will be activated according to the RX Squelch Mode defined by the user You can receive the call and LED flashes orange After the radio decod...

Page 22: ...1 The radio cannot be switched on or no display after switched on z Battery pack may not be installed properly Remove the battery pack and install it again z Battery power may be insufficient Recharge...

Page 23: ...Beyond the efficient communication range Settings by the Dealer Model ____________ Serial No ___________ 1 Channels List Channel Type Receiving Frequency Transmittin g Frequency CTCSS DCS Decode CTCSS...

Page 24: ...Middle Long 3 Auxiliary Function Button Settings Note...

Reviews: