34
INSTALLATION
INSTALLATION MANUAL
Lifting mechanism assembly
(continued)
1) Ensure the COVANA cover is centered. Use a
measuring tape on all four sides and make sure
it is still resting on the foam spacers. If not,
center the COVANA cover, using a measuring
tape on all four sides.
2) Verify whether all the posts are vertically leveled
with a 48
″ (122 cm) level. You will need to verify
the front and right sides of each post with the
level.
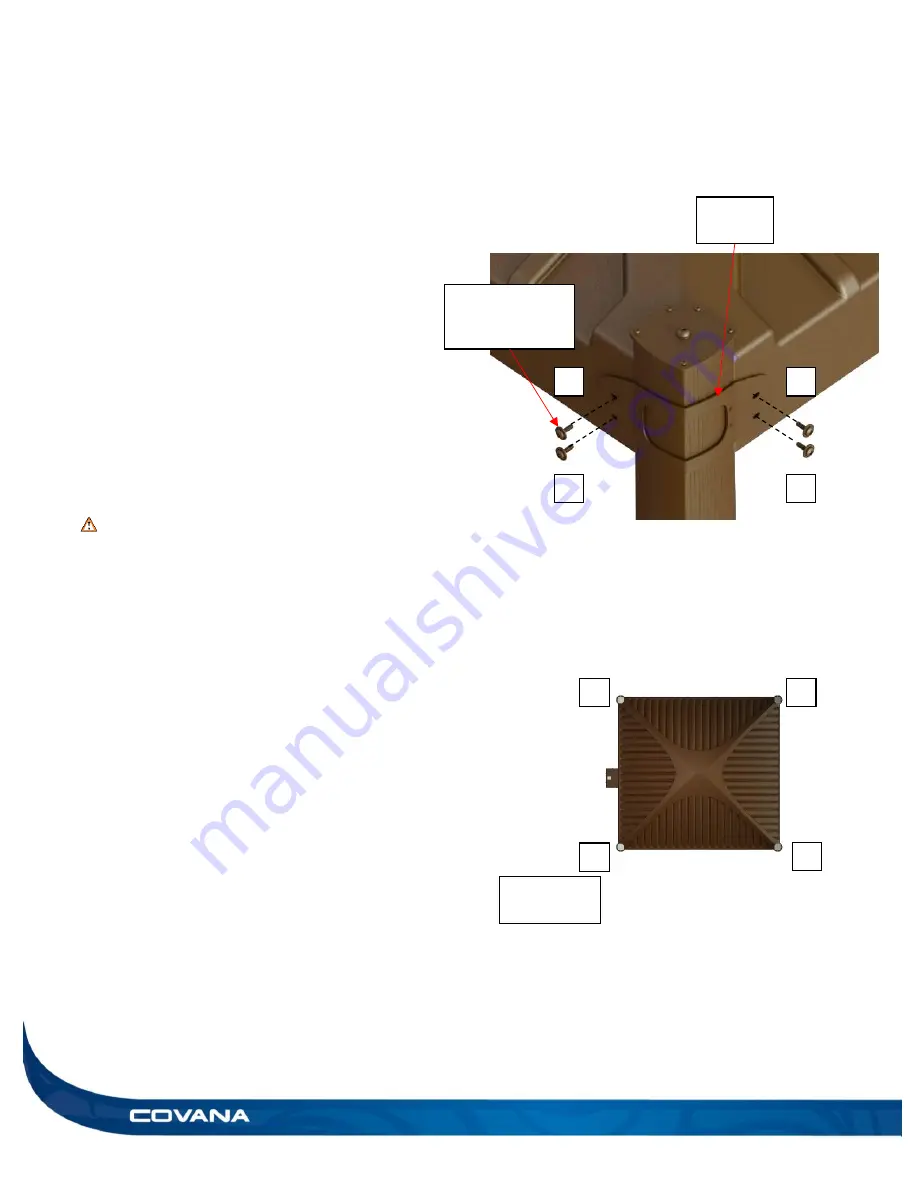
3) Install the first corner bracket (Figure 73).
Fasten the bracket to the cover with four painted
Phillips M6 x 20mm bolts and 5/16
″ painted
washers.
WARNING
Ensure the sleeve is correctly pressed against the
outer shell before screwing in the M6 x 20 mm
screws.
Note:
Follow the patterns shown for installing the
bolts (A to D). (Figure 73)
Note:
We recommend placing the rounded edge of
the corner bracket toward the top. (Figure 73)
4) Repeat step 3 for each remaining corner
bracket, follow the order of installation as shown
in Figure 74, 1 to 4.
1
2
3
4
First corner
bracket
Figure 74
A
D
C
B
Figure 73
Painted Phillips
M6 x 20 mm bolts
with washers
Corner
bracket
Summary of Contents for OASIS
Page 1: ...2019 Revision 0 2019 04 03 C A 232859 ...
Page 44: ...44 TECHNICAL SPECIFICATIONS INSTALLATION MANUAL NOT TO SCALE Long side LS model Figure 87 ...
Page 49: ...INSTALLATION MANUAL APPENDIX 49 APPENDIX ...
Page 50: ...50 APPENDIX INSTALLATION MANUAL ...
Page 51: ...INSTALLATION MANUAL APPENDIX 51 ...
Page 52: ...52 APPENDIX INSTALLATION MANUAL ...
Page 53: ...INSTALLATION MANUAL APPENDIX 53 ...
Page 54: ...54 APPENDIX INSTALLATION MANUAL ...
Page 55: ...INSTALLATION MANUAL APPENDIX 55 ...
Page 56: ...56 APPENDIX INSTALLATION MANUAL ...
Page 57: ...INSTALLATION MANUAL APPENDIX 57 ...
Page 58: ...58 INSTALLATION MANUAL This page intentionally left blank see next page ...


