background image

Covaris 

LE220 (-plus, R-plus, and Rsc) Setup & Instruction Manual 

54 

Part Number: 010398 Rev H | November 2019 


Appendix C: Humidity and Water Management for the Covaris LE220-plus 

Your Covaris instrument employs a six-liter tank of distilled or deionized water located inside the instrument housing.    For the system    to 
operate correctly, the water must be filled to an appropriate level, clean, free of algae growth, and degassed to retard bubble  formation in the 
acoustic field outside of the sample vessel. Additionally, bath temperature is controlled by the Covaris ultraCUBE connected to your system’s 
water bath.  Managing this water and relative humidity is important for the correct operation and reliability   of your Covaris system. The 
following suggestions will  help: 


When the system is powered on, the interior is vented by fans located in the rear panel to maintain an appropriate air    temperature and 
humidity within the instrument enclosure. It is recommended, when the  acoustic  tank  is  full,  that  the instrument be left with power on, 
so that these fans run and retard water condensation on interior surfaces.   If it is not practical    or desirable to leave these fans running 
when the instrument is not in use, please leave the front access door ajar so that interior   air may exchange with ambient air.  The risk of 
condensate forming within the instrument is increased when operating with a   Water Conditioning System 2.0 (WCS), because the WCS will 
add a small amount of heat to the bath water. 


The WCS 2.0 precludes the need for a daily change of bath water.  It is, however, important that water which evaporates each  day be 
made up with fresh distilled or deionized water. It is also important that a monthly cleaning protocol with bleach or equivalent solution 
continue to be followed, as the WCS 2.0 will retard but cannot completely prevent algae from taking hold in hoses and interior tank 
surfaces. Detach the WCS water flow from system when cleaning with bleach or equivalent. 
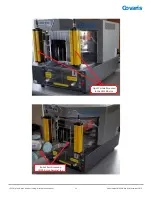
 

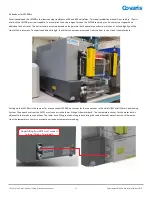
When the system is being operated at a low temperature, you may notice condensate water forming on the black manifold   block, on 
hoses leading to the degas pump, and around the fittings and chassis of the WCS 2.0. Particularly in summer, when relative humidity is 
higher, condensate may drip onto interior surfaces and small amounts may leak onto the laboratory bench. This condensation is 
expected, and no harm is being done to the system. Excess condensate dripping onto a laboratory bench may be captured by placing an 
absorbent pad (e.g. VWR 82020-845) beneath the system and/or  WCS. 


If the instrument is going to be idle for more than 2 weeks, it may be beneficial to turn all components off to prevent any damage 
to the instrument. Please follow the recommended  sequence: 


1.


Turn off chiller 

2.


Move instrument to service position 

3.


Turn off the ultraCUBE and disconnect  hoses 

4.


Empty the water tank 

5.


Replace the water tank and move instrument to load  position 

6.


Purge the degas pump by turning on for 10 seconds.  Purge the ultraCUBE lines by connecting the hoses and powering  on 
ultraCUBE until flow subsides 

7.


Turn the WCS off and disconnect hoses. Raise instrument to service position. 

8.


Empty the water tank and dry 

9.


Gently dry transducer and surfaces of instrument 

Summary of Contents for LE220

Page 1: ...98 Rev H November 2019 LE220 plus R plus and Rsc Setup Instruction Manual Instrument and Software Developed for High performance Sample Preparation using Adaptive Focused Acoustic AFA Energy For Research Only Model Numbers LE220 plus LE220R plus and LE220Rsc Software SonoLab 8 ...

Page 2: ...sachusetts 01801 1721 USA UNIVERSAL PRECAUTIONS Universal Precautions should be followed on all specimen samples regardless of whether a sample is known to contain an infectious agent Laboratories handling specimen samples are advised to comply with applicable parts of the following government and clinical standards or their equivalent in the country of use Centers for Disease Control CDC Universa...

Page 3: ...e temperature NEVER run a method without water in the bath since this could damage the transducer The instrument is equipped with a water level sensor to protect the transducer and degassing pump The system will not allow the degassing pump to operate or the acoustic treatment to start unless an adequate volume of water is detected Distilled or deionized water should be used to fill the water bath...

Page 4: ...ium on which the software is delivered is free of defects in materials under normal use and service The warranty is void if damage has resulted from third party software not intended for use with the system The high power focused transducer is designed to give maximal mechanical energy output in water Permanent damage to the transducer and electronic circuits could result if the transducer is oper...

Page 5: ...ting Methods using Repeat Function 30 4 3 Scanning Treatments LE220Rsc Only 33 4 4 Modifying Existing Methods 34 5 SonoLab Application Software 35 5 1 Home Screen 35 5 2 History Tab 35 5 3 About Tab 37 5 4 Admin Tab 38 6 System Specifications 42 7 Maintenance 43 7 1 Cooling Air Intake 43 7 2 Water Bath 43 7 3 Transducer 44 7 4 Safety System 44 7 5 Degassing System 44 7 6 Cleaning the System 44 7 7...

Page 6: ...ce via the API Water Management System which consists of a cooler heater and a UV treatment chamber with particulate filter to maintain water quality in the instrument bath 1 3 The LE220R plus Instrument In addition to the features of the LE220 plus described above the LE220R plus is designed to be integrated with a sample handling robot in an automated work cell The front door of the safety enclo...

Page 7: ...cessory kit LE220 plus Focused ultrasonicator LE220R plus Focused ultrasonicator 2 2 1 Unpack the instrument the Water Conditioning System 2 0 WCS and the CH05 chiller Refer to the WCS User Manual to install the quartz tube and UV lamp into the WCS The quartz tube and lamp are shipped separately to prevent breakage during shipment Arrange the instrument WCS and chiller on a bench as shown below Th...

Page 8: ...wo ports on the opposite side of the WCS It doesn t matter which bath port connects to which WCS port for these two hoses The WCS contains a particulate filter and UV lamp to prevent biological growth This allows the water bath to be changed just once per month Refer to the User Maintenance section of this manual for details NOTE See the addendum at the end of the manual for connecting the hoses t...

Page 9: ...F at this time 2 2 4 Plug one end of the USB cable into the instrument USB Port and the other end into any USB port on the notebook computer 2 2 5 Connect the temperature control cable between the D connector at the rear of the LE220 plus or LE220R plus and the D connector on the CH05 chiller 2 2 6 Connect the CH05 to a power source The CH05 is a universal input device Do not turn on the CH05 at t...

Page 10: ...power switch at the right rear at the power entry module 2 2 12 Press and hold the green Door button while pulling the door handle to open the safety enclosure front door Slide out the water tank and remove it from its plastic shipping bag Remove and discard the desiccant pack The instrument is now ready to be started Enclosure Door Safety Lock Enclosure Door Handle Door Lock Release Button Stop B...

Page 11: ...nstrument at the power entry module When power is ON the green door lock release switch will illuminate and the ventilation fans in the rear panels will run Power on the WCS and CH05 chiller SonoLab software will perform its temperature control it is not necessary to adjust temperature set points from the CH05 control panel The first time the chiller and WCS are operated the WCS filter and UV trea...

Page 12: ...og box in front of it SonoLab is preconfigured with a single administrative user named Administrator whose password is admin User Authentication and creating new users and their permissions are described in Section 5 4 the ADMIN Tab Enter the username and password and click LOGIN Following login the motion system homing dialog appears Click Yes The transducer and sample holder mechanical assemblie...

Page 13: ...is is useful for training purposes or for creating methods off line 3 3 Preparing your System for Use 3 3 1 Instrument Status Basic Controls To run an acoustic treatment a number of conditions must be met including a The motion system must be initialized b There must be an acoustic method selected in the Method box c Water temperature must be within acceptable Min and Max limits d The bath water m...

Page 14: ... unless the user purposely skipped this step In this case the motion system can be homed from the Motion Control pane Click on the Motion Control button to display the Motion Control pane Click on Home to initialize the motion system See additional information for the Motion Control pane in this section of the manual under Other Controls on the Home Screen b To select and load an acoustic method c...

Page 15: ...f water is detected in the bath the degassing pump is automatically turned on when SonoLab is started The pump should be allowed to run until the Degas indicator on the Status Screen turns green 60 minutes prior to an acoustic treatment The degas pump can be manually turned on and off from the Water Works pane See additional information below in section Other Controls on the Home Screen e When the...

Page 16: ...hout waiting for these conditions to be met With the temperature and degas override boxes checked the display changes to yellow caution indicators as shown Once a method has been loaded and all conditions are acceptable the Run button will turn green and the selected acoustic Method can be started To modify an existing method see Section 5 Create and Edit Methods A red X in any items in the Status...

Page 17: ... plate Racks allow separate entries for each row to be treated by the method When the barcode scanning button is switched on the green Run button changes to a yellow Scan button Click the Scan button then click Yes when prompted to confirm scanning The Scan Enter Barcode box displays Scan the barcode or optionally enter a value or label using the computer keyboard Click Next Position If a plate is...

Page 18: ... are both switches and indicators The current status is highlighted in blue as shown above These switches are disabled when operating in Auto scheduled Mode Current chiller set point current system bath temperature and current system bath water level Enable disable switch for automatic temperature and degas pump control this is both a switch and indicator It toggles between Auto Mode as shown abov...

Page 19: ...er software control your system s water bath will automatically activate degassing and adjust to the user specified temperature at the beginning of the schedule period It will also turn off the degas pump and place the chiller in standby mode at the end of the scheduled period In standby mode the chiller s heating cooling circuit is disabled while the pump continues to operate circulating bath wat...

Page 20: ... the functions to be scheduled Normally all four boxes will be checked Click on the clock icon for Degas on circled above This displays a clock Click on either AM or PM then on the hour the degas pump is to start The clock changes to display the hour selected 7 o clock in this example and the minutes part of the time highlighted ...

Page 21: ...rt and stop as scheduled on weekdays In Auto Mode the chiller and degas buttons at the top of the Water Works pane are disabled Manual Chiller and Degas Control Tomanually control degassing and chiller operation click the red Auto Mode button The button will change to Auto Is Off indicating that manual control isenabled In Manual Mode the chiller and degas pump may be toggled on and off by clickin...

Page 22: ... the water bath to be removed from the instrument Stop Stops any motion currently in progress 3 4 Running a Method When the Run button is green the selected method may be started Click the Run button to start The instrument will verify that water level is appropriate for the specified for the method and begin the treatment Once a method starts if the bath temperature rises beyond the user specifie...

Page 23: ...cer submerged in the bath if automatic scheduling is active At the end of the scheduled period the scheduler will turn off the degas pump and disable cooling in the chiller then automatically restart both as scheduled for the next day SonoLab software must be left running and the system and ultraCUBE powered on for the scheduled events to occur If automatic scheduling is not in use click on the Wa...

Page 24: ...le process containing a single treatment step If more complex methods are required they can be easily constructed 4 1 Create a New Method To create a new method click the New button on the main screen Figure 4 1 New Method Button on Main Screen The Method Editor window will appear Figure 4 2 Method Editor Window 1 Enter the name of the new method in Name box as shown 2 Select the appropriate plate...

Page 25: ...Choose a Step Type pop up is displayed Click Process The process bar is displayed See section 4 2 below for a discussion of the Repeat function Click the button inside the process bar to display the step type menu 4 1 2 Choosing a Treatment Choosing Treatment allows editing of the four acoustic parameters Duration Peak Incident Power Duty Factor and Cycles per Burst ...

Page 26: ...et to 10 Watts and Duty Factor is set to 15 the Average Incident Power will be approximately 1 5 Watts However the real average incident power from the transducer may vary due to factors such as sample tube type water level and water temperature Cycles per Burst This parameter indicates the number of electrical signals used in each acoustic burst of the transducer On your system you may define Cyc...

Page 27: ...he Pen Paper icon on the right end of the Process bar to display the Dithering Parameters pane Figure 4 4 Dither Parameter Pane Enter the specified dithering parameters and click OK Temperature Set Point and Range Enter the temperature set point for the protocol and the allowable range into the text entry fields SonoLab allows a minimum range of plus minus 3 degrees Figure 4 5 Entering Temperature...

Page 28: ...w causes the row to be selected Any number of rows may be selected for treatment rows selected for treatment turn from white to yellow Clicking on a row a second time removes it from the list to be treated When the method is run the graphic for the position being treated flashes green indicating which position is under treatment Rows 1 3 6 and 9 Selected for Treatment Figure 4 6 Rows 1 3 6 and 9 S...

Page 29: ... method until the operator clicks OK Define the prompt message by clicking on the pen paper button of the prompt bar to display the text entry field for the prompt Enter the text of the prompt and click OK Figure 4 8 Add a Prompt Step Add a Prompt Step When the prompt step is reached during the treatment the method pauses and the prompt message will be displayed as shown in Figure 4 9 Enter delay ...

Page 30: ...epeat function is used when one or more treatment delay or prompt steps are to be applied to each row of the plate multiple times There are two scenarios for how this may need to be performed and the required scenario determines how the repeat function is implemented In Scenario A all treatment delay or prompt steps are applied to the first row the number of times specified in the repeat bar then ...

Page 31: ...es specified in the Repeat bar Then all will be applied to the second row and so forth until the entire plate is treated When all method parameters and steps have been defined save changes In Scenario B all treatment or delay or prompt steps are applied to all selected rows of the plate once This repeats for the number of times specified in the Repeat bar Scenario B is typically used in pulsing Th...

Page 32: ...plement Scenario B Create a method as explained in section 4 1 1 above but select Repeat instead of Process for the step type Click the button inside the Repeat bar and select Process Click the button inside the Process bar and create one or more treatment steps Two treatment steps are created in this example ...

Page 33: ...canning Treatments LE220Rsc Only In a scanning treatment rather than the sample tray indexing to place one column of the sample tray at a time over the transducer the sample tray moves continuously from under the sample tray In this mode treatment time is a function of the speed at which the sample tray moves One or more rows may be treated but the rows must be adjacent 4 3 1 Create a scanning tre...

Page 34: ...nt for assistance in specifying the appropriate scanning speed and treatment parameters for your application 4 4 Modifying Existing Methods To modify an existing method select the method as described above then click the Edit button The method editor window will be displayed Make desired changes and click Save The user is then prompted to confirm if they wish to overwrite the existing method Figur...

Page 35: ...o admin users About Information on system configuration 5 1 Home Screen The Home Screen is the principal user screen for the system Refer to Section 3 3 for details on operating the instrument through the Home Screen 5 2 History Tab The History tab Figure 5 1 provides a scrolling list containing the history of every method performed on the instrument This list can be sorted by method name date the...

Page 36: ...ls generated for each sample treated by the method This pane scrolls as necessary to display the graphs of all samples treated by the method See Figure 5 2 Figure 5 2 Details of a Method History Double click on one of the graphics on the right side The graphic will be outlined in orange indicating it has been selected Additional information pertaining to the part of the method which generated the ...

Page 37: ...occurs click the OK button to continue to the History screen However the error will be presented each time the History tab is selected until the offending file is removed To remove the corrupt file navigate to Documents Covaris SonoLab History then locate the offending file in this example fddf_04_14_2016 09 10 38 xhst Drag this file to the Recycle Bin 5 3 About Tab The About Tab provides basic in...

Page 38: ...edit other Administrator level users Can add or edit user level users Can assign access to specific methods to administrators and users Can run and edit any methods installed on the system An Editor Can run and edit methods assigned to them by an administrator Can create methods Can edit and run methods the user created Can review the history screens for methods run by this editor An Operator Can ...

Page 39: ...rom this window the user s name and role may be edited and methods may be added or removed from the methods available for the user to use When a method in the list on the right is selected the button between the available methods becomes a left pointing arrow indicating the selected method will be copied to the Assigned Methods list If a method is selected in the Assigned Methods list the arrow po...

Page 40: ...dialog box Click Yes to confirm that you are deleting the user click No to exit without deleting the user Once a user is deleted the user cannot be reactivated nor can that username be reused Figure 5 9 Deleting a User 5 4 5 Clicking the Add button displays the Add Edit User window Figure 5 10 Add User Screen Select the Role from the drop down list Figure 5 11 Select User s Role ...

Page 41: ...ting arrow to add the methods to the user s assigned method list Figure 5 13 Methods Assigned to User Click Save to add the user to the data base When a new user is created the user will be prompted to create a password the first time the user tries to log in The user enters their new password and then must enter it again to verify correct spelling Clicking OK returns the user to the login screen ...

Page 42: ...ark for Product Safety WEEE Safety Complies with Low Voltage Directive 2006 95 EC Certified to IEC EN ANSI UL 61010 1 2004 and CAN CSA C22 2 No 61010 1 2004 2nd Edition Safety Requirements for Electrical Equipment for Measurement Control and Laboratory Use Part 1 General Requirements EMC Complies with Class A Industrial Scientific Medical ISM equipment under EN 61326 1 2005 EN 61000 3 2 2004 and E...

Page 43: ...cleaning protocol 1 Turn off the WCS and CH05 chiller and disconnect the hoses from the front of the water tank 2 Start SonoLab and open the Motion Control pane 3 Fill the tank with approximately 450 ml of household bleach or equivalent and the rest with DI water 4 Click the Home button The transducer will lower into the bath and the degas pump starts 5 Operate the degas pump for approximately 5 m...

Page 44: ...ere is a small inlet tube that can be removed and cleaned Degassing the instrument is best performed on room temperature water as water below 15 degrees C will not degas as efficiently SonoLab prevents the chiller from coming on until the bath has been degassing for 30 minutes If being operated manually the operator should likewise begin degassing approximately 30 minutes prior to powering on the ...

Page 45: ...aining over a period of a couple weeks or more some biological growth may take place potentially leading to filter blockage and reducing filter life 7 7 2 Close SonoLab Exit SonoLab by clicking on the X in the upper right corner The following message is displayed Click No to cancel this request or take no action and SonoLab will close following a 20 second countdown Click Yes to close the applicat...

Page 46: ...EVEL label Verify that the Acoustic Assembly is fully lowered into the tank Tank Present Verify that the Acoustic Assembly is fully lowered into the tank Verify that the tank is slid fully into the enclosure so that the magnet embedded at the rear of the tank can be sensed Verify that the magnet is embedded in the rear of the tank Door Closure not recognized Verify that the door interlock is not b...

Page 47: ...culates in bath water Change the bath water with fresh DI water Perform a cleaning protocol with a 10 bleach or equivalent solution if this has not recently been done Tube Breakage Verify that the acoustic parameters being employed are correct Verify that average power levels are approximately correct see Power Level RF Board Limits Exceeded Error If Peak Incident Power is set to values above 400 ...

Page 48: ...ty the CH05 may be used with a step up transformer if operated at less than 115 VAC Water Requirements The instrument s water bath requires about 5 0 liters of either deionized or distilled water which should be topped up daily The water should be changed and cleaning protocol with 10 bleach or equivalent solution performed at least once a month Relocating of the System When moving the instrument ...

Page 49: ...f SonoLab 8 to a newer version For an upgrade simply uninstall the existing version of SonoLab 8 using the Windows Uninstall Program control panel Then install the new version by double clicking its setup file 1 Install 210063 SQL Server Express Covaris Part Number210063 Double click the SQLServer2016 SSEI Expr exe file to start the installation Confirm you wish to install if prompted The Express ...

Page 50: ...ile to run the installation 3 Install 210061 SonoLab 8 3 Double click the Setup exe file Accept the defaults when prompted 4 Install 210079 Baluff RFID Driver Copy entire 210079 folder to desktop open and double click the BalluffVCPInstaller_x64 exe file to run the installation 5 Install 210062 Plate Installer Copy the contents of the 210062 Plate Definition Files folder Plates_210062_revX to C Us...

Page 51: ...ations with a USB device If an internet connection is not available perform the manual driver installation as described below Manual driver installation If the automatic installation fails to occur Windows will post the following message Click on the Windows Start button Either via Control Panel or by right clicking on Computer and choosing Properties locate Device Manager Click on this link to op...

Page 52: ... option to Browse my computer for driver software Point the file open dialog to C Program Files x86 Covaris Driver and verify that Include subfolders is checked Windows will install the driver and post the following dialog box with a message Windows has successfully updated your driver software Click the Close button The Device Manager screen will refresh ...

Page 53: ... Covaris device entries have been assigned a COM number under Ports COM LPT The Device Manage window should now show Note that the COM numbers will vary from computer to computer but should occupy four consecutive ports Launching SonoLab 8 for the first time 1 Launch SonoLab 8 and WAIT for the message box to appear It might take a couple of minutes to establish a database connection for the first ...

Page 54: ...r a daily change of bath water It is however important that water which evaporates each day be made up with fresh distilled or deionized water It is also important that a monthly cleaning protocol with bleach or equivalent solution continue to be followed as the WCS 2 0 will retard but cannot completely prevent algae from taking hold in hoses and interior tank surfaces Detach the WCS water flow fr...

Page 55: ...Covaris LE220 plus R plus and Rsc Setup Instruction Manual 55 Part Number 010398 Rev H November 2019 Light Curtain Mounted to the LE220R plus Robot Arm Accessing LE220R plus Sample Tray ...

Page 56: ...iculate filter to the AutoFill inlet on the side of your system Assemble a male quick disconnect fitting to one end of the tube from the filter to your system and to one end of the tube from the regulator to the filter Refer to image below Install the tube from the regulator to the filter by sliding the open tube end into the push to connect fitting at the outlet of the regulator and clicking the ...

Page 57: ...w extend slightly out the front of the instrument Tominimize additional length the chiller connections are moved from the front to the side of the water bath Setting up the LE220Rsc is the same as for a conventional LE220R plus except for the connections to the ultraCUBE Chiller Water Conditioning System The upper hose from the WCS 2 must connect to the lower fitting of the water bath The temperat...

Reviews: