background image


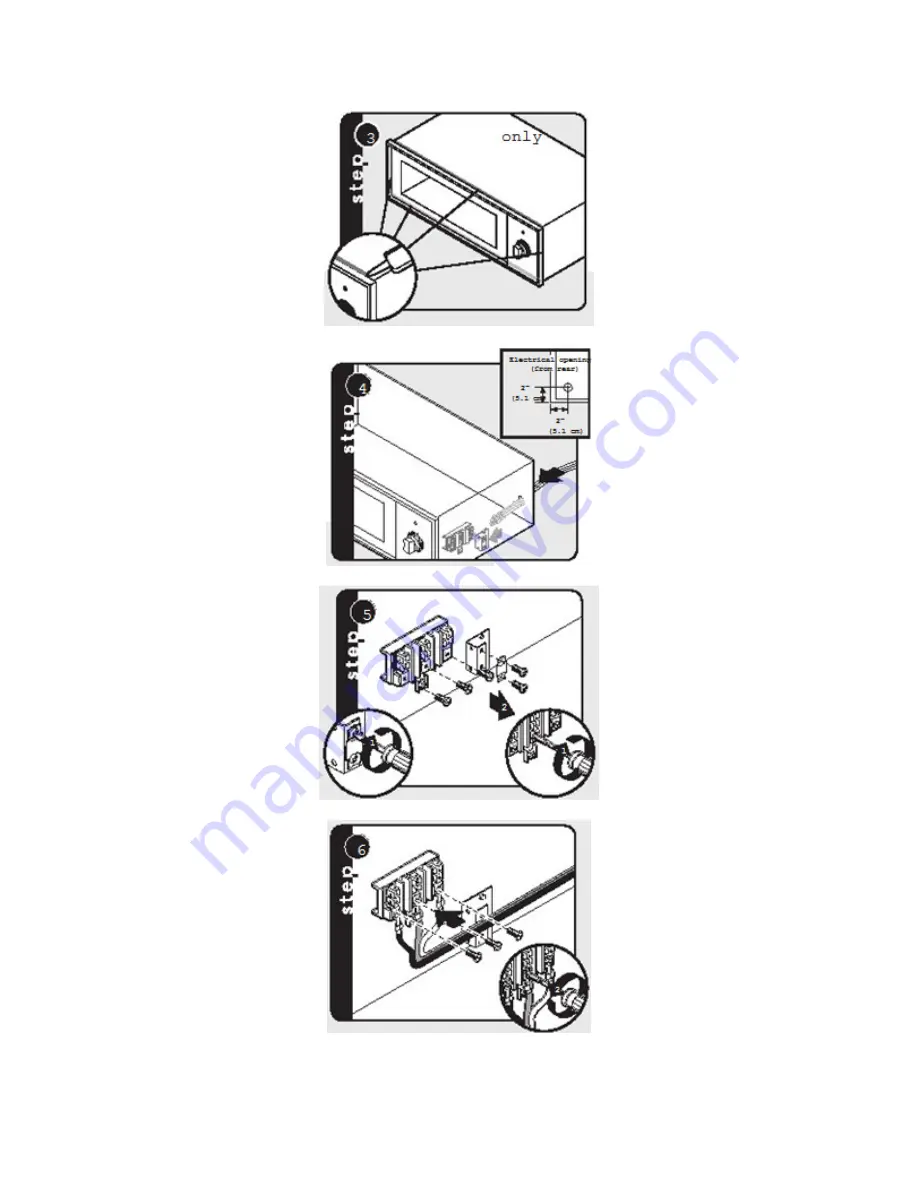
Apply silicone caulk around the back of the warming drawer trim. 


Feed supply cord up through hole in rear of warming drawer. 


Remove strain relief bracket and mounting screws on the terminals. 


Attach the white (neutral) and black (line) lead to terminals. Attach ground wire to the center terminal. 

Summary of Contents for CCD-WD

Page 1: ...Coyote Warming Drawer Owners Manual CWD ...

Page 2: ...d at High Heat Settings Boilover causes smoking and greasy spillovers that may ignite 11 Make Sure Reflector Pans or Drip Bowls Are in Place Absence of these pans or bowls during cooking may subject wiring or components underneath to damage 12 Protective Liners Do not use aluminum foil to line surface unit drip bowls or oven bottoms except as suggested in the manual Improper installation of these ...

Page 3: ... near surface units may become hot enough to cause burns During and after use do not touch or let clothing or other flammable materials contact surface units or areas near units until they have had sufficient time to cool Among these areas are the cook top and surfaces facing the cook top SAVE THESE INSTRUCTIONS ...

Page 4: ...t is the responsibility of the installer to comply with local codes If no local codes are applicable wire in accordance with the National Electrical Code AINSUNFPA 70 latest edition This appliance is not fused Protect with a proper sized fuse or circuit breaker and a GFI Line disconnect switch circuit breaker GFI or a plug receptacle of power cord connection should be readily accessible to the ope...

Page 5: ...minal or lead on the appliance Electrical Requirements o Hard wire direct with separate 120v 15 amp minimum 2 wire with ground circuit o Maximum amp usage is equal to 400 watts 3 3 amps o AC 120V H60 Installation Pull out drawer assembly until fully extended Slide finger along right and left side until you reach the black hand latches located at the front of the rails Pull up on both the right and...

Page 6: ... warming drawer trim Feed supply cord up through hole in rear of warming drawer Remove strain relief bracket and mounting screws on the terminals Attach the white neutral and black line lead to terminals Attach ground wire to the center terminal ...

Page 7: ...relieve strain reattach supply cord strain relief bracket over supply cord Slide entire warming drawer cabinet assembly into the cabinet opening Secure the warming drawer using four 8 mounting screws four screws provided Replace drawer assembly ...

Page 8: ...on must conform with local codes or in the absence of codes the National Electrical Code ANSI NFPA70 latest edition Your safety and the safety of others is very important We have provided many important safety messages in this manual and on your appliance Always read and obey all safety messages This is the safety alert symbol This symbol alerts you to hazards that can kill or hurt you and others ...

Page 9: ...e same as unit rating An electric rating plate specifying voltage hertz wattage amps and phase is attached to the product Wiring the warming drawer with more voltage than it is rated for may cause sever damage to the thermostat element and other components Wiring the warming drawer with less voltage than it is rated for may cause significant decrease in performance WARNING To reduce the risk of fi...

Page 10: ...have your model number serial number and proof of purchase available for any warranty claim Coyote Outdoor may require the return of defective parts for examination before issuing replacement parts If you are required to return defective parts shipping charges must be prepaid by the customer Upon examination and to Coyote Outdoor s determination if the original part is proven defective Coyote Outd...

Reviews: