background image

10

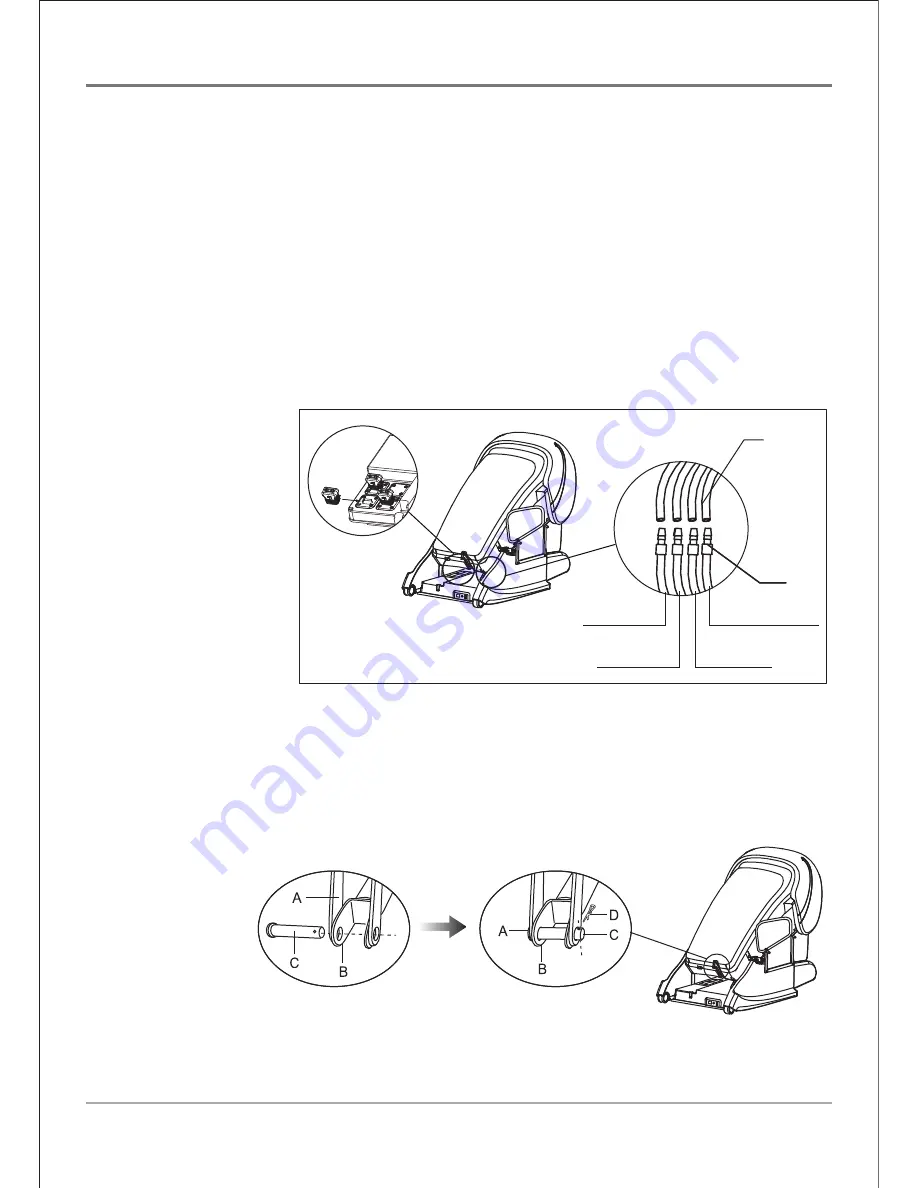
Green+2

Grey+2+Red

Grey+2

Green+3

A

B

Step 2: 

●  Turn the backrest to front, it will help expose all the air tubes out from backrest, named 

group A as picture showing, and remove the spare white plastic stoppers on each air tube.

●  Connect well air tubes "A" with corresponding air tube "B"(out from PCB box) as shown 

in picture. Then stuff all air hoses well connected inside to avoid pressing air tubes whiling 

chair moving.

●    Connect  data  plug  out  from  backrest  into  the  corresponding  socket  in  the  electric 

control box.

●  Raise the backrest.

Note:

 Please make sure above connection is well done before turning on the chair.

Step 3:

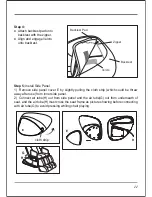
●  Take off the bin (flat head rivet) and bolt (split pin) from backrest actuator (a), and put 

them on the ground.

●  Attach the backrest connection rod (A) and the fork (B) with the flat head rivet (C). Lock 

the rivet with split pin (D) as showed in PIC 1 and PIC 2.

●  Turn the backrest to back until a “click” sound is heard.

A: Connecting rod

B: Fork

C: Flat head rivet

D: Split pin

PIC 1

PIC 2

Summary of Contents for EC-618B

Page 1: ...INSTRUCTION MANUAL EC 618B...

Page 2: ...struction manual and refer to it when needed Luxury Features 1 Safety Precautions 2 6 Chair Components 7 8 Chair Installation Moving 9 14 Chair Remote Controller 15 Operation Guide 16 21 Grounding Ins...

Page 3: ...d in neck shoulder arm back seat and leg Luxurious and shining head cover with functions of speakers for surrounding music and various LED light to creat most relaxing and comfortable massage environm...

Page 4: ...uctions before using A massage chair should never be left unattended when plugged in Unplug from the outlet when it is not in use and before putting on or taking off parts Close supervision is necessa...

Page 5: ...Check the skin in contact with the heated area of the appliance frequently to reduce the risk of blistering Burns may result from improper use Do not crush avoid sharp folds Keep children away from ex...

Page 6: ...han 5 minutes at a time as this may result in excessive stimulation and may have adverse effects Do not insert your hand or foot along the paths of the massage rollers during use as this may cause inj...

Page 7: ...apabilities or lack of experience and knowledge unless they have been given supervision or instruction or instruction concerning use of the massage chair by a person responsible for their safety Child...

Page 8: ...massage chair must only be professionally serviced or repaired Do not attempt to disassemble or repair the massage chair yourself 6 Things to Note About the Power Plug and Cord Check that the Alternat...

Page 9: ...7 03 Chair Components Castor LED Speaker Shoulder panel Handrest Seat Pad Calvesrest Footrest Pillow Backrest Side panel...

Page 10: ...8 Massaging Position Roller Heater Air Bag 34 Air Bags 1 Vibration 2 Heater 30 Air Bags 2 Roller Vibration Back Massage Mode...

Page 11: ...Use the diagonal pliers to cut off the cable tie which binds the stopper of the backrest and unwrap the packaging material of the backrest actuator a underneath the seat pad and both seat anchor b Pu...

Page 12: ...es whiling chair moving Connect data plug out from backrest into the corresponding socket in the electric control box Raise the backrest Note Please make sure above connection is well done before turn...

Page 13: ...ove side panel cover E by slightly pulling the cloth strip which could be threw away after use from inner side panel 2 Connect air tube H out from side panel and the air tube G out from underneath of...

Page 14: ...sic and it could be place into the right pocket 3 Attach side panel to the seat by aiming the 4 screw holes then fix by the 4 bolts M6 30 4 Target the white plastic holes on inner side of side panel t...

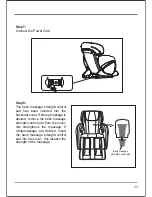
Page 15: ...assage is desired remove the back massage strength control pad from the cover this strengthens the massage If mildermassage are desired insert the back massage strength control pad into the cover this...

Page 16: ...the wheels as the fulcrum Note Always return the footrest to its original length and restore it to its original position before moving the chair otherwise injury during movement may result Do not move...

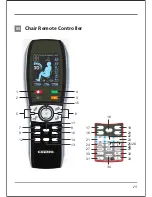
Page 17: ...15 05 Chair Remote Controller 1 2 5 7 9 12 8 11 17 18 21 24 27 30 31 19 20 23 22 25 26 29 28 32 33 34 15 16 10 14 13 6 4 3...

Page 18: ...l Control Button When a massage function is activated the timer is preset at 15 minutes Every single press on this button will change the timer interval in the sequence of 20 25 30 5 10 15 20 minutes...

Page 19: ...until the length of chair legrest fit your leg well Note When Zero G program is activated 1st time after chair is turn on the chair will scan and adjust the length of legrest automatically and memory...

Page 20: ...t soles Note During Auto Program mode pressing this button can also disable enable the Foot Rolling function 19 VIBRATION Seat Vibration function Start Stop Control Button Press this button once to ac...

Page 21: ...thmic mode 1 Tapping function for a full back massage at medium speed Press the button again to activate mode 2 Tapping function Press the button for the third time to stop Tapping function and switch...

Page 22: ...and partial massage When the spot and partial massage function are activated this button can be used to move the massage rollers Hold this button to move the massage rollers upward downward respective...

Page 23: ...thmic air pressure massage at Hand Rest Press this button again to stop the function 33 FOOT Footrest Air Squeeze Massage Control Button 5 levels of intensity to be adjusted Press this button once to...

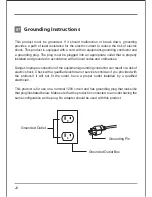
Page 24: ...l local codes and ordinances Danger Improper connection of the equipment grounding conductor can result in a risk of electric shock Check with a qualified electrician or service technician if you prov...

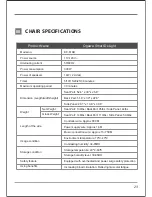
Page 25: ...onnection wire Approx 15 75CM Environment temperature 10 C 40 C Contrasting humidity 30 85RH Storage temperature 20 C 60 C Storage humidity level 30 85RH Equipped with overheated and power surge safet...

Page 26: ...the massage chair switch is turned to the I position 1 Make sure the chair is plugged into a working outlet 2 Turn the power OFF and then ON again The remote control works but the massage chair is not...

Page 27: ...off dust and dirt from the massage with a dry soft clean cloth after each use This product can be cleaned thoroughly with a slightly damp cloth Do not iron the upholstery Do not wash the upholstery u...

Page 28: ...e the unit serial number and dated proof of purchase sales receipt when they contact the COZZIA service department regarding a repair A COZZIA customer service representative will attend to most consu...

Page 29: ...ll be shipped to the consumer at no charge by the COZZIA service department PRODUCT REPAIRS Many COZZIA product repairs may be performed by the consumer in their own home with parts and instructions s...

Page 30: ...iting parts or repair Damage due to shipping and handling does not constitute a defect under this warranty Under no circumstance shall COZZIA or its representatives be liable for indirect consequentia...

Page 31: ...e Price Model No Date Purchased First Name Last Name Address City State Zip Phone Email Please mail to Cozzia USA LLC 14327 E Don Julian Rd City of Industry CA 91746 Tel 1 877 977 0656 Fax 1 800 521 4...

Page 32: ......
Reviews: