effigis.com
CPAT FLEX (DRV3 Lite)
13
12
User Manual
3. DRV3 Lite Settings Application
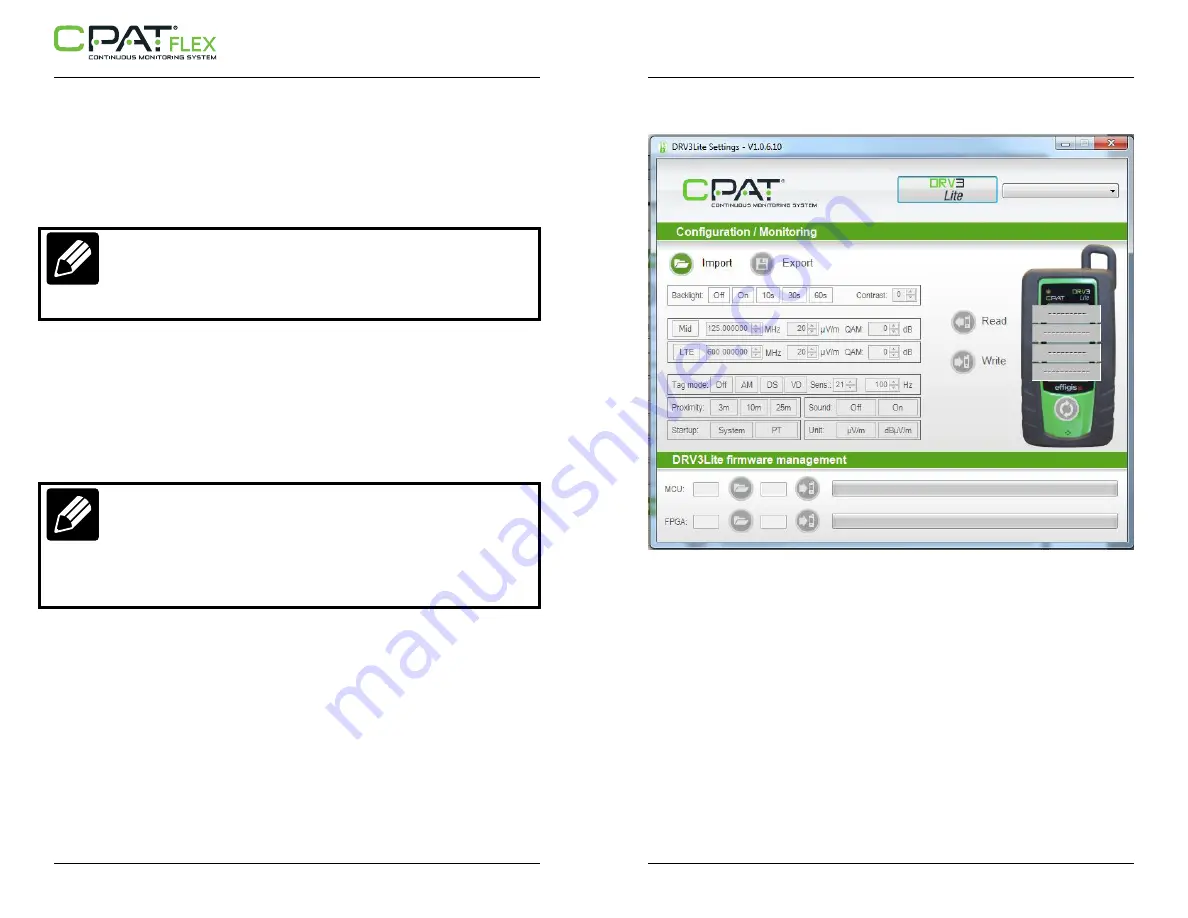
The following section describes how to use the DRV3 Lite Settings application to configure
the DRV3 Lite from a computer operating under Windows.
NOTE
This installation of DRV3 Lite Settings is required only if operating parameters
need to be modified.This can also be performed using the CPAT Mobile
application described in Section 4.
3.1 Installing the PC-based DRV3 Lite Settings Application
Effigis provides a PC-based settings application to configure the DRV3 Lite unit. This
software is required to configure your DRV3 Lite from your Windows PC. It is also useful to
configure several DRV3 Lite units with the same settings.
The DRV3 Lite Settings Application can read the setting of a configured DRV3 Lite unit and
copy these settings to other DRV3 Lite units.
NOTE
The DRV3 Lite Settings Application is a required system component for any
modifications to the DRV3 Lite settings. Another option is to use a third-party
module, which was developed with the DRV3 Lite Commands Set application
programming interface (API). This API can be sent upon written request to an
Effigis representative.
The application can be downloaded from the following link:
https://www.cpat-solution.com/CPAT
1. Login into CPAT Web Connection using your “User” and “Password”.
2. Select “Downloads” from the “Need help” button.
3. Download the Settings-Application-DRV3Lite.zip file, which contains Settings-Application-
DRV3Lite.exe and .xml files with default configuration of the DRV3 Lite device.
4. Unzip the .zip file on your Windows PC. You are now ready to use DRV3 Lite Settings
Application.
5. To launch the application, just double click on the executable file named Settings-
Application-DRV3Lite.exe. The main window will appear.
3.2 Connecting the DRV3 Lite
1. Turn the DRV3 Lite on.
2. Connect the DRV3 Lite to the PC using a USB cable. The interface on the DRV3 Lite is
Micro-B USB. To be automatically detected, the Windows ‘Device Installation Settings’ must
be set to ‘Yes, do this automatically (recommended)’. This can be set through ‘Start menu
> right click on ‘My computer’ > select Properties’; In the window, select ‘Advanced
System settings’; In the advanced settings window, select the ’Hardware tab’; In the
hardware section, press on the ‘Device installation Settings’ button. Windows should
automatically detect the DRV3 Lite device connected to your computer. The application
automatically detects the port on which the DRV3 Lite is connected.
3. When you click the “DRV3 Lite” button, the application will try to find every DRV3 Lite unit
connected to the the Windows-PC and all found units are put in the drop-down menu
beside the “DRV3 Lite” button. When several DRV3 Lite devices are found, the DRV3 Lite
Settings Application is connected by default to the first device in the drop-down menu.

