background image

CHPA SERIES


B-14


THIS


DOCUMENT


IS


THE


PROPERTY


OF


COMMUNICATIONS


&


POWER


INDUSTRIES. 

REPRODUCTION


OR


RELEASE


WITHOUT


EXPRESS


PERMISSION


IS


STRICTLY


PROHIBITED 

D

OC

.01023245


R

EV

.L 


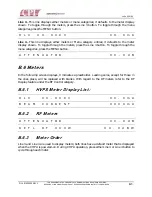
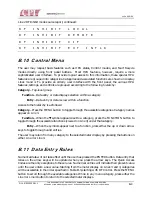
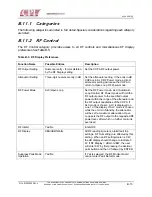
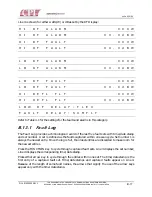
The sample screen (Lines 1-3) for RF Control is as follows: 

L O C A L 

1 5 :  2 7 

S T A N D B Y 

R F   C O N T R O L 

Depending on the RF Display setting, either of the first two lines will appear on Line 4 for the 
RF Out Setting. Pressing the FUNCTION button will toggle through the remaining entries: 

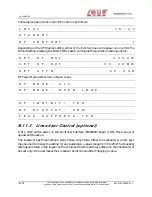
S  E T   R F   O U T 

X X X X W 

S  E T   R F   O U T 

X X .  X d B W 

S E T   A T T N 

X X .  X d B 

RF Power Mode (either ALC or Open Loop): 

F  M 

:  A 

R  F    M O D E  :    O P  E  N   L  O O P 


R F   I N H I B I T :   Y E S 

R F   D I  S P L A Y :    d B W 

P E A K   S U P P R E S S :  Y E S 

B.11.3  Linearizer Control (optional) 

If S1-1 (DIP switch bank) on the Controller Interface (01020360) board is ON, this menu will 
appear and be active. 
The linearizer has three settings: Gain, Phase, Amplitude. Either the keyboard or arrow keys 
may be used to change the setting for any parameter—values range from 0 to 253. The linearizer 
settings are stored in the linearizer; the command to store all three settings in the linearizer will 
be sent only if the user leaves the Linearizer Control menu after changing a value. 

Summary of Contents for Satcom Division VZC-6967 Series

Page 1: ...LLATION OPERATION AND PREVENTATIVE MAINTENANCE M A N U A L CHPA COMPACT HIGH POWER AMPLIFIER For Use With Model Numbers Service Center Headquarters and Design Center West Coast Operations 811 Hansen Way Palo Alto CA 94303 Manufacturing East Coast Operations 45 River Drive Georgetown ON Canada L7G 2J4 VZU 6997 Series VZU 6996 Series VZU 6995 Series VZC 6967 Series ...

Page 2: ...ntained in this document are provided solely for the installation operation and maintenance of CPI equipment Except for rights expressly granted by contract all such information is the exclusive property of CPI Satcom Division This document may not be duplicated in whole or in part or be used for manufacture without written permission of CPI Satcom Division Copyright 2011 by Communications Power I...

Page 3: ...ROWAVE DISCUSSION S 5 GENERAL MICROWAVE GUIDELINES S 5 PHYSICAL SAFETY S 6 LIFTING HEAVY OBJECTS S 6 EXTENDING RACK SLIDES S 6 CHAPTER 1 INTRODUCTION 1 1 1 1 OVERVIEW 1 1 1 2 ABOUT THIS MANUAL 1 3 1 3 MAJOR SUBSYSTEMS AND THEIR FUNCTIONS 1 4 1 4 TECHNICAL DESCRIPTION 1 4 1 4 1 RF SUBSYSTEM 1 4 1 4 2 POWER SUPPLY SUBSYSTEM 1 6 1 4 3 POWER FACTOR CORRECTION MODULE 1 7 1 4 4 POWER PROCESSOR MODULE 1 ...

Page 4: ...ERFACES 2 4 2 5 6 RF CONNECTIONS 2 4 2 5 7 RF OUTPUT WAVEGUIDE CONNECTION J3 2 5 2 5 8 COOLING CONSIDERATIONS 2 5 CHAPTER 3 INTERFACES 3 1 3 1 OVERVIEW 3 1 3 2 CHPA CONTROL MODE HIERARCHY 3 1 3 3 SERIAL REMOTE INTERFACE 3 2 3 4 RF SWITCH SYSTEM INTERFACE 3 4 3 4 1 RELAY DEFINITIONS 3 4 3 5 EXTERNAL INTERLOCKS INTERFACE 3 6 3 6 COMPUTER INTERFACE 3 8 3 6 1 CIF HARDWARE CONFIGURATION 3 8 3 7 COMPUTE...

Page 5: ... POWER PROCEDURES 4 1 4 3 USING THE FRONT PANEL 4 2 4 4 INITIAL POWER ON PROCEDURES 4 3 4 4 1 POWER ON SELF TEST AND HEATER TIME DELAY 4 3 4 5 VERIFYING OPERATIONAL SETTINGS 4 4 4 6 SETTING THE FAULT AND ALARM TRIP POINTS 4 4 4 7 SETTING SERIAL REMOTE AND CIF PORT PARAMETERS 4 6 4 8 VERIFYING RF OUTPUT LEVEL 4 7 4 9 VERIFYING RF ALARM AND RF FAULT TRIP POINTS 4 8 4 10 TESTING THE CHPA VIA COMPUTER...

Page 6: ...A FUNCTIONS 5 10 5 13 1 FACTORY AUTHORIZED ACCESS MODE 5 10 5 14 TERMINOLOGY 5 10 5 15 EXITING A MENU 5 11 5 16 DATA ENTRY RULES 5 11 5 17 QUICK ACCESS CODES 5 13 CHAPTER 6 MAINTENANCE 6 1 6 1 OVERVIEW 6 1 6 2 SCHEDULED PREVENTIVE MAINTENANCE 6 1 6 3 MECHANICAL PREVENTIVE MAINTENANCE 6 2 6 4 VISUAL INSPECTION 6 4 6 4 1 INSPECTING AND CLEANING AIR FILTERS 6 5 6 4 2 CHECKING A3 LEDS AND DISPLAY 6 5 ...

Page 7: ...3 B 5 ALPHANUMERIC DISPLAY DEFINITION B 3 B 6 METERS B 5 B 6 1 HVPS METER DISPLAY LIST B 5 B 6 2 RF METERS B 5 B 6 3 METER ORDER B 5 B 6 4 METER LIST B 6 B 7 FAULT MESSAGES THAT CORRESPOND TO DIGITAL STATUS LINES B 6 B 8 FAULT MESSAGES GENERATED BY LIMIT COMPARISONS B 7 B 9 ALARMS B 8 B 10 CONTROL MENU B 9 B 11 DATA ENTRY RULES B 9 B 11 1 CATEGORIES B 13 B 11 2 RF CONTROL B 13 B 11 3 LINEARIZER CO...

Page 8: ... COMPUTER INTERFACE PARAMETERS B 23 B 13 11 SOFTWARE VERSIONS B 26 B 13 12 ELAPSED HOURS INFORMATION B 26 B 14 QUICK ACCESS CODES B 27 B 15 POST FAULTS B 29 B 16 SOFTWARE ERROR CODES B 29 B 16 1 FLASH RAM OPERATION AND PROGRAMMING B 30 B 16 2 TO FORCE THE CHPA TO USE EPROM CONTENTS B 30 B 16 3 REPROGRAMMING THE FLASH RAM B 30 B 16 4 ERROR MESSAGES ASSOCIATED WITH THE FLASH RAM B 32 APPENDIX C REPL...

Page 9: ... Setup 6 10 Figure B 1 Front Panel Picture B 1 List of Tables Table 1 1 CHPA Model Number and Frequency Ranges 1 1 Table 1 1 CHPA Model Number and Frequency Ranges continued 1 2 Table 3 1 Serial Remote Interface Pin Assignment J6 3 3 Table 3 1 Serial Remote Interface Pin Assignment J6 continued 3 4 Table 3 2 Low RF Relay Function 3 5 Table 3 3 RF Switch Pin Assignment J5 3 6 Table 3 4 Interlocks I...

Page 10: ...aintenance Schedule CHPA continued 6 3 Table 6 2 Recommended Test and Service Equipment Description 6 3 Table 6 2 Recommended Test and Service Equipment Description continued 6 4 Table 6 3 CHPA Performance Test Results 6 9 Table 7 1 Compact HPA Drawings 7 1 Table B 1 Front Panel Button Description B 2 Table B 2 Front Panel LEDs B 3 Table B 3 Front Panel Categories B 10 Table B 3 Front Panel Catego...

Page 11: ...HE PROPERTY OF COMMUNICATIONS POWER INDUSTRIES REPRODUCTION OR RELEASE WITHOUT EXPRESS PERMISSION IS STRICTLY PROHIBITED xi Table B 14 Software Error Codes B 29 Table C 1 Replaceable Parts Listing C 1 Table C 1 Replaceable Parts Listing continued C 2 ...

Page 12: ...SERIES xii THIS DOCUMENT IS THE PROPERTY OF COMMUNICATIONS POWER INDUSTRIES REPRODUCTION OR RELEASE WITHOUT EXPRESS PERMISSION IS STRICTLY PROHIBITED DOC 01023245 REV L This page is intentionally left blank ...

Page 13: ...chnicians who work with high voltage equipment In the context of this discussion any voltage that is lethal is viewed as high voltage Therefore even prime power 115 to 440VAC is dangerous because prime power potentials have been known to cause death or injury Electrical circuits operate quickly and do not allow a careless individual a second chance When dealing with high voltage the results are ve...

Page 14: ... other person Be sure someone else is present and knows what to do in any emergency e g how to shut equipment off first aid who to call etc d Use one hand when working with high voltage circuits Many people recommend that you put one hand in your pocket when you use a probe or other piece of equipment inside a high voltage section e Do not float measuring equipment above ground Make all measuremen...

Page 15: ... healthy respect for high voltage o A good operating practice is to check the potential between the equipment chassis and earth ground before you complete the circuit with your body As voltage levels increase the protection you get from insulation and air gap diminishes For example in a piece of equipment that involves beam voltages of about 16kV the beam transformers look very safe with massive i...

Page 16: ...tches and anything else you can think of to protect yourself w When troubleshooting a unit assume that the switches and components are defective You may shut off the high voltage switch in some systems but if the switch were defective the high voltage would still be on Returned units are potential booby traps x Make sure that your workstation is stable Flimsy work surfaces or supports for the equi...

Page 17: ...ntly the permissible level has been reduced to 1mw cm sq in the United States as has been the case in several European countries General Microwave Guidelines The purpose of these guidelines is to provide practical approaches to control unwanted microwave energy associated with the operation and servicing of CPI Satcom Division equipment The following approaches are effective in both laboratory or ...

Page 18: ...s 45 kg and require two persons to lift them Due to the weight of the drawers at least two persons are required for installation of the drawers to the final rack assembly At least two people are also required for removal of the drawers from the rack assembly Extending Rack Slides a Serious injuries can result from heavily loaded racks or drawers falling forward b Due to the weight of the drawers t...

Page 19: ...DBS band amplifiers is available in this series The model numbers frequency ranges and rated output power at the waveguide flange of the high power CHPA series are as follows Table 1 1 CHPA Model Number and Frequency Ranges Model No Frequency Range GHz Rated Power Watts VZC 6967AM 5 850 6 725 650 VZC 6967AN 5 850 7 075 650 VZC 6967AT 5 850 6 650 650 VZC 6967AD 5 715 6 425 602 VZC 6967AB 5 850 6 65...

Page 20: ...e use of a microprocessor control system thereby simplifying interfacing with remote control and monitor facilities Flash RAM allows firmware updates to be made without opening the unit Implementation of a compact lightweight wideband TWT traveling wave tube permits continuous efficient use across the entire frequency band The CHPA also supports the unique internal linearizer which can be controll...

Page 21: ...ion and unpacking the CHPA It also describes the steps required to make the necessary power connections Chapter 3 Interfaces describes the CHPA s built in interfaces to external devices also listed are detailed descriptions for each connection The communication protocol and command set used for computer control of the CHPA are also included in this chapter Chapter 4 Initial Power On and Checkout d...

Page 22: ...ectors and output filter The power supply section includes the power factor correction power processor and high voltage regulation circuitry as well as monitor and control circuitry Microprocessor circuits provide automatic sequencing to control both CHPA operation and continuous monitoring of critical parameters The front panel of the unit serves as the primary user interface housing all monitor ...

Page 23: ...ernal waveguide run and antenna feed The isolator assists in protecting the TWT from excessive reflected power due to damaged broken waveguides or antenna components The isolator is rated such that it will safely dissipate all reflected power equal to the full rated output of the CHPA for the duration of time until the protection circuits shut off the high voltage power supplies In addition the is...

Page 24: ...th CPI Remote Panel Computer I F User Interlocks Control Display Micro controller RF Metering Faults Control DC Power Monitor Control HV Module Helix Cathode Coll 1 Coll 2 RF Subsystem TWT Linearizer optional DC Power SSIPA RF Monitor DC Power DC Power Figure 1 3 Power Supply Block Diagram The traveling wave tube derives its operation from four DC power supplies a low voltage filament heater suppl...

Page 25: ...rrent protection functions 1 4 5 High Voltage Module The High Voltage Module provides the following key power supply functions regulated TWT heater supply regulated TWT high voltage helix and collector supplies helix supply current voltage monitoring and fault protection The High Voltage Module contains the transformers rectifiers filters and voltage current sense circuits for all critical TWT vol...

Page 26: ...t output and decision making with the exception of critical module level decisions is done by the Control Module All rear panel user interfaces are also communicated to via the Control Module To survive AC power loss all user settings and operating parameters such as RF trips TWT operating voltages serial port baud rate and PIN diode attenuation setting etc are stored in the battery backed random ...

Page 27: ...al Linearizer The internal linearizer extends the linear operating region of the amplifier It is easily installed inside the CHPA and is controlled through the front panel optional remote panel and serial computer interface A Separate Remote Control Panel This Remote panel has identical functions and configuration as the one supplied with the CHPA Redundant and Power Combined Subsystems The TWT am...

Page 28: ...SERIES 1 10 THIS DOCUMENT IS THE PROPERTY OF COMMUNICATIONS POWER INDUSTRIES REPRODUCTION OR RELEASE WITHOUT EXPRESS PERMISSION IS STRICTLY PROHIBITED DOC 01023245 REV L This page is intentionally left blank ...

Page 29: ...vident immediately contact the carrier that delivered the equipment and submit a damage report Failure to do so could invalidate future claims 2 3 Unpacking Carefully unpack and remove all items inspect the interior of the container for damage Save all packing material until all inspections are complete It is recommended that all packing material be saved for potential future use Verify that all i...

Page 30: ...lifier CHPA without proper termination or under excessive load voltage standing wave ratio VSWR could cause destruction of the traveling wave tube TWT and will void the warranty See specifications in See Drawings Schematics in Chapter 7 2 5 Installation Installation of the CHPA includes four phases Mechanical installation Electrical connections RF connections Cooling considerations 2 5 1 Mechanica...

Page 31: ...1 Rear Panel of CHPA 2 5 3 Prime Power The prime power requirement for the equipment is nominal 208 240 VAC 47 63 Hz single phase The wiring used for applying prime power to the system should be sized in accordance with National Electrical Code considering the total input power required See Specifications in See Drawings Schematics in Chapter 7 Prime power is applied to connector J1 located on the...

Page 32: ...s For best EMI performance use metal shell connectors and connect the cable shield directly to the connector shell Refer to Chapter 3 Interfaces for pin out information Switch Port J5 15 pin Serial Remote Control J6 9 pin Computer I F J7 9 pin User Interlock J8 9 pin Aux Serial Port J10 9 pin Note Connectors J5 and J8 are shipped with jumper interlock connectors attached These jumpers are explaine...

Page 33: ...fter alignment is verified in all three planes loosely attach the interconnecting waveguide to the output waveguide flange of the CHPA Start all bolts and verify proper alignment before uniformly tightening the bolts 5 Carefully tighten all bolts in opposite pairs rather than sequentially around the perimeter of the flange so that the connection is firm Do not over tighten because this can strip t...

Page 34: ...length It is therefore recommended that for longer duct runs a transition be made to perhaps 8 inch duct as near the CHPA exhaust as possible 8 inch plumbing will significantly reduce pressure drop and permit much longer duct runs Use of 4 inch diameter ducting should be strictly avoided It is highly recommended that a heating ventilation and air conditioning HVAC engineer be consulted before duct...

Page 35: ...terlocks Interface These interlocks enable the user to interlock the CHPA with external safety devices Computer Interface This interface enables the user s computer equipment to control the CHPA via RS 422 485 or RS 232 serial communication Users must write all necessary software for their computers Auxiliary Serial This RS 232 or RS 422 485 serial port is factory configured for RS 232 operation a...

Page 36: ...NL RMTPNL will configure the port for the CHPA Remote panel No other entries will be available USER will make the port act similarly to the CIF port All of the same protocol and command set choices will be available press the FUNCTION button to access these selections The port will still be subject to the control mode hierarchy described at the beginning of this section The CHPA Serial Remote Inte...

Page 37: ...e reconfigurated from the default RMTPNL to a user defined configuration Refer to Table 3 1 for J6 pin assignments Refer to the Computer Interface discussion later in this chapter for information on how to configure J6 for computer control operation Note Use a shielded cable and ground the shield on both ends for EMC EMI compliance Figure 3 1 Setting Termination Resistors Table 3 1 Serial Remote I...

Page 38: ... relay reported CHPA status and RF Inhibit command required by a waveguide switch controller Three relays provide CHPA status Low RF Fault and Sum Fault The relay coil is de energized to indicate a condition this fail safe mode means that a loss of power will provide condition indications on all relays The only command on this interface RF Inhibit is active at all times and is not subject to the c...

Page 39: ...ion FAULT RELAY is displayed use the arrow keys to select one the following FAULT Fault state LOW RF Mimics the action of the Low RF Relay SUMFLT Mimics the action of the Sum Fault Relay HV ON Reports the result of the logical equation High Voltage On and NOT RF Inhibit XMIT Reports High Voltage ON See note 6 The Sum Fault Relay indicates that the CHPA is latched into the Fault state When the CHPA...

Page 40: ...um Fault Common Relay Common 3 11 Sum Fault NO Relay NO 3 Normally open when coil is de energized open from pin 10 when the CHPA is latched into the Fault state 12 Not used 13 Not used 14 RF Inhibit Closed to pin 15 for No RF Inhibit 15 RF Inhibit Return Input Return Table 3 3 Notes 1 Outputs are dry relay contacts rated up to 50 VDC 50 mA and are connected in fail safe mode 2 The RF Inhibit requi...

Page 41: ...ments as shown in Table 3 4 Figure 3 2 Setting Serial Format Table 3 4 Interlocks Interface Pin Assignments J8 Pin Signal Name Remarks 1 External Interlock latching beam off Open from Return pin 2 for External Interlock Fault Latching 2 External Interlock Latching Latching Return 3 External Interlock Latching Open from Return pin 4 for External RF Inhibit 4 External Interlock Non Latching Return N...

Page 42: ... Note that there are slight format differences in the attenuator setting and query commands Refer to Table 3 7 and 3 8 Also note that DIP switch setting changes do not take effect until power to the CHPA has been cycled OFF and ON 3 6 1 CIF Hardware Configuration The serial interface can be configured to one of two serial hardware formats RS 232 or RS 422 485 4 wire A slide switch mounted inside t...

Page 43: ... the CHPA The CIF protocol includes commands for controlling and monitoring the CHPA CHPA control commands are executed by the CHPA if the CIF port has been chosen as the valid control point CHPA monitoring commands are valid at all times unless otherwise stated Use the CIF Configuration menu to set the desired CIF parameters Unless otherwise specified all numbers in this document are base 10 3 8 ...

Page 44: ...erred to as status bytes and are described in detail later in this section If the CHPA was not able to execute a command received via the CIF a reject code or codes is included in the response message If the STX ETX header ending byte message format was used the header byte is NAK thus indicating a rejection 3 9 Command and Response Format Command Received by CHPA HEADER ADDRESS COMMAND PARAMETERS...

Page 45: ...ont panel All commands and responses Header byte ASCII 123 Ending byte ASCII 125 3 9 2 Address Byte The address byte is under CIF CONFIGURATION as PORT ADDRESS The address byte provides the computer port with an address It may be set from 48 to 111 using the keypad or the arrow keys 3 9 3 Command Byte The range of command bytes is from 32 to 111 3 9 4 Response Byte s The response byte s range from...

Page 46: ...ilable Longitudinal Parity The check byte is the exclusive OR of all message bytes including the header and ending bytes and excluding CR or LF if chosen LONG on front panel Checksum This formula provides a printable ASCII checksum SUM on front panel N Checksum 32 MOD95 Σ message bytei 32 N i 1 where MOD95 is the operation modulo 95 N is the total number of bytes in the message including header an...

Page 47: ...r and control computer settings mismatches in settings may result in the CHPA providing partial or unexpected responses To select CR press the MENU button to select CIF CONFIGURATION press the FUNCTION button to select CR ENABLE Use the arrow keys to select the desired choice YES or NO To select LF press the MENU button to select CIF CONFIGURATION press the FUNCTION button to select LF ENABLE Use ...

Page 48: ...replaced with a blank 7 55 RF Output Power in Watts Query Four ASCII characters in the form NNNN are returned Leading zeros are blanked 8 56 Attenuator Setting Query Four ASCII characters in the form NN N are returned Leading zero is blanked See Note 2 9 57 Not used 58 Low RF Alarm Trip point Query Watts see note 1 59 High RF Alarm Trip point Query Watts see note 1 60 Low RF Fault Trip point Query...

Page 49: ...requested Provide the setting in the form NN N G 71 Set ALC RF O P in Watts This command activates the ALC mode and sets the power requested Provide the setting in the form NNNN Leading zeros may be replaced with blanks H 72 Terminate ALC I 73 Enable RF Inhibit J 74 Clear RF Inhibit K 75 Not used L 76 Set Low RF Alarm Trip point Watts see note 2 M 77 Set High RF Alarm Trip point Watts see note 2 N...

Page 50: ...ed and S1 1 on 01020360 CCA Controller Interface is ON 4 For CHPA Protocol Option DIP Switch S1 Switch 2 of Interface CCA is ON Attenuator setting is of the form NN NO dB 3 10 1 Slow Commands A subset of CHPA commands these commands may require several seconds to complete These commands are listed in the CHPA commands table Table 3 8 Table 3 9 Slow Commands ASCII Byte Decimal Commands for descript...

Page 51: ...his bit is determined each time a Summary Status Query is requested 4 Info Error Message Data Check This bit is set when a selected information or error condition has occurred This bit is cleared by an Info Error Message Query command Refer to Interface commands Activate Info Error Message command and Deactivate Info Error Message command 3 Secondary Status Data Check This bit is set when any chan...

Page 52: ...4 Control Point 0 0 Local 1 0 Remote 1 1 Computer Interface CIF 3 BB RAM Error Detected This bit is set if the battery backed RAM contents are suspected to be corrupt This condition usually indicates that the BB RAM must be replaced Under this circumstance firmware defaults are used for all alarm and fault settings 2 Not used 1 High RF Alarm This bit is set during High RF Alarm 1 0 LSB Low RF Alar...

Page 53: ...lix Over Voltage 4 Helix Under Voltage 3 Helix Average Over Current 2 Power Supply Arc Trip 1 DC Buss Under Voltage 1 0 LSB Helix Voltage Detected in Standby 7 MSB Parity 6 Complement of bit 5 5 Reflected RF 4 PS Thermal Interlocks Open 3 TWT Thermal Fault 2 High RF Fault 1 Low RF Fault 2 0 LSB External Interlock Fault 7 MSB Parity 6 Complement of bit 5 5 Not used 4 Not used 3 Not used 2 Not used ...

Page 54: ...te Panel 4 0 LSB Not used Table 3 13 Note Bit is set for the fault condition Table 3 14 Information Error Messages Response is port sensitive and will reflect the status of the port Remote or CIF queried Byte Bit Bit Definition set if condition exists since last query 7 MSB Parity 6 Complement of bit 5 5 Control of the CHPA has been given to the computer interface 4 Control of the CHPA has been lo...

Page 55: ...t 5 5 RF O P power setting command terminated due to the cessation of high voltage 4 RF O P power setting command terminated before reaching requested value 3 ALC activity terminated due to cessation of high voltage 2 Not used 1 Not used 2 0 LSB Not used 3 12 ID Version Message The ID Version Message is returned upon receiving the ID Version Query and consists of the following string where x is a ...

Page 56: ...SERIES 3 22 THIS DOCUMENT IS THE PROPERTY OF COMMUNICATIONS POWER INDUSTRIES REPRODUCTION OR RELEASE WITHOUT EXPRESS PERMISSION IS STRICTLY PROHIBITED DOC 01023245 REV L This page is intentionally left blank ...

Page 57: ...propriate use of the CHPA can cause harm to the operator or equipment Do not attempt the procedures outlined in this chapter before becoming thoroughly familiar with its contents 4 2 Pre Power Procedures Before applying prime AC power to the CHPA verify that the following conditions are met The voltage of the station s AC prime power matches those marked on the back label 208 240 VAC A ground stra...

Page 58: ...efore switching on power for the first time become familiar with all CHPA controls and indicators and with the procedures in this chapter Figure 4 1 The CHPA Series Front Panel 4 3 Using the Front Panel The CHPA is fully controlled using the front panel this panel is also used to display and in some cases to change the CHPA s RF power level settings protection settings and computer interface and c...

Page 59: ...ntroller performs a series of self tests to ensure that it has the ability to control and monitor the CHPA The HTD Heater Time Delay then counts down for a predetermined time to allow the TWT traveling wave tube heater to warm up The following steps are to be performed in the order indicated Refer to Basic CHPA Operations in Chapter 5 for example displays during each operating state Verify the res...

Page 60: ...its operational values factory preset to meet the requirements of a typical installation Before the CHPA is used at the installation site the user configurable settings must be checked and if necessary set to meet the user s requirements 4 6 Setting the Fault and Alarm Trip Points The following Fault and Alarm Trip Point settings can be displayed and changed HELIX Over and Under voltage and curren...

Page 61: ...hange to the entry for the FAAC 7 Enter the FAAC and then press ENTER to exit the FAAM The Test Mode LED should now be dark To change RF Faults and Alarms perform the following steps 1 Press the SPECIAL button followed by the decimal button Key in 07 the display will change to the entry for RF Faults and Alarms 2 Repeatedly press the FUNCTION key to cycle through the RF faults and alarms 3 For the...

Page 62: ...uter These ports are described in detail in Chapter 3 Interfaces To change the factory default settings for the Remote port perform the following steps 1 Press the SPECIAL key followed by the decimal button 2 Key in 18 the display will change to RMT CONFIGURATION 3 Repeatedly press the FUNCTION button to review each selection under this menu If a CHPA Remote panel is to be used with the unit the e...

Page 63: ...uator 4 Ensure that the attenuator is set to maximum attenuation a To quickly get to the attenuator setting adjustment press the SPECIAL button followed by the decimal button b Key in 01 the display will change to attenuator input c Key in 25 0 to set the attenuator to its maximum The attenuator may be set by either keying in a desired attenuator setting directly followed by the ENTER button or pr...

Page 64: ...he High RF Fault message will appear briefly c The TRANSMIT LED will flash as the CHPA recycles through the Beam On Sequence state back to the Transmit state d Once the CHPA is in the Transmit state the High RF Fault will be detected and steps a through c will occur two more times before the CHPA latches into the Fault state e Once the CHPA is latched into the Fault state the FAULT LED will flash ...

Page 65: ...ts at the computer to confirm that it not only has complete control of the CHPA but that it has complete monitoring capabilities of all of the metering available on the CHPA front panel 7 If no options are to be tested switch off the main power to the CHPA remove the RF Input and Output test loads and make the normal RF Input and RF Output connections 4 11 Testing Optional Equipment At this time a...

Page 66: ...e Configuration is set for RMTPNL 3 Verify that the CHPA is powered on and in the Standby state as indicated by the STANDBY LED being lit 4 Press the LCL RMT pushbutton on the front panel until REMOTE appears in the upper left corner of the display This indicates that the Remote Control Panel can now control the CHPA 5 Perform tests at the Remote Control Panel to confirm that it not only has compl...

Page 67: ... status and meters on the alphanumeric display and associated LEDs Individual pushbuttons control essential CHPA functions such as transmitting and selecting the Control mode The keypad and alphanumeric display form a simple terminal through which the user accesses CHPA features which are grouped in menu categories such as RF Control Fault Log and Time Date Setting This chapter consists of the fol...

Page 68: ...On Self Test POST Heater Time Delay counts down from 3 00 to 0 00 minutes The Heater Time Delay countdown will be greater than three minutes if User Heater Time Delay is greater than zero seconds User Heater Time Delay can be used to prevent multiple amplifiers from entering Transmit simultaneously after a prime power failure for example See Appendix B under Time Date Set for more information on U...

Page 69: ... power should be switched off to conserve electricity and prolong TWT life The following procedure describes normal shutoff 1 Press the STANDBY button to place the CHPA in Standby state Verify that Line 2 of the display indicates STANDBY 2 Leave the CHPA in Standby approximately 10 minutes to allow the TWT collector to cool off 3 Switch off the Main circuit breaker Note Repeated cycling of AC powe...

Page 70: ...S Beam Off Sequence Transition from Transmit to any beam off state Fault Non latched Beam off malfunction state the CHPA will recycle to the state prior to the fault Fault Latched Beam off malfunction state Only user intervention will return the CHPA to a normal operating state 5 6 Initialization and Power On Self Test POST State To start the CHPA turn on the Main Power circuit breaker The micropr...

Page 71: ...O N During POST the microprocessor controller performs tests that check the integrity of the microprocessor controller hardware software and CHPA subsystems Each test is assigned a number for troubleshooting purposes In the event of a POST Fault the fault will be indicated See Appendix B Table B 13 At the successful completion of the POST the CHPA will automatically enter the HTD state 5 7 Heater ...

Page 72: ...utes HTD 3 minutes During HTD the user may press the TRANSMIT button to select Beam On when HTD has elapsed this action is displayed on the front panel as XMIT SELECT The user may also press the MENU button to scroll through available menu categories See later in this chapter under Special CHPA Functions for a description of the menu category hierarchy See Appendix B for a complete description of ...

Page 73: ... hour format RF output power in dBW default meters L O C A L A L C 1 0 0 7 A R F O U T 2 3 0 d B W H L X 1 2 0 1 K V 0 0 m A A T T E N U A T O R 1 0 0 d B The Beam Off Sequence BOFS is the transition from any Transmit state to any Beam Off state It occurs so quickly that the message for this sequence may not be seen 5 10 Fault State The CHPA features Auto Fault Recycle mode this feature allows the...

Page 74: ... The RF Switch port and Interlock interface connect to switching systems and user defined interlocks The RF Switch port and Interlock interface have the highest level of control They are active at all times all commands that are issued by the user through these ports must be acknowledged and acted upon if the CHPA may physically do so For the Local Remote and Computer modes On the front panel pres...

Page 75: ... the unit is in Standby the attenuator will be set to maximum attenuation While in ALC mode if the RF Output Power drops below 10 watts W the Attenuator Setting is frozen until the RF Output Power exceeds 10 watts or a new RF output power request is made by the user The CHPA will remain in ALC mode This feature prevents the attenuator from being adjusted to 0 dB if RF is removed from the unit If t...

Page 76: ...e to CHPA if misused These settings and features are included to facilitate manufacturing and servicing 5 14 Terminology Various CHPA features settings and controls are grouped according to the following hierarchy Category Top level group Function Data entry or data display selection within a category Entry Data entry or data review within a function Access to the hierarchy is as follows Category ...

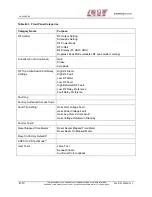
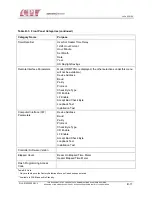
Page 77: ...new value Starting from the meter display on Lines 3 and 4 categories are accessible in the order specified in Table 5 1 starting with RF Control Press the MENU button to scroll through the available categories While in any menu category press either the Line 3 or Line 4 buttons to return to the selected meter displays Appendix B describes each category in detail Table 5 1 Front Panel Categories C...

Page 78: ... in Standby Factory Tests Reset Elapsed Time Meters Reset Heater Elapsed Time Meter Reset Beam On Elapsed Meter Reset to Factory Defaults HVPS Test Mode User Tests Lamp Test Beeper Mute Aux Serial Port Loopback Time Date Set User Set Heater Time Delay 12 24 Hour Format Hour Minute Set Month Date Year US Daylight Savings Remote Interface Parameters Mode If RMTPNL is displayed the other selections u...

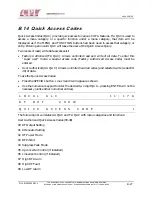
Page 79: ...d Only available during FAAM and when unit is in Standby See appendix B for a complete list of Quick Access Codes 5 17 Quick Access Codes Quick Access Codes QAC provide access to various CHPA features If a QAC is used to access a menu category or a specific function under a menu category that item will display as if the MENU and FUNCTION buttons had been used to assess that category or entry Enter...

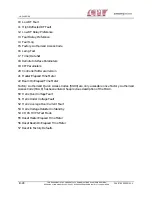
Page 80: ...7 A R F O U T 0 0 W Q U I C K A C C E S S C O D E The following lists correlates UA QACs and FA QACs with menu categories and functions User Authorized Quick Access Codes 00 49 00 RF Output Setting 01 Attenuator Setting 02 RF Power Mode 03 RF Inhibit 04 Suppress Peak Mode 05 Not used 06 Linearizer Control if installed 07 High RF Alarm 08 High RF Fault 09 Low RF Alarm 10 Low RF Fault 11 High Reflec...

Page 81: ...ime Meter 22 Beam On Elapsed Time Meter Factory Authorized Quick Access Codes 50 99 are only accessible once the Factory Authorized Access Code FAAC has been entered See previous description of the FAAC 50 Helix Over Voltage Fault 51 Helix Under Voltage Fault 52 Helix Average Over Current Fault 53 Helix Voltage Detected in Standby 54 CHPA HVPS Test Mode 55 Reset Heater Elapsed Time Meter 56 Reset ...

Page 82: ...SERIES 5 16 THIS DOCUMENT IS THE PROPERTY OF COMMUNICATIONS POWER INDUSTRIES REPRODUCTION OR RELEASE WITHOUT EXPRESS PERMISSION IS STRICTLY PROHIBITED DOC 01023245 REV L This page is intentionally left blank ...

Page 83: ... THE SAFETY GUIDELINES IN CHAPTER S AT THE FRONT OF THIS MANUAL WARNING IN SOME CASES IT MAY BE REQUIRED TO WORK ON THE EQUIPMENT WITH EXPOSED LIVE VOLTAGES EXCEEDING 50 V ACCESS INTO THE CHPA AND WORKING CIRCUITRY WITH LIVE VOLTAGES EXCEEDING 50 V IS RESTRICTED TO AUTHORIZED PERSONNEL SKILLED IN RF AMPLIFIERS AND HIGH VOLTAGE EQUIPMENT THE PERSON EXPOSED TO LIVE VOLTAGES MUST BE OBSERVED BY AT LE...

Page 84: ...70 01022070 RF assembly drawings 6 3 Mechanical Preventive Maintenance WARNING BEFORE ATTEMPTING ANY INSPECTION OR CLEANING SWITCH OFF ALL POWER AND LEAVE UNIT FOR FIVE MINUTES BEFORE PERFORMING SERVICE OPERATIONS WHEN USING SOLVENTS PROVIDE ADEQUATE VENTILATION AND AVOID BREATHING FUMES WHEN CLEANING WITH AIR WEAR SAFETY GOGGLES AND USE CLEAN DRY COMPRESSED AIR NOT EXCEEDING 25 PSI 1 75 KG CM Tab...

Page 85: ...r measurement range 30 to 20 dBm Variable Attenuator 0 to 25 dB DC to 20 GHz Merrimac ASM25 11K 50 Ohms Scalar Network Analyzers frequency range HP 8757 with two sensors DC to 20 GHz complete with dual detector probes Should have dual markers with Delete mode Compatible with Sweep Signal Generator item 1 RF Splitter precision 2 way 50 Ohms Type N HP 11667A DC to 20 GHz High quality low loss RF tes...

Page 86: ...in reflected power or unexplained fault conditions could point to a deteriorating condition that may be found during a thorough visual inspection The main circuit breaker must be off while the following general inspection is performed 1 With the main circuit breaker off check that all connector plugs are properly seated in their mating connectors and have not been damaged Replace any bad connector...

Page 87: ...nce The TWT collector airflow system must be checked to ensure that it is properly transferring the heat into the airstream and away from the TWT This means that the measurement of air flow and temperature and the inspection and elimination of any contaminants restricting the air flow must be performed periodically The recommended cycle is three months but inspection may be required more often if ...

Page 88: ...Maintenance Operating voltages and metering accuracy must be verified every six months If any voltage is not within the range stated in the maintenance chapter for the assembly it should be adjusted the daily log for the equipment should note the indication before and after adjustment In addition perform the entire initial power on and checkout as described in Chapter 4 Initial Power on and Checko...

Page 89: ...urrent has stabilized 7 Apply RF slowly up to the point of rated power 8 Run with and without RF input for a minimum of 30 minutes after the body current has stabilized The time required to stabilize varies with the age of the tube storage time and storage conditions 9 Follow the instructions in Performance Testing 10 Go through normal shutdown Once the TWT is in service it is important that the t...

Page 90: ... the results on the chart provided in Table 6 3 1 Connect the equipment as shown in Figure 6 1 2 Set the input drive level to minimum and the HPA gain to maximum 3 Set the sweeper to CW to the frequencies selected These will be used every time preventive maintenance is performed so that a trend can be developed 4 Increase the drive level until the HPA has reached saturation Record level on the tes...

Page 91: ...1 VOLTAGE NOTE 1 ____________________kV COLLECTOR 2 VOLTAGE NOTE 1 ____________________kV BEAM CURRENT NOTE 1 ____________________A HELIX CURRENT NO RF ____________________mA NOTE 1 MEASURED USING OPTIONAL BREAK OUT BOX AVAILABLE FROM CPI FREQ POWER OUT MAXIMUM GAIN DO NOT EXCEED RATED RATED MAX POWER F1________ ___________________________ _______________________ F2________ _______________________...

Page 92: ... SERIES 6 10 THIS DOCUMENT IS THE PROPERTY OF COMMUNICATIONS POWER INDUSTRIES REPRODUCTION OR RELEASE WITHOUT EXPRESS PERMISSION IS STRICTLY PROHIBITED DOC 01023245 REV L Figure 6 1 TWT Amplifier Test Setup ...

Page 93: ... Compact HPA LM 01020270 XX Specification C Band Compact HPA 01020296 Specification Ku Band Compact 700W 01020297 RF Assy C Band Compact HPA LM 01020370 XX RF Diagram CHPA 01020371 Specification DBS Compact HPA 01022061 RF Assy DBS Band Compact HPA LM 500W to 750W 01022070 XX Assy Power Supply 750W Thales Tube Compact HPA LM 01022071 00 RF Assy DBS Band 750W Thales Tube Compact HPA LM 01022080 00 ...

Page 94: ...SERIES 7 2 THIS DOCUMENT IS THE PROPERTY OF COMMUNICATIONS POWER INDUSTRIES REPRODUCTION OR RELEASE WITHOUT EXPRESS PERMISSION IS STRICTLY PROHIBITED DOC 01023245 REV L This page is intentionally left blank ...

Page 95: ...DUSTRIES REPRODUCTION OR RELEASE WITHOUT EXPRESS PERMISSION IS STRICTLY PROHIBITED 8 1 8 1 Chapter 8 Supplementary Data Appendix A Specifications Appendix B Control Appearance and Content Appendix C Replaceable Parts Appendix D Warranty Support Information Appendix E Options and Features ...

Page 96: ...SERIES 8 2 THIS DOCUMENT IS THE PROPERTY OF COMMUNICATIONS POWER INDUSTRIES REPRODUCTION OR RELEASE WITHOUT EXPRESS PERMISSION IS STRICTLY PROHIBITED DOC 01023245 REV L This page is intentionally left blank ...

Page 97: ...DOCUMENT IS THE PROPERTY OF COMMUNICATIONS POWER INDUSTRIES REPRODUCTION OR RELEASE WITHOUT EXPRESS PERMISSION IS STRICTLY PROHIBITED A 1 A 1 Appendix A Specifications Chapter 7 includes specifications for all CHPAs listed in this manual ...

Page 98: ...SERIES A 2 THIS DOCUMENT IS THE PROPERTY OF COMMUNICATIONS POWER INDUSTRIES REPRODUCTION OR RELEASE WITHOUT EXPRESS PERMISSION IS STRICTLY PROHIBITED DOC 01023245 REV L This page is intentionally left blank ...

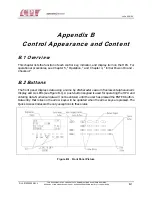
Page 99: ...edures see Chapter 5 Operation and Chapter 4 Initial Power On and Checkout B 2 Buttons The front panel displays data using a 4 line by 20 character vacuum fluorescent alphanumeric display and six LEDs see Figure B 1 A push button keypad is used for operating the HPA and entering data Numerical data will not be entered until the user has pressed the ENTER button Data entry that relies on the arrow ...

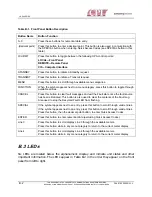
Page 100: ... CANCEL Press this button to clear fault messages and exit the Fault state once the fault source has been eliminated This button is also used to clear the contents of the Fault Log Also used to stop the Recycled Fault LED from flashing SPECIAL If the symbol appears next to an entry press this button to scroll through valid entries If the symbol appears next to an entry press this button to scroll ...

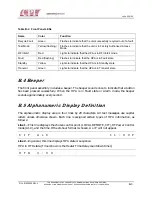
Page 101: ...een Lights to indicate that the HPA is in Transmit state B 4 Beeper The front panel assembly includes a beeper The beeper sounds once to indicate that a button has been pressed successfully When the HPA is in Fault state or Alarm mode the beeper sounds approximately every second B 5 Alphanumeric Display Definition The alphanumeric display area is four lines by 20 characters All text messages use c...

Page 102: ...E Q U E N C E HPA in Beam Off Sequence B E A M O F F S E Q U E N C E HPA in Beam On state R F O U T X X X X W or when dB scale is chosen R F O U T X X X d B W HPA in Beam On state during Low RF Alarm R F O U T X X X X W L O R F HPA in Beam On state during High RF Alarm R F O U T X X X d B W H I R F HPA in Beam On state when RF meter is in Peak mode R F P E A K X X X X W or when dB scale is chosen ...

Page 103: ...ress the Line 4 button To toggle through the menu categories press the MENU button A T T E N U A T O R X X X d B B 6 Meters In the following screen displays X indicates a placeholder Leading zeros except for those in the ones place will be replaced with blanks With regard to the RF meters refer to the RF Display feature under the RF Control category B 6 1 HVPS Meter Display List H L X X X X X K V ...

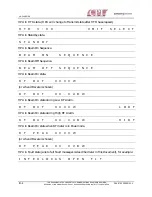
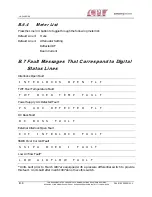
Page 104: ...respond to Digital Status Lines Interlocks Open Fault I N T E R L O C K S O P E N F L T TWT Over Temperature Fault T W T O V E R T E M P F A U L T Power Supply Arc Detected Fault P S A R C D E T E C T E D F L T DC Buss Fault D C B U S S F A U L T External Interlock Open Fault E X T I N T E R L O C K F A U L T SSIPA Over Current Fault S S I P A O V E R I F A U L T Low Airflow Fault L O W A I R F L ...

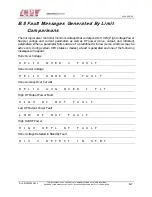
Page 105: ...flected parameters When a parameter falls outside of a predefined window some windows may be active only during certain HPA states or modes a fault is generated and one of the following messages will appear Helix Over Voltage H E L I X O V E R V F A U L T Helix Under Voltage H E L I X U N D E R V F A U L T Helix Average Over Current H E L I X A V G O V E R I F L T High RF Output Power Fault H I G ...

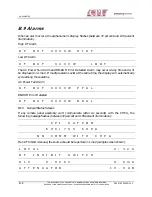
Page 106: ...be displayed on Line 2 If multiple alarms exist at the same time the display will automatically cycle among those alarms AC Power Fail Alarm R F O U T X X X X W P F A L BB RAM Error Detected R F O U T X X X X W B R A L B 10 General Status Screens If any remote panel assembly can t communicate after six seconds with the CHPA the following message flashes between 37 percent and 100 percent illuminat...

Page 107: ...n a function Access to the hierarchy is as follows Category Press the MENU button to toggle through the accessible categories Category names appear on Line 3 Function When the W symbol appears next to a category press the FUNCTION button to toggle through the accessible functions viewed on Line 4 under that category Entry When the symbols appear next to a function press either the up or down arrow...

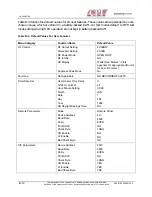
Page 108: ... Control optional Gain Phase Amplitude RF Trip Limits Switch Port Relay Settings High RF Alarm High RF Fault Low RF Alarm Low RF Fault High Reflected RF Fault Low RF Relay Preference Fault Relay Preference Fault Log Factory Authorized Access Code Fault Trip Setting Helix Over Voltage Fault Helix Under Voltage Fault Helix Avg Over Current Fault Helix Voltage Detected in Standby Factory Tests Reset ...

Page 109: ...played the other selections under this menu will not be available Device Address Baud Parity Protocol Check Byte Type CR Enable LF Enable Accept Bad Check Byte Loopback Test Installation Test Computer Interface CIF Parameters Device Address Baud Parity Protocol Check Byte Type CR Enable LF Enable Accept Bad Check Byte Loopback Test Installation Test Controller Software Version Elapsed Hours Beam O...

Page 110: ...lt Value RF Control RF Output Setting Attenuator Setting RF Power Mode RF Inhibit RF Display Suppress Peak Mode 20 0dBW 25 0dB OPEN LOOP NO Watts See Meters in this appendix for appropriate dB units for each RF meter No Fault Log Not Applicable NO RECORDED FAULTS Time Date Set User Heater Time Delay 12 24 Hr Format Hour Minute Setting Month Date Day Year US Daylight Savings Time 0 24 00 00 JAN 1 F...

Page 111: ...PA to return to Open Loop RF Power mode RF Power Mode ALC Open Loop Set the RF Power mode ALC Automatic Loop Control RF Power mode will hold the RF output power to the specified output power within the range of the attenuator and the RF output capabilities of the CHPA If ALC mode is chosen ALC is displayed on Line 1 of the display If ALC mode is chosen while the unit is in Standby the attenuator w...

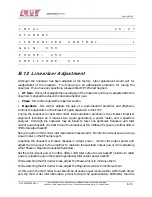
Page 112: ... X X X d B W S E T A T T N X X X d B RF Power Mode either ALC or Open Loop R F M O D E A L C R F M O D E O P E N L O O P R F I N H I B I T Y E S R F D I S P L A Y d B W P E A K S U P P R E S S Y E S B 11 3 Linearizer Control optional If S1 1 DIP switch bank on the Controller Interface 01020360 board is ON this menu will appear and be active The linearizer has three settings Gain Phase Amplitude Ei...

Page 113: ...roducts is the simplest linearizer alignment technique as it requires two signal generators a power meter and a spectrum analyzer Although the linearizer may be tuned to favor one particular frequency and total output power backoff it is best to tune the linearizer at the midband frequency at either 4dB or 7dB total output backoff Set up to perform third order intermodulation measurement Monitor t...

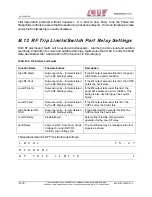
Page 114: ...output exceeds this limit the panel will indicate an alarm condition High RF Fault Numerical entry format dictated by the RF Display setting If the RF output exceeds this limit the CHPA enters the Fault state Low RF Alarm Numerical entry format dictated by the RF Display setting If the RF output falls under this limit the panel will indicate an alarm condition This setting is also used to trigger ...

Page 115: ...s for the faults and alarms in this category B 13 1 Fault Log The Fault Log provides a chronological record of the last five fault sets with time date stamp and set number A set is defined as the faults captured within one scan cycle Set number 1 is always the newest entry Once the log is full the oldest entries are discarded to make room for the newest entries Press the FUNCTION key to cycle thro...

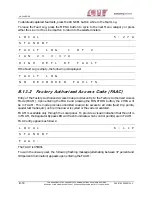
Page 116: ... F A U L T S B 13 2 Factory Authorized Access Code FAAC Entry of the Factory Authorized Access Code provides entry to the Factory Authorized Access Mode FAAM Upon entering the FAAC and pressing the FUNCTION button the CHPA will be in FAAM This mode provides unlimited read write access to all data fault trip points special test modes etc until prime power is cycled or the code is reentered FAAM is ...

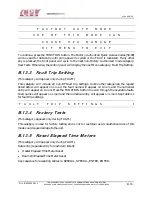
Page 117: ...ll appear only during FAAM This category will include all non RF fault trip settings Unlike other categories the legend listed below will appear on Line 2 the fault name will appear on Line 3 and the numerical entry will appear on Line 4 Press the FUNCTION button to scroll through the available faults Fault names will appear on Line 3 and the numerical entry will appear on Line 4 See Table 4 1 for...

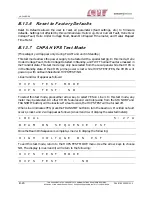
Page 118: ...al panel while the CHPA is in the Standby state If the CHPA prime power is lost while HVPS TEST YES the CHPA will power up with no Beam Select and HVPS TEST NO Lines 3 and 4 will appear as follows H V P S T E S T M O D E H V P S T E S T N O To select this test mode press either arrow key to select YES on Line 4 In this test mode any meter may be selected All other CHPA features and controls aside ...

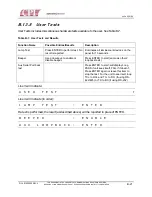
Page 119: ...cent devices on the panel for 15 seconds Beeper Use arrow keys to enable or disable beeper Press ENTER to start same as other 2 loopback tests Aux Serial Port back test Press ENTER to start will display Loop PASS if unit sees itself FAIL if it doesn t Press ENTER again or leave this item to stop the test For the unit to see itself loop TX to RX and TX to RX if using RS 422 485 or TX to RX if using...

Page 120: ... that in the case of a line interruption all of the CHPAs don t come on line simultaneously 12 24 Hour Format Toggle between 12 HR and 24 HR The displayed time format will be either 12 HR A indicates AM P PM or 24 HR Hour Minute Set Numerical entry of the form HH MM Title of this function is self explanatory If the user enters a new time the seconds are automatically set to 00 Month Set Toggle bet...

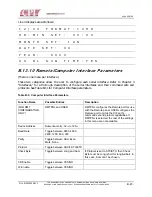
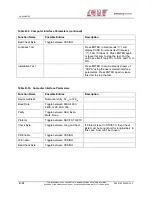
Page 121: ...ls See Table B 11 for Computer Interface parameters Table B 9 Computer Interface Parameters Function Name Possible Entries Description FOR RMT CONFIGURATION ONLY RMTPNL and USER RMTPNL configures the Remote port for use with the Remote panel USER configures the Remote port to mimic the CIF port s command set and protocol capabilities If RMTPNL is selected the rest of the settings in this menu are ...

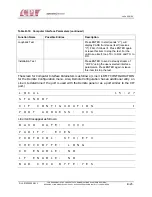
Page 122: ...op TX to RX and TX to RX Installation Test Press ENTER to send a steady stream of CHPA using the user selected interface parameters Press ENTER again or leave this item to stop the test Table B 10 Computer Interface Parameters Function Name Possible Entries Description Device Address Numerical entry 3210 to 12610 Baud Rate Toggle between 9600 4800 2400 1200 600 300 Parity Toggle between Odd Even M...

Page 123: ...Press ENTER to send a steady stream of CHPA using the user selected interface parameters Press ENTER again or leave this item to stop the test The screen for Computer Interface Parameters is as follows Line 3 is RMT CONFIGURATION for the Remote Configuration menu Also Remote Configuration has an additional entry on Line 4 to determine if the port is used with the Remote panel or as a port similar ...

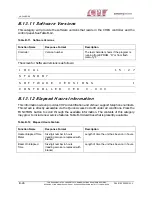
Page 124: ... R E V E R S I O N S t C O N T R O L L E R V E R X X X X B 13 12 Elapsed Hours Information This information screen provides CHPA identification and 24 hour support telephone numbers This screen is directly accessible via the Quick Access Code 00 under all conditions Press the FUNCTION button to scroll through the available information The contents of this category may grow to include new service f...

Page 125: ...of all data To enter this super user mode a special access code Factory Authorized Access Code must be entered User Authorized UA QAC Allows unlimited read all codes and selected write codes 00 49 of data To use the Quick Access Codes Press the SPECIAL button Lines 3 and 4 will appear as shown Use the numerical keypad to enter the desired two digit QAC pressing ENTER will not be necessary unlike o...

Page 126: ...18 Remote Interface Parameters 19 CIF Parameters 20 Controller Software Version 21 Heater Elapsed Time Meter 22 Beam On Elapsed Time Meter Factory Authorized Quick Access Codes 50 99 are only accessible once Factory Authorized Access Code FAAC has been entered See previous description of the FAAC 50 Helix Over Voltage Fault 51 Helix Under Voltage Fault 52 Helix Average Over Current Fault 53 Helix ...

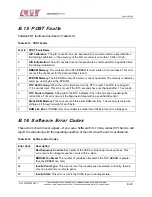
Page 127: ...urs if the RTC seconds have not changed after 1 5 seconds 6 RTC Stuck in Update A flag within the RTC indicates if it s in the process of updating the current time This error occurs if the flag doesn t clear within a specified time limit 7 Static RAM Memory This error occurs if this static RAM test fails The memory is tested by shifting a bit through all eight of each byte 8 RAM size Error If SRAM...

Page 128: ...r F follows the software version number the CHPA is using the Flash RAM s program If the letter R follows the software version number the CHPA is using the EPROM s program B 16 2 To Force the CHPA to Use EPROM Contents To force the CHPA to use the EPROM s program start with the CHPA turned off On the front panel simultaneously hold down the 1 2 and 3 keys Turn the CHPA on wait about one second the...

Page 129: ...e FLASHCOM then press the Enter key 7 Enter 2 digit Rev number of Flash RAM program as displayed on PC disk label then select COM1 or COM2 depending upon which PC serial port you are using 8 As soon as the PC and CHPA establish communication the display will show C H P A P R O G R A M L O A D E R E R A S I N G F L A S H M E M O R Y P L E A S E W A I T The PC screen will display a similar message I...

Page 130: ...with the Flash RAM 1 Several error messages may occur during programming All of them allow the user to restart the programming process If multiple failures occur the serial cable connection may be intermittent or there may be excessive noise on the serial line Take steps to assure a solid connection between the PC and CHPA Use a shielded cable where the shield attaches to the connector shell Use a...

Page 131: ...ming if the checksum for the Flash RAM contents do not match the expected checksum This message may mean that the Flash RAM device is faulty Before arriving at that conclusion take steps to assure a solid cable connection from the PC and CHPA also review troubleshooting items 3 and 4 2 If you complete the procedure but see this message upon recycling the CHPA s prime power C P I S A T C O M C H P ...

Page 132: ...er 3 above Pay particular attention to other device drivers which may be competing for the serial port that you are trying to use c Check the CHPA s auxiliary serial port Disconnect the PC from the CHPA then turn the prime power off and wait until the CHPA s display is blank Connect a 9 pin male connector with pins 2 and 3 shorted together to J10 Turn the CHPA on After POST press the MENU button u...

Page 133: ...solete Use Tab 00 CCA Control Interface 01020360 00 Tunnel Diode C Band RLC Alternative 01000769 00 01 02 Eclipse Preferred 01037156 00 01 02 Tunnel Diode Ku Band RLC Alternative 01002559 00 up to 10 Eclipse Preferred 01032595 00 01 02 Tunnel Diode DBS Band high Ku RLC Alternative 01004916 01 Eclipse Preferred 01037176 00 01 02 Tunnel Diode Ku Band 14 0 to 14 8 GHz 0102259 09 Tunnel Diode Ku Band ...

Page 134: ...z 01020197 03 TWT 750 W C Band 5 85 to 6 725 GHz 01020197 02 TWT 750 W C Band 6 425 to 7 100 GHz 01020197 04 TWT 750 W C Band 5 725 to 6 725 GHz 01040158 00 TWT 700 W Ku Band 13 75 to 14 5 GHz 01020198 00 TWT 600 W Ku Band 13 75 to 14 5 GHz 01020198 02 TWT 600 W Ku Band 12 75 to 14 5 GHz 01020198 03 TWT 750 W Ku Band 12 75 to 14 5 GHz 01020198 01 and 07 TWT 700W Ku Band 14 0 to 14 8 GHz 01020198 0...

Page 135: ...THOUT EXPRESS PERMISSION IS STRICTLY PROHIBITED D 1 D 1 Appendix D Warranty and Support Information For details refer to separate supplement included with this manual HARD COPY Refer to Warranty and Support supplement located at the front of this manual CD If applicable Refer to separate folder titled Warranty and Support ...

Page 136: ...SERIES D 2 THIS DOCUMENT IS THE PROPERTY OF COMMUNICATIONS POWER INDUSTRIES REPRODUCTION OR RELEASE WITHOUT EXPRESS PERMISSION IS STRICTLY PROHIBITED DOC 01023245 REV L This page is intentionally left blank ...

Page 137: ...inearizer Remote Control Panel Redundant and Power Combined Subsystems Features Meets IEC 215 555 Safety Harmonic Standards as well as 89 336 EEC EMC Standards CE Marked MTBF of 40 000 hours including TWT MTTR 1 hour Filament voltage reduction of 10 in Standby Auto Fault Recycle Internal test points for ease of maintenance RS 232 RS 422 485 4 wire computer interface standard Configurable CHPA CHPA...

Page 138: ...SERIES E 2 THIS DOCUMENT IS THE PROPERTY OF COMMUNICATIONS POWER INDUSTRIES REPRODUCTION OR RELEASE WITHOUT EXPRESS PERMISSION IS STRICTLY PROHIBITED DOC 01023245 REV L This page is intentionally left blank ...

Page 139: ... signal will be reported on the optional CPI remote panel or through the supplied Setup Remote software The alarm will be reported via the CIF port but the amplifier will take no action Alternatively the BUC alarm can be set to a latched fault via a user setting in the CIF protocol using the supplied utility software or the 1RU remote control In the event that the BUC LO becomes unlocked a fault w...

Page 140: ... systems that need to slave all KHPAs to a common timing reference such as the GPS signal The level required is 5 to 5 dBm Note Refer to the Drawing chapter of the respective Service manual for more information Refer to the amplifier specifications in the documents section of this manual for performance of the amplifier with a BUC F 2 Precautions The modulator s gain should be adjusted for the bes...

Reviews: