background image


     GENERAL SAFETY RULES

Safety is a combination of  common sense, staying alert and knowing how to use a tool.

WARNING: 

 To avoid mistakes that could cause serious injury, do not attach Circle Guide for Router Table until

  you have read and understood the following:

1.

READ

 and become familiar with the entire installation instructions on

how to attach Circle Guide for Router Table to your Router table.

2.

LEARN

 the tool's application, limitations and possible hazards.

3.

REMOVE ADJUSTING KEYS AND WRENCHES

.  Form a  habit  of 

checking to see that keys and wrenches are removed from router table.
before turning ON.

4.

KEEP WORK AREA CLEAN

.  Clutter areas and benches invite accidents.

5.

DON'T USE IN DANGEROUS ENVIRONMENT

.  Don’t use power tools in  

damp or wet locations, or expose them to rain. 
Keep work area well lighted. 

6.

KEEP CHILDREN AWAY

.  All visitors should be kept at a safe distance

from work area.

7.

MAKE WORKSHOP CHILDPROOF

 with padlocks.

8.

DON'T FORCE THE TOOL

.  It will do the job better and safer at the 

rate for which it was designed.

9.

USING THE RIGHT TOOL

.  Do not force tool or attachments to do a 

job for which it was not designed.

10.

USE PROPER EXTENSION CORD

.  Make sure your extension cord is in condition.  

11.

DRESS PROPERLY

.  Do not wear loose clothing, neckties, or jewelry that 

can get caught and draw you into moving parts. Wear protective 
hair covering to contain long hair.

12.

ALWAYS WEAR SAFETY GLASSES WITH SIDE SHIELDS

.  Everyday 

eyeglasses have only impact resistant-lenses, they are NOT
safety glasses. 

13.

SECURE WORK

.  Use clamps or a vise to hold work when practical,

it is safer than using your hand and frees both hands to operate 
the tool. 

14.

DO NOT OVERREACH

.  Keep proper footing and balance at all times

15.

DISCONNET TOOLS

.  When not in use or when changing attachments,

blades, bits, cutter, etc. all tools should be disconnected from 
power source.

16.

AVOID ACCIDENTAL STARTING

.  Be sure switch is off when plugging 

in any tool.

17.

NEVER LEAVE TOOL RUNNING UNATTENDED.  TURN THE POWER OFF.
DO NOT LEAVE TOOL UNTIL IT COMES TO A COMPLETE STOP.

18.

PROTECT YOUR LUNGS

.  Wear a face or dust mask if the operation 

is dusty.

19.

PROTECT YOU HEARING

.  Wear hearing protection during extended 

periods of operation.

20.

KEEP FINGERS AWAY FROM REVOLVING CUTTER.

Summary of Contents for CPRT-104

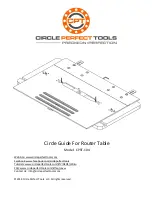
Page 1: ...te www circleperfecttools com Facebook www facebook com circleperfecttools Tutorials www circleperfecttools com VIDEOS c20ku FAQ www circleperfecttools com faq cavw Contact Us info circleperfecttools com 2014 Circle Perfect Tools LLC All rights reserved ...

Page 2: ...as designed 9 USING THE RIGHT TOOL Do not force tool or attachments to do a job for which it was not designed 10 USE PROPER EXTENSION CORD Make sure your extension cord is in condition 11 DRESS PROPERLY Do not wear loose clothing neckties or jewelry that can get caught and draw you into moving parts Wear protective hair covering to contain long hair 12 ALWAYS WEAR SAFETY GLASSES WITH SIDE SHIELDS ...

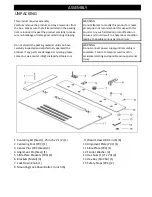
Page 3: ...ets Metal 3 14 Hex Key 5 32 SA 1 7 Lock Down Knob 1 8 Mounting Lock Down Bolts 1 4 inch 6 ASSEMBLY WARNING Do not attempt to modify this product or create accessories not recommended for use with this product Any such alteration or modification is misuse and could result in a hazardous condition leading to possible serious personal injury 15 Safety Stops PVC 2 Do not discard the packing material u...

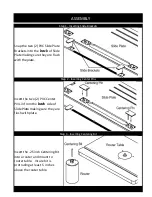
Page 4: ...ve the router table Step 1 Inserting Slide Brackets Step 2 Inserting Center Pins Snap the two 2 PVC Slide Plate Brackets into the back of Slide Plate making sure they are flush with the plate Insert the two 2 PVC Center Pins in from the back side of Slide Plate making sure they are flush with plate Step 3 Inserting Centering Bit ...

Page 5: ...Plate Carefully place the Centering Tool over both the Centering Pins and Centering Bit to square the entire tool with your router table and the bit at the correct distance Tip Clamp or tape plates to your router table to prevent movement while mounting Step 6 Centering Circle Guide onto Router Table Starting from one side of the Slide Plate slide the Alignment Plate so that the Slide Plate Bracke...

Page 6: ...ter table and use Hex Key to secure with washers and hex nuts Note multiple sets of holes are pre drilled in Alignment Plate to accommodate different sizes of router tables Mount two metal brackets one on each side to the back edge of router table by aligning the brackets with the pre drilled holes in the Alignment Plate Insert mounting bolts through Alignment Plate and metal mounting bracket and ...

Page 7: ...k down bolt and bushing if necessary Step 8 Option A Attaching Slide Plate USING BOLTS Step 8 Option B Attaching Slide Plate USING MOUNTING BRACKETS Using a 5 16 drill bit drill a hole through the center of the lock down channel of Slide Plate closet to the front edge of the router table and in alignment with the center line on the Slide Plate Insert Slide Plate Lock down bolt through the lock dow...

Page 8: ... when using bits larger than 1 4 English or 6mm Metric The Safety Stops ensure the router bit will not cut into the Circle Guide tool when routing very small circles Smoothly rotate material around Center Pin ensuring to keep ahold of material until router is completely turned off Turn on router and plunge material onto the Center Pin through the 1 8 English or 3mm Metric hole Set Slide Plate into...

Page 9: ... as this may cause damage to the surface of the Circle Guide tool It is recommended to remove debris such as saw dust from the Alignment Plate channel routinely to provide smooth sliding operation Tips To prolong the life span of the tool s surface make sure to remove any abrasive particles and or spurs from face of material before routing to prevent damage to the surface of the Circle Guide tool ...

Page 10: ......

Reviews: