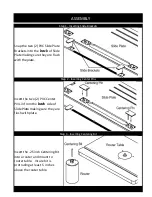
Place Safety Stops in the Lock-Down Channel in designed area which contains the Lock-Down Bolt.
NOTE: Safety Stops can be stored in un-used Lock-Down Channels.
Step 1:
Step 2:
After preparing the material you can proceed to setting up the Circle Guide and Router to perform cut.
Step 1:
Step 2:
Insert a plunge-able style router bit and raise to the desired height.
Step 3:
Step 4:
Basic Operations
Preparing Material
Routing Material
Safety Stops
Remove any abrasive particles and/or spurs from face of material before routing to prevent
damage to the surface of the Circle Guide tool.
Use Safety Stops to prevent damage to the Circle Guide tool when using bits larger than 1/4" (English) or 6mm
(Metric). The Safety Stops ensure the router bit will not cut into the Circle Guide tool when routing very small
circles.
Smoothly rotate material around Center Pin ensuring to keep ahold of material until router is
completely turned off.
Turn on router and plunge material onto the Center Pin through the 1/8" (English) or 3mm (Metric)
hole.
Set Slide Plate into desired measurement position. Lock down Slide Plate by using Alignment Pin
and/or Lock-Down Bolt.
The Circle Guide tool requires the rotation of material around a Center Pin. Please perform these basic steps
before routing to prepare your material.
Drill a 1/8" (English) or 3mm (Metric) hole in material which will be the center point of your circle.
Drill the hole as perpendicular as possible to ensure precise rotation around the Center Pins.
Summary of Contents for CPRT-104
Page 10: ......

