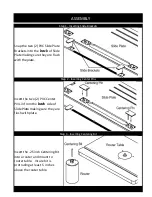
Step 1:
Loosen the Lock-Down Bolt and release Alignment Pin.
Step 2:
Move the Slide Plate to desired measurement position.
Step 3:
Insert Alignment Pin into Slide Plate (should click into position).
Step 4:
Tighten the Lock-Down Bolt and ensure the Slide Plate is held firmly in position.
Step 5:
Perform cut and repeat as necessary.
Step 1:
Loosen the Lock-Down Bolt and release Alignment Pin.
Step 2:
Move the Slide Plate to desired position.
Step 3:
Tighten the Lock-Down Bolt and ensure the Slide Plate is held firmly in position.
Step 4:
Perform cut and repeat as necessary.
Tip 1:
Tip 2:
Tip 3:
Tip 4:
It is recommended to perform multiple cuts and not perform a single cut where the bit protrudes
all the way through the material. The best practice is to make cuts as deep as only 1/2 of the
diameter of the bit at a time.
When using harder material, ensure the material does not overheat from excessive routing as this
may cause damage to the surface of the Circle Guide tool.
It is recommended to remove debris such as saw dust from the Alignment Plate channel routinely
to provide smooth sliding operation.
Tips
To prolong the life span of the tool's surface, make sure to remove any abrasive particles and/or
spurs from face of material before routing to prevent damage to the surface of the Circle Guide
tool.
The Circle Guide for Router Table provides the ability to set the Slide Plate into positions simply by moving
Slide Plate into desired position and ONLY tightening the Lock-Down Bolt. This provides "infinite" positions
between the minimum and maximum radius settings allowing operator to make incrementally small
adjustments (i.e. shave edge) or set Slide Plate into a position which cannot be locked into by using the
Alignment Pin.
The Circle Guide for Router Table provides the ability to lock in at set measurements every 1/16" (English) or
2mm (Metric). This operation provides precise repeatability by allowing operator to recall to a prior position.
Using Set Measurements
Using Infinite Variability
Summary of Contents for CPRT-104
Page 10: ......

