background image

- 4 - 


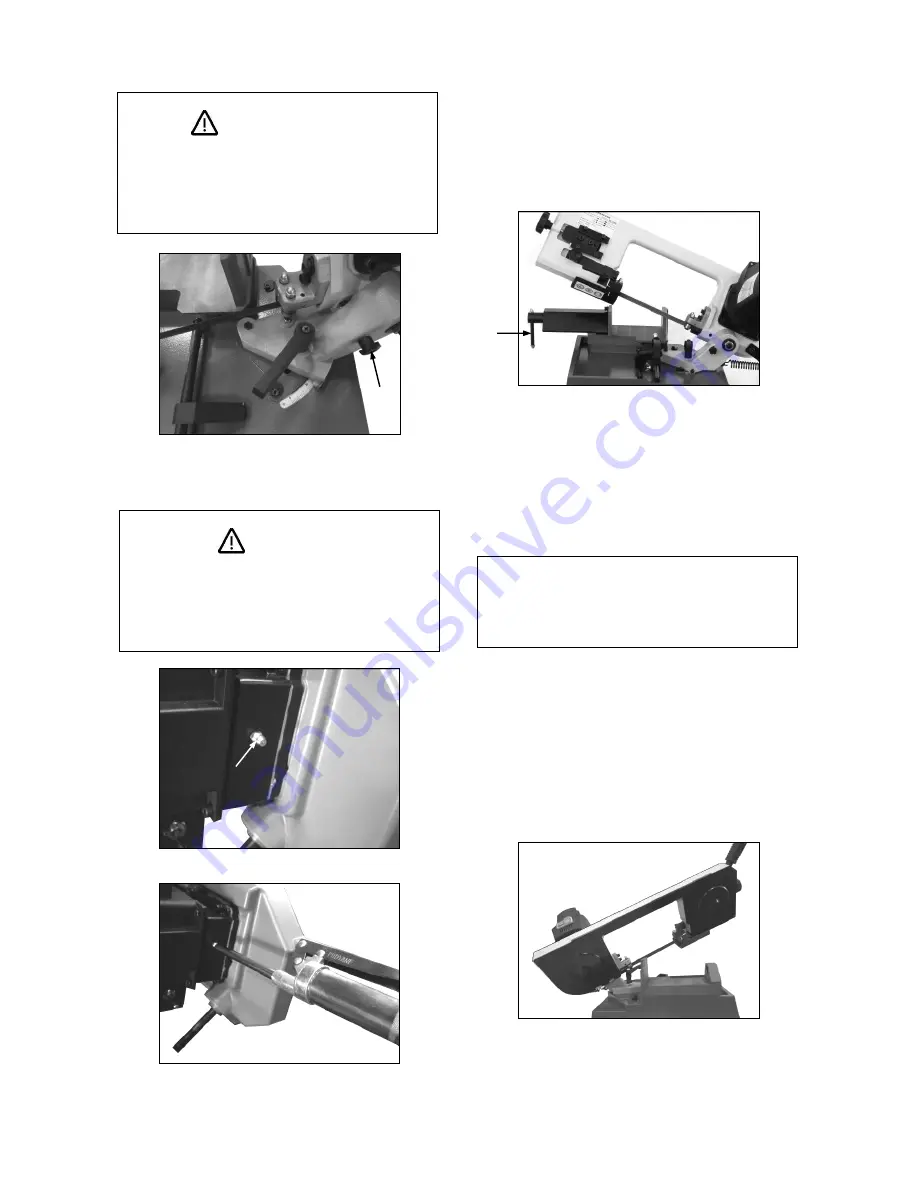
Fig. 1 


Before Cutting and Pump Grease 


 ATTENTION 

Apply 

grease into the gear reducer every 

week to lubricate the gears

.


Choose super high-density grease.


Grease 

location

 located at rear of gear reducer

.


Use grease gun 

to 

pump in grease from grease 

nipple. 

2. The Vise and Work Set Up 


Usage of the Vise 


The vise is mounted on the machine base. 

Follow the 

following 

steps to open or close the vise. 


Fig. 2 


1.  Turn the handle (A) in Fig.2 counter 

clock-wise to open the vise jaw 

allowing

 the 

width of vise 

to 

load work piece. 

2.  Make sure the work piece is 

placed properly

between 

the 

jaws

. Turn the handle (A) in Fig.2 

clock-wise to close the vise jaw 

clamping

 the 

work piece. 


CAUTION ! 

NEVER OPERATE SAW WITHOUT BLADE 

GUARDS IN PLACE.


Work Set Up 


1.  Raise 

the 

saw head to proper position in Fig.3. 

2.  Open vise to accept the 

work 

piece by 

pulling

the hand lever at the end of the 

base.


3.  Place the work piece on saw bed if the piece is 

long, support the end. 


Fig.3 


BEFORE CUTTING


Release the lock pin (A) in Fig.1 to 

release the


saw. After service, must relock 

the saw


properly for your safety and carry. Failure to 

comply with the warning could result in 

personal injury 

and damage to the machine

A

Grease Nipple 

A

Summary of Contents for CX112

Page 1: ...CX112 PORTABLE METAL BAND SAW User Manual Version 1 0 ...

Page 2: ... Safeguard Pad Lock 6 Blade teeth selection and speed recommendation 6 4 Power Supply 7 Motor Specifications 7 Grounding 7 Motor Safety Protection 7 5 Unpacking and Checking Contents 7 6 Description and Characteristics 8 7 Operating 8 Information before Operation 8 Manual Cutting 9 Angle Cutting 9 Changing Blade 9 Magnetic Switch 10 8 Adjusting 10 Adjusting Blade Guide 10 Adjusting Poor Cutting 11...

Page 3: ...d it frees both hands to operate tool 14 DON T OVERREACH Keep proper footing and balance at all times 15 MAINTAIN TOOLS WITH CARE Keep tools sharp and clean for best and safest performance Follow instructions for lubricating and changing accessories 16 DISCONNECT TOOLS before servicing when changing accessories such as blades bits cutters and the like 17 REDUCE THE RISK OF UNINTENTIONAL STARTING M...

Page 4: ...ir or replacement of the electric cord or plug is necessary do not connect the equipment grounding conductor to a live terminal Check with a qualified electrician or service personnel if the grounding instructions are not completely understood or if in doubt as to whether the tool is properly grounded Use only 3 wire extension cords that have 3 prong grounding plugs and 3 pole receptacles that acc...

Page 5: ... 3 Electrical Schematic ...

Page 6: ... to load work piece 2 Make sure the work piece is placed properly between the jaws Turn the handle A in Fig 2 clock wise to close the vise jaw clamping the work piece CAUTION NEVER OPERATE SAW WITHOUT BLADE GUARDS IN PLACE Work Set Up 1 Raise the saw head to proper position in Fig 3 2 Open vise to accept the work piece by pulling the hand lever at the end of the base 3 Place the work piece on saw ...

Page 7: ...This saw is equipped with a bi metallic blade which can be used to cut stainless steel steel iron brass aluminum and so on Make sure the direction of rotation arrow on the blade matches the direction arrow on the saw The blade teeth should always point downward at the front of the saw Make sure the blade is sharp undamaged and properly aligned With the saw unplugged push the power head all the way...

Page 8: ...e 4 Let the blade reach full speed before cutting 5 Feed the saw into the work piece only fast enough to let the blade cut without bogging down or binding 6 Before freeing jammed material turn the switch off and unplug the saw Wait for all moving parts to stop 7 After finishing a cut keep holding the power head down release the switch and wait for all moving parts to stop before moving your hands ...

Page 9: ...art the motor again 3 If the motor still does not start that have to check the motor s carbon brushes which can be used 600 800 hours if carbon brush has been worn please change the new one 4 If the motor suddenly stalls while cutting material turn the band saw OFF unplug the power cord and remove the work piece Make sure the balde is not in contact with the work piece then you may start the saw a...

Page 10: ...e less trouble after service Note If anything unusual happens on your gear transmission system do not try to fix or restore it personally Send it back to your dealer for check up or repair Failure to comply can result in machine damage 6 The machine combines miter and horizontal cutting and is designed for full efficiency and operator s convenience in each position WARNING SHUT OFF THE POWER SOURC...

Page 11: ...rd along the scale to search a right index for the work piece being cut 3 If the pointer matches the right index on the scale Tighten the handle and a perfect angle cut will be given Fig 7 WARNING Disconnect machine from the power source when servicing adjusting or installing and uninstalling any parts Failure to do so could result in serious personal injury or damage to the machine Changing Blade...

Page 12: ...sconnected from the power source before attempting to service the machine or installing and uninstalling any parts Magnetic Switch The band saw is equipped with magnetic switch see Fig 13 designed for safe operation After power failure the machine has to be restarted by pushing the green ON button There is a red OFF button which is pressed to stop all machine functions Fig 13 8 Adjusting Adjusting...

Page 13: ... Fig 15 16 are getting loose Then tighten it properly Fig 15 Fig 16 WARNING SHUT OFF THE POWER SOURCE BEFORE MAKING ADJUSTMENT MAINTENANCE OR INSTALLING OR UNINSTALLING PARTS Changing the Motor Carbon Brushes If the motor is making an unusual noise then the carbon brushes may need to be replaced 1 Disconnect machine from power supply 2 Remove two tap screws connected with on off switch box and thr...

Page 14: ... depending on the material length If the working piece is longer than vise adjust the assistant plate Fig 23 A location to support the work piece This plate makes cutting more stable and easy While miter cutting it will cut the plate slightly It won t damage with plate This plate is replaceable Fig 23 Fig 24 Carbon brush A ...

Page 15: ...1030318 V2 SECTION A 13 ...

Page 16: ...1030318 V2 SECTION B 14 ...

Page 17: ...1030318 V2 SECTION C 15 ...

Page 18: ... handy All returned merchandise will be subject to a minimum charge of 15 for re stocking and handling with the following qualifications Returns must be pre authorized by us in writing We do not accept collect shipments Items returned for warranty purposes must be insured and shipped pre paid to the nearest warehouse Returns must be accompanied with a copy of your original invoice as proof of purc...

Reviews: