background image


19 

Using the Buffing Wheel: 
 

1.  Use safety glasses and respirator. 


2.  Select 

the 

desired 

polishing 

compound and buffing wheel for the 
application. 
 

3.  Turn  the  machine  on  and  apply  the 

compound to the rotating face of the 
buffing wheel. 
 

4.  Position workpiece for buffing. 


5.  Perform  buffing  operations  outlined 

in Buffing section of manual. 
 

6.  When  desired  results  have  been 

achieved turn machine off. 


Rotary Shaft Operations


The  rotary  shaft  installs  onto  your 
CX904  3”  Mini  Grinder  to  allow  you  to 
operate  in  tight  spaces  with  greater 
control.  Do  not  operate  the  rotary  shaft 
with sharp bends. 


Installing Rotary Shaft: 


1.  Make  sure  machine  is  disconnected 

from its power supply. 


2.  Remove  cover  and  screw  or 

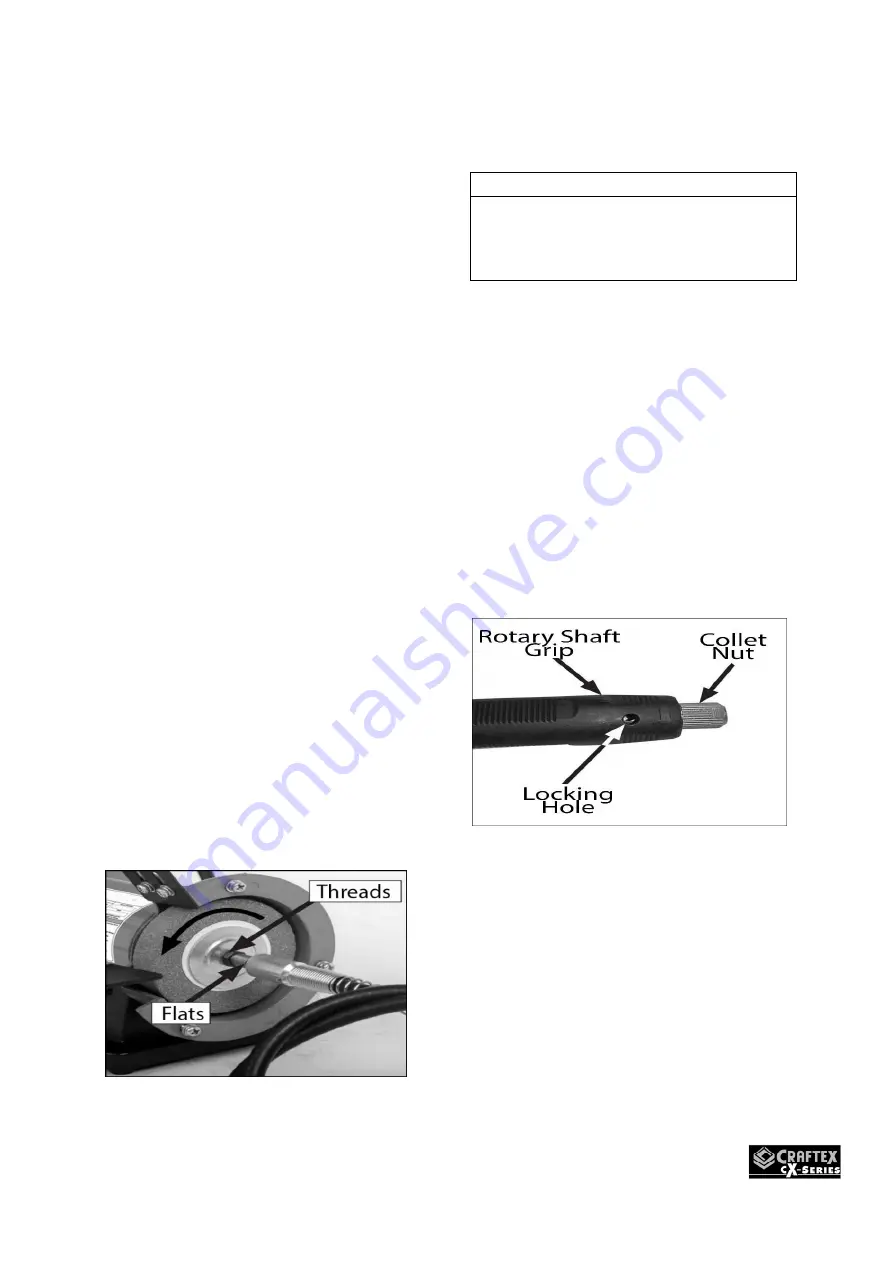
thread  rotating  shaft  onto  spindle 
located  on  the  right-hand  side  of 
the grinder. (See figure 15) 


Figure 15 


NOTE 

Hold the wrench on flats of the rotating 
shaft, then rotate the grinding wheel 
counter-clockwise with spare hand to 
tighten. 
 

Installing Bits in Rotary Shaft: 

 
CX904’s rotary shaft uses cutter and bits 
with a 1/8” shaft diameter. 
 
How to Install a Bit:


1.  Make 

sure 

machine 

is 

disconnected  from  its  power 
source. 


2.  Now  rotate  the  collet  nut  until  the 

locking  holes  in  the  rotary  shaft  are 
aligned  with  the  grip,  then  insert the 
pin wrench. (See figure 16 below) 


Figure 16 
 

3.  Turn  the  collet  nut  counter- 

clockwise  to  loosen.  Do  not 
remove 

nut 

from 

shaft 

completely. 


4.  Insert  shank  of  bit  into  the  collet. 

At least ½” of shank on bit should 
be mounted into end of the collet. 
 

Summary of Contents for CX904

Page 1: ...MODEL CX904 3 Mini Grinder with Rotary Shaft Version 1 ...

Page 2: ... 7 Unpacking Your CX904 8 Specifications 9 Control Components 10 Inventory 11 Assembly 12 Adjusting Spark Deflector 13 Operation 14 Wheel Dressing 15 Installing Removing Grinding Wheel 16 Buffing 17 Types of Buffing Compounds 18 Using the Buffing Wheel 19 Maintenance 20 Trouble Shooting 22 Parts 24 Parts List 25 Wiring Diagram 27 Warranty 28 ...

Page 3: ...n of the bench grinder 2 Read through the owner s manual thoroughly and understand how to use this machine for its intended applications 3 Ground all machines If the machine has a 3 prong plug it must be used in conjunction with a 3 prong electrical receptacle The purpose of the third prong is to provide grounding for the machine and to prevent accidental electrical shock DO NOT under any circumst...

Page 4: ...ys keep machine clean and in proper working order Dress the grinding wheels and replace other abrasive accessories when worn out 21 Before operating machine check for any damaged parts or accessories Thoroughly check all safety guards are operating as they should and are not damaged Also check for the alignment binding breaking of moving parts 22 Do not operate machine under the influence of drugs...

Page 5: ...y to warm up reducing the chances of wheel damage Do not grind on the sides of the grinding wheels or use coolant or cutting liquids directly on the surface of the grinding wheel 7 The Grinding wheel should be dressed often to keep the wheel surface flat and free of contaminates like residue or glaze 8 Tool rest should be kept securely in place and used to position your work piece for grinding 9 D...

Page 6: ...avoid these issues insure you are connected to a circuit in which meets the specified circuit requirements for this piece of machinery WARNING Do not connect machine to power before setup has been fully completed to avoid risk of personal injury or property damage CIRCUIT REQUIREMENTS FOR CX904 3 MINI GRINDER BUFFER The CX904 has been prewired at the factory for operation on an electrical circuit ...

Page 7: ...sed electrician NOTE If ever you notice damage or ware to either the cord or plug disconnect it immediately from the power supply and have it replaced by a licensed electrician or service tech before any further use of the machine USE WITH EXTENSION CORDS If you absolutely must require the use of an extension cord with your machine do so on a temporary short term basis only NOTE We recommend that ...

Page 8: ...u may need to repeat this step a couple times to remove all protective coating NOTE Do not use gasoline acetone or paint thinner to remove protective coating as they may damage the painted areas 3 Compare all the items from the carton with Figure 1 Make sure all items in the inventory are accounted for before throwing away carton and packaging materials WARNING If any parts of the machine appear t...

Page 9: ...A Minimum Circuit Size 15A Connection Type Cord Plug Power Cord Included Yes Power Cord Length 6 1 2 ft Plug Included Yes Plug Type 5 15 Switch Type Toggle ON OFF Switch Motors Main Type Induction Horsepower 1 14 HP Phase Single Phase Amps 0 4A Speed 3450 RPM Power Transfer Direct Drive Bearings Shielded Permanently Lubricated Main Specifications Operation Info Right Wheel Type Aluminum Oxide Left...

Page 10: ...erator during grinding operations C Tool Rest Flat surface for resting the workpiece during operation D ON OFF Switch Turns the motor on when pushed to the right and off when pushed to the left E Wheel Guard Protects the operator from accidental contact with the grinding wheel and helps to contain sparks while performing any grinding operations F Rotating Shaft Rotary tool attachment that connects...

Page 11: ...eft 1 F Tool Rest Right 1 G Pin Wrench 1 H Open End Wrench 10mmx7mm 1 I Collet Wrench 1 J Wing Bolts M4 0 7 3 K Phillips Head Screw M4 07x40 2 L Flange Nut M4 0 7 1 M Flat Washers 3 N Phillips Head Screw M4 0 7x8 2 MOUNTING The grinder features four pre drilled holes on its base which allow mounting it to the workbench There are two ways to mount the grinder onto the workbench through mount and di...

Page 12: ...6 below Figure 6 3 Connect each tool rest to the grinder using 2 4mm flat washers and 2 M4 7 x 10 wing bolts as seen in figure 7 below Figure 7 Adjusting Tool Rests The tool rest supports the workpiece when grinding hence it is important to adjust the tool rest correctly The tool rest should be positioned at 1 16 1 8 from the grinding wheel As the grinding wheel wears and the gap between the grind...

Page 13: ...assembled the grinder and verified that grinding wheel is secured it is then time to do a test run and see that the machine powers up and runs properly To rest run the grinder Remove and clear away all the tools and objects used for assembling the machine Make sure you have read and understood the instructions given in this user manual and your grinder is set up properly Connect the cord to the po...

Page 14: ...l may crack or become damaged more easily and grinding of the other objects will be difficult If the workpiece becomes hot dip it into the water or oil to cool it preventing surface hardening or temper loss If the surface of the grinding wheel is no longer square the wheel should be reshaped using a wheel dressing tool or replaced GRINDING WHEEL INSPECTION The CX904 comes with an aluminum oxide gr...

Page 15: ... the possibility of breaking apart during operation and injuring the operator or others in the area Tips to Help Avoid Breaking a Wheel Always store and transport the wheels with care Wheels can become damaged if dropped or if heavy objects are place on top of them Only use wheels that are compatible and are rated for the RPM of your grinder Use the proper grinding wheel for the application Do not...

Page 16: ...ove M6 1 hex nut See Figure 12 below Figure 12 5 Remove outer wheel flange along with the paper disc Note hold grinding wheel with free hand to stop the spindle from turning while removing the hex nut 6 Now remove the grinding wheel and bushing from the spindle Pay attention to the fiber or paper disc between the wheel flange and wheel The paper disc is there to cushion the pressure of the wheel f...

Page 17: ...ot to use too much compound Place your workpiece under the wheel when you are applying the compound on to the buffing wheel By doing this should any of the compound drop it will land on the workpiece and won t be wasted on the floor To start buffing you will need to place your workpiece on to the tool rest and slowly start moving it towards the buffing wheel You must always hold the workpiece firm...

Page 18: ... with sisal and airway hard buffing wheels The black compound is perfect for the initial rough cut on stainless steel and iron Tripoli This is a middle of the road abrasive that provides a great medium cut for aluminum brass or zinc alloy Installing Removing Buffing Wheels The CX904 has a left and right shaft to allow for the option of mounting grinding or buffing accessories dependent on the appl...

Page 19: ...s disconnected from its power supply 2 Remove cover and screw or thread rotating shaft onto spindle located on the right hand side of the grinder See figure 15 Figure 15 NOTE Hold the wrench on flats of the rotating shaft then rotate the grinding wheel counter clockwise with spare hand to tighten Installing Bits in Rotary Shaft CX904 s rotary shaft uses cutter and bits with a 1 8 shaft diameter Ho...

Page 20: ...ose or severely worn buffing wheel Check chord for any wear or damage Grinding Wheels Grinding wheels must be inspected before each use You can use a method called the ring test that was mentioned in the wheel inspection section of this manual When storing grinding wheels you have to mindful to keep them from potential damages by being dropped or having other items stacked on top of them Grinding ...

Page 21: ...or heat Buffing Wheels Buffing wheels must be raked out before each use and when buildup becomes heavy during operation Raking is cleaning the buffing wheels with a wheel rake to remove any build up of compounds or metal debris When using a wheel rake always use light pressure ...

Page 22: ... Motor is overheating 3 Bearings for motor are at fault 4 Run capacitor is at fault 5 Motor has been wired incorrectly 1 Try new grinding or buffing wheel and slow your feed rate 2 Let motor cool down Clean motor and reduce the workload 3 Test bearings Repair or replace 4 Test capacitor Repair or replace 5 Re wire motor correctly Machine is noisy or vibrates during operation 1 Component or motor i...

Page 23: ...ot being held firmly 2 Wheel surface has an impurity 1 Utilize a holding device to securely retain workpiece 2 Grinding wheel requires dressing Workpiece has burnt spots or cracks 1 Using the wrong type of grinding wheel for the application 2 Workpiece Material requires quenching 3 Improper feed rate 1 Use a grinding wheel that is a softer style or coarser grit 2 Use water to quench and cool down ...

Page 24: ...24 Parts ...

Page 25: ...L GUARD RIGHT 12 PCX90412 INNER WHEEL GUARD RIGHT 13 PCX90413 SCREW PH HD M4 0 7 X 10 W WASHER 14 PCX90414 SCREW PH HD M4 0 7 X 40 15 PCX90415 WASHER FLAT M4 16 PCX90416 SPARK DEFLECTOR 17 PCX90417 TOOL REST RIGHT 18 PCX90418 SAFETY SHIELD 19 PCX90419 NUT HEX FLANGE M4 0 7 20 PCX90420 SWITCH ON OFF KEDU HY35C 21 PCX90421 STATOR 22 PCX90422 EXT RETAINING RING 10MM 23 PCX90423 ROTOR 24 PCX90424 WASH...

Page 26: ...CREW PH HD M4 0 7 X 10 W WASHER 35 PCX90435 GRINDER BASE COVER 36 PCX90436 RUBBER FOOT 37 PCX90437 SCREW PH HD M4 0 7 X 6 W WASHER 38 PCX90438 GROMMET 6MM 39 PCX90439 ROTATING SHAFT COVER 40 PCX90440 ROTATING SHAFT 42 PCX90442 SCREW PH HD M4 0 7 X 12 W WASHER 43 PCX90443 PIN WRENCH 3MM 44 PCX90444 COLLET WRENCH 45 PCX90445 WRENCH 10MM X 7MM OPEN END ...

Page 27: ...27 ...

Page 28: ...usive to Busy Bee Tools For replacement parts directly from Busy Bee Tools for this machine please call 1 800 461 BUSY 2879 and have your credit card and part number handy You can find the part number in the back of your owner s manual under the parts list exploded diagram All returned merchandise will be subject to a minimum charge of 15 for re stocking and handling A Machinery Return Form must b...

Reviews: