background image

Summary of Contents for 139.53965SRT

Page 1: ... of this product Fasten the manual near the garage door after installation Leer y seguir todas las reglas de seguridad y las instrucciones de operacibn antes de usar este producto por primera vez Guardar este manual cerca de la puerta del garaje Periodic checks of the opener are required to ensure safe operation Se deben realizar revisiones peribdicas del abre puertas para asegurar su operacibn se...

Page 2: ...l mounted Door Control 32 To open the door manually 32 Care of your garage door opener 33 Having a problem 34 Programming 35 36 To add a hand held remote control 35 To erase all codes 35 Multi Function Remotes 35 To add or change a Keyless Entry PIN 36 Repair Parts 37 38 Rail assembly parts 37 Installation parts 37 Motor unit assembly parts 38 Accessories 39 Warranty Service Numbers 39 Back cover ...

Page 3: ... binds sticks or is out of balance An unbalancedgarage door may not reversewhen required NEVERtry to loosen move or adjust garagedoor door springs cables pulleys brackets or their hardware all of which are under EXTREMEtension DisableALL locks and removeALL ropes connected to garagedoor BEFORE installing and operating garage door opener to avoid entanglement To prevent damageto garage door and ope...

Page 4: ...or It must close on the floor all the way across Otherwise the safety reverse system may not work properly See Adjustment Step 4 Floor or door should be repaired SECTIONAL DOOR INSTALLATIONS Do you have a steel aluminum fiberglass or glass panel door If so horizontal and vertical reinforce ment is required Installation Step 12 The opener is normally installed at the center of the door If there is ...

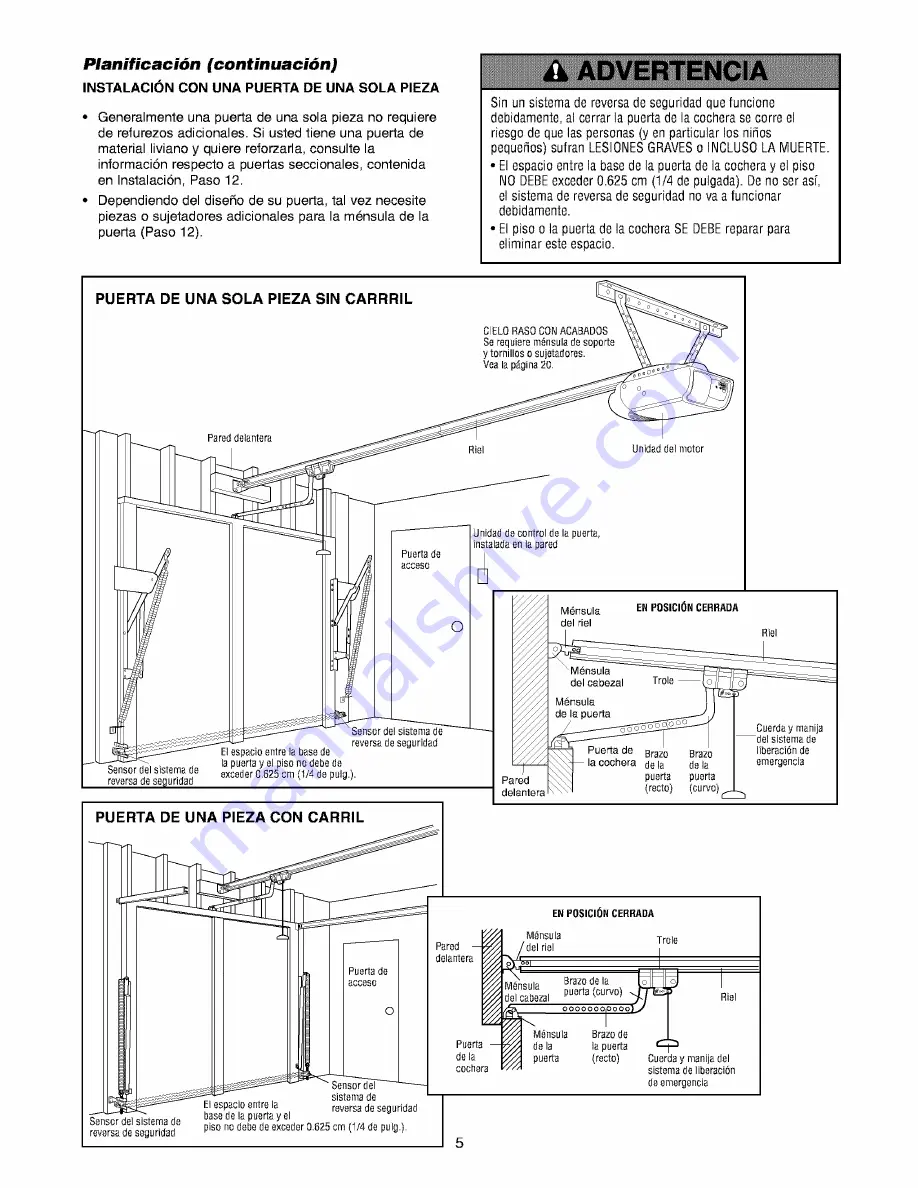
Page 5: ...em may not work properly The floor or the garagedoor MUST be repairedto eliminate the gap ONE PIECE DOOR WITHOUT TRACK FINISHED CEILING Support bracket fastening hardware is required See page 20 Header Wall Rail Motor unit Safety Reversing Sensor Gap between floor and bottom of door must not exceed 1 4 Wall mounted Door Control Access Do I Safety Reversing Sensor teader Vail Rail Bracket Door CLOS...

Page 6: ... installation is shown on the next page Save the carton and packing material until installation and adjustment is complete Premium Control Console Light Lens 2 Conductor Bell Wire White White Red Sprocket Coupling SECURITY I Three Function Remote Control with Visor Clip 2 Rail Support graces_ Header Rail Brackets Header Bracket Hanging Brackets with attached 2 Conductor White White Black Bell Wire...

Page 7: ...pling Sleeve INSTALLATION HARDWARE Carriage Bolt Wing Nut 2 Ring 1 4 20xl 2 2 Fastener 3 1111111111_ Lag Screw 5 16 9xl 5 8 2 111111111111_ Lag Screw 5 16 18xl 7 8 2 Carriage Bolt 5 16 18x2 1 2 2 Clevis Pin 5 16 x2 3 4 1 _ 1111111111 D Hex Screw 5 16 18x7 8 4 Nut 5 16 18 6 Lock Washer 5 16 6 Screw 6ABx1 1 4 2 o Dry Wall Anchors 2 Clevis Pin 5 16 x1 1 Handle Insulated Staples 30 Rope oH Clevis Pin ...

Page 8: ... is up Keep it clean and free of debris while you are working Rail Support Braces Straight Door Arm Sprocket End Remove Cardboard Packing Door End Rail Assembly Carton Remove Cardboard Packing Rail Assembly Chassis Assembly Hardware Bag Hardware Bag NOTE During assembly avoid pulling the rail section _ Sprocket End housing the trolley rack away from the screw rod f _ The rack is factory set about ...

Page 9: ... 4 20xl 3 4 bolts through the center holes of a brace and place its open length against the rail at the joint aligning the holes as shown Position the other brace on the opposite side of the rail over the bolts add 1 4 20 lock nuts and hand tighten Insert remaining bolts and hand tighten 7 With a 7 16 wrench tighten bolts until snug beginning with the center holes Do not overtighten Lock Alignment...

Page 10: ...Align the two screw holes in the rail with those in the motor unit bracket Insert two 1 4 20x5 8 hex screws and lock nuts Tighten securely with a 7 16 socket wrench Slide the trolley onto and along the bottom of the rail until it snaps firmly in place Be certain to install it facing correctly the trolley release arm must be horizontal lock position with its arrow pointed away from the motor unit H...

Page 11: ...nd other hardware MUST be made by a trained door systems technician before installing opener 4 Disableall locks and remove all ropes connected to garage door before installing opener to avoid entanglement 5 Install garage door opener7 feet or more abovefloor 6 Mount emergency releasehandle 6 feet above floor 7 NEVERconnect garagedoor opener to power source until instructed to do so 8 NEVERwear wat...

Page 12: ...xtend the line onto the header wall above the door You can fasten the header bracket within 4 feet of the left or right of the door center only if a torsion spring or center bearing plate is in the way or you can attach it to the ceiling see page 14 when clearance is minimal It may be mounted on the wall upside down if necessary to gain approximately 1 2 If you need to install the header bracket o...

Page 13: ...the door Add 8 to the remainder See Example 3 Close the door and draw an intersecting horizontal line on the header wall at the determined height NOTE If the total number of inches exceeds the height available in your garage use the maximum height possible or refer to page 14 for ceiling installation EXAMPLE Distance from top of door at highest point of travel to floor 92 Actual height of door 88 ...

Page 14: ...upport with the hardware provided HARDWARE SHOWN ACTUAL SIZE 1111111111 Lag Screw 5 16 9xl 5 8 Wall Mounting Holes _j_ The nail hole is for positioning only Y UmUn_tti_sehlagdscrt_ws ket Wall Mounting Holes Highest Point of Garage Door Travel Vertical Centerline L rw agSce s _ _ 5 16 x9x1 5 8 Ooor or oo I f Garage _ Door I_ Vertical I I Centerline i CEILING HEADER BRACKET INSTALLATION Extend the v...

Page 15: ... opener securely on a temporary support to allow the rail to clear the spring Position the rail bracket against the header bracket Align the bracket holes and join with a clevis pin as shown Insert a ring fastener to secure Rail Bracket Torsion Spring Ring Fastener Header Bracket Garage Door Clevis Pin 5 16 x2 3 4 Rail Bracket Rail Foam Packaging Opener Carton or Temporary Support HARDWARE SHOWN A...

Page 16: ...ectly into the receiving eye lens The mounting brackets are designed to clip onto the track of sectional garage doors without additional hardware Besure power is not connected to the garage door opener BEFORE installing the safety reversing sensor To prevent SERIOUSINJURYor DEATHfrom a closing garagedoor Correctly connect and align the safety reversing sensor This required safety device MUST NOTbe...

Page 17: ...6 diameter pilot holes on the wall at each side of the door no higher than 6 above the floor Attach brackets to wall with lag screws not provided If using extension brackets or wood blocks adjust right and left assemblies to the same distance out from the mounting surface Make sure all door hardware obstructions are cleared Floor installation Use wood blocks or extension brackets see Accessories t...

Page 18: ...his time and run the door control wire along the rail with the sensor wires Use one rail channel for the door control wire and the other channel for both sensor wires If you choose this option follow instructions 1 3 on page 21 now 3 Pull wires taut across the top of the chassis and insert into the opening above the terminal block see inset B You will complete the wiring in Installation Step 7 Fig...

Page 19: ... raise the door pull down on the trolley release arm to disconnect inner and outer sections The trolley can remain disconnected until Step 13 is completed To prevent damageto garage door rest garage door opener rail on 2x4 placed on top section of door Header 2x4 Bracket o o Trolley _ _ _ _ Trolley Release Arm ONE PIECE DOOR WITHOUT TRACK With the door fully open and parallel to the floor measure ...

Page 20: ...vious installation you must fasten a supplied hanging bracket diagonally to the two existing brackets See Figure 3 6 Check to make sure the rail is centered over the door or in line with the header bracket if the bracket is not centered above the door 7 Remove the 2x4 Operate the door manually If the door hits the rail raise the header bracket HARDWARE SHOWN ACTUAL SIZE 111111111111 Lag Screw 5 16...

Page 21: ...hen connecting multiple door controls to the opener twist same color wires together Insert wires into quick connect holes white to white and red white to red 6 Use tacks or staples to permanently attach entrapment warning label to wall near door control and manual release safety reverse test label in a prominent location on inside of garage door NOTE DO NOT connect the power and operate the opener...

Page 22: ...Wire White Wire Black Wire INSTALLATION STEP 9 Complete Safety Reversing Sensor Installation ALIGNING THE SAFETY SENSORS Plug in the opener The indicator lights in both the sending and receiving eyes will glow steadily if wiring connections and alignment are correct The sending eye orange indicator light will glow regardless of alignment or obstruction If the green indicator light in the receiving...

Page 23: ... rope through the hole in the top of the red handle so NOTICE reads right side up as shown Secure with an overhand knot at least 1 from the end of the rope to prevent slipping Thread the other end of the rope through the hole in the release arm of the outer trolley Adjust rope length so the handle is 6 feet above the floor Secure with an overhand knot NOTE If it is necessary to cut the rope heat s...

Page 24: ...e the bracket Position the bracket on the face of the door within the following limits A The top edge of the bracket 2 4 below the top edge of the door B The top edge of the bracket directly below any structural support across the top of the door To prevent damage to garage door reinforce inside of door with angle iron both vertically and horizontally HARDWARE SHOWN ACTUAL SIZE Nut 5 16 18 kockwas...

Page 25: ...for your installation Refer to the dotted line optional placement drawing Drill 3 16 pilot holes and substitute 5 16 x1 1 2 lag screws not provided to fasten the bracket to the door HARDWARE SHOWN ACTUAL SIZE Nut 5 16 18 Lockwasher 5 16 Carriage Bolt 5 16 18x2 1 2 Header Wall Header Bracket 2x4 Support Optional Placement of Door Bracket Finished Ceiling Door Bracket Vertical Centerline of Garage D...

Page 26: ...p and bottom holes on the curved door arm as shown Figure 3 Hole Alignment Alternative If holes in curved arm are above holes in straight arm disconnect straight arm Cut about 6 from the solid end Reconnect to trolley with cut end down as shown Bring arm sections together Find two pairs of holes that line up and join with screws lock washers and nuts Pull the emergency release handle toward the op...

Page 27: ...Nuts _ _ __ Lock 5 16 18 _ _ _ _ Washers I _ _ _c_ 5 16 I I_JI Clevi s Pin Straight J e I I I 5 16 x1 1 4 Arm r_ _ __ k_ 5 1 6 18x7 8 _ _Curved Door Arm Press the Door Control push bar The trolley will travel to the fully closed position Manually close the door and lift the door arm to the trolley The arm should touch the trolley just ahead of the door arm connector hole Refer to the fully closed ...

Page 28: ...ff the door does not close completely Increase down travel Turn the down limit adjustment screw counterclockwise One turn equals 2 of travel If door still won t close completely try lengthening the door arm page 26 and decreasing the down limit If the opener reverses in fully closed position Decrease down travel Turn the down limit adjustment screw clockwise One turn equals 2 of travel Without a p...

Page 29: ...INCREASE DOWN close force by turning the control clockwise Make small adjustments until the door completes a close cycle After each adjustment run the opener through a complete travel cycle Do not increase the force beyond the minimum amount required to close the door 2 Test the UP open force Grasp the door bottom when the door is about halfway through UP open travel The door should stop If the do...

Page 30: ... down direction Increase the DOWN limit by turning the DOWN limit adjustment screw counterclockwise 1 4 turn NOTE On a sectional door make sure limit adjustments do not force the door arm beyond a straight up and down position See the illustration on page 26 Repeat the test When the door reverses on the one inch board remove the obstruction and run the opener through 3 or 4 complete travel cycles ...

Page 31: ...Security Keyless Entry System If you purchase a new remote or if you wish to deactivate any remote follow the instructions in the Programming section Activate your opener with any of the following The hand held Remote Control Hold the large push button down until the door starts to move The wall mounted Door Control Hold the push button down until the door starts to move The Keyless Entry See Acce...

Page 32: ...ted Additional feature when used with the 3 function hand held remote To control the opener lights In addition to operating the door you may program the remote to operate the lights 1 With the door closed press and hold a small remote button that you want to control the light 2 Press and hold the Light button on the Premium Control Console 3 While holding the Light button press and hold the Lock b...

Page 33: ...es not require additional lubrication Do not grease the door tracks To prevent possible SERIOUSINJURYor DEATH NEVERallow small children near batteries If battery is swallowed immediately notify doctor The lithium battery should produce power for up to 5 years To replace battery use the visor clip or screwdriver blade to pry open the case as shown Open location is stamped on back of remote control ...

Page 34: ...nches of travel See Adjustment Step 1 Repeat the safety reverse test after the adjustment is complete 8 The door stops but doesn t close completely Review the travel limits adjustment procedures on page 28 Repeat the safety reverse test after any adjustment of door arm length close force or down limit 9 The door opens but won t close If the opener lights blink check the safety reversing sensor See...

Page 35: ...the button on the hand held remote that you wish to operate your garage door While holding the remote button press and hold the LIGHT button on the Premium Control Console Continue holding both buttons while you press the push bar on the Premium Control Console all three buttons are held Release buttons when the motor unit lights blink It has learned the code If light bulbs are not installed two c...

Page 36: ...t has expired To set a temporary PIN 1 Press the four buttons for your personal entry PIN not the last temporary PIN then press and hold the button The opener light will blink three times Release the button 36 NOTE This method requires two people if the Keyless Entry is already mounted outside the garage 1 2 Enter a four digit personal identification number PIN of your choice on the keypad Then pr...

Page 37: ...A163 Wear pads PART NO DESCRIPTION 41A4884 29B137 41A5076 10A20 41A2828 217A238 41A5047 41A4353 41A5034 178B35 178B34 12B350 41A5266 1 41A4675 5 114A2465 Premium control console Visor clip 3 function remote control case no circuit board 3V 2032 Lithium battery 1 required Emergency release rope handle assy 2 Conductor bell wire white white red Door bracket w clevis pin fastener Header bracket w cle...

Page 38: ...cket 10 41A4837 1 Worm gear and retainer 5 41A3150 Terminal block w screws 11 41C5417 Low voltage wire harness 6 41 D4671 Limit switch assembly 11a 41C5416 High voltage wire harness 7 12D630 Bracket light socket limit switch 12 41A5389 1 Receiver logic board assy 8 41A5388 Motor drive assy complete with 13 41C1474 Cover 8a 144B41 22T Pulley 14 41C22 1 Drive coupling hub 8b 144B42 28T Pulley 15 175...

Page 39: ...nables homeowner to turn on a lamp television or other appliance from car bedside or anywhere in the home with a remote WARRANTY SEARS WARRANTY FULL 90 DAY WARRANTY ON GARAGE DOOR OPENER For 90 days from the date of purchase Sears will repair this Garage Door Opener free of charge if defective in material or workmanship LIMITED WARRANTY From the 91st day up to 3 years from the date of purchase Sea...

Page 40: ...bridor de la puerta de su cochera 31 C6mo usar la unidad de control de pared 32 C6mo abrir la puerta manualmente 32 Mantenimiento de su abridor de puerta de cochera 33 Si tiene alg6n probtema 34 Cdmo programar el abridor 35 36 C6mo usar un control remoto de mano 35 C6mo borrar o renovar los c6digos de seguridad 35 Controles remotos de funciones multiples 35 C6mo aSadir o modificar un c6digo de ent...

Page 41: ...der como se requiere NUNCAintente aflojar mover ni ajustar la puerta de su cochera los resortes de la puerta los cables las poleas las mdnsulas ni la torniller a pues todos estos elementos est_ n bajo tensi6n EXTREMA Quitar TODOSlos seguros y retirar TODASlas cuerdas conectadasa la puerta de cocheraANTESde instalar y operar el abridor de la puerta de cochera paraevitar que se enreden Paraevitar da...

Page 42: ...el piso Si no es asf se corre el riesgo de que el sistema de reversa de emergencia no funcione correctamente Vea Ajustes Paso 4 Vaa ser necesario reparar ya sea el piso o la puerta INSTALACI _N CON UNA PUERTA SECCIONAL Si tiene una puerta de aluminio libra de vidrio o con paneles de vidrio vaa necesitar refuerzos verticales y horizontales en la puerta InstalaciOn Paso 12 El abridor generalmente se...

Page 43: ...seguridad nova afuncionar debidamente Elpiso o lapuertadelacocheraSEDEBE repararpara eliminaresteespacio PUERTA DE UNA SOLA PIEZA SIN CARRRIL C ELO RAS0 CONACAE_ADOS Se requiere m_nsula de soporte y tornillos o sujetadores Vea la p_gina 20 Pared delantera Riel Unidad del motor Pue_a de aCCeSO Sensor del sistema de reversa de seguridad Elespacio entre la base de la puerta y el piso no debe de Senso...

Page 44: ... siguiente p_gina Conserve la caja y los materiales de empaque hule espuma hasta que la instalacidn y el ajuste se hayan terminado Unidad de control Premium Lente para la luz SECURITY I Control remoto de tres funciones con clip para el visor 2 Cople de la polea Puntales del _ __ Dos cables conductores de campana Blanco y blancotrojo M_nsulas del cabezal y del riel M nsulas para colgar Mdnsula del ...

Page 45: ...eroa de 1 4 20xl 2 pulg 2 mariposa 2 5t16 18 pulg 6 1111111111_ Tornillo de cabezacuadrada de 5tt6 9xl 5 8 de pulg 2 IIIIIIIIIII1_ Tornillo de cabeza cuadrada de 5tl 6 18xl 7t8 pulg 2 Perno de 5 t6 t8x2 1 2 pulg 2 Pasador de ohaveta de 5t16x2 3t4 pulg 1 Manija _1111111111 D Tornil o de oabezahexagonal de 5tl 6 18x7 8 pulg 4 Roldana de 5 t6 pulg f6 Grapas con material aislante 3o Tornillo 6ABxt 1 4...

Page 46: ...porte del riel Brazo recto de la puerta Lad0 hacia la polea Quite el cart6n de protecci6n Lado hacia la puerta Cajadel riel Quite elcart6n de protecci6n Bolsa con las piezas Bolsa con las piezas y sujetadores para y sujetadores para el armado del riel el armado del chasis Lado hacia NOTA Durante el montaje def rief nunca mueva ni jafe el _ lapolea I asiento para el trofe fejos de fa variffa de con...

Page 47: ... una de los puntales de soporte despu6s ponga el puntal con los pernos en los orificios a Io largo de la conexi6n de las dos secciones del riel Coloque el otro puntal de soporte al lado opuesto del riel sobre los pernos y ponga las tuercas de 1 4 20 de pulg Apriete a mano y coloque el resto de los tornillos y tuercas 7 Con una Ilave de tuercas de 7 16 de pulg y empezando al centro ajuste las tuerc...

Page 48: ...s correspondientes orificios de la m6nsula del motor Sujete con los tornillos hexagonales de 1 4 20x5 8 pulg y sus respectivas tuercas Apri6telos con una Nave de tuercas de 7 16 de pulg Deslice el trole por debajo y a Io largo del riel basra que se atore en su lugar Aseg_rese de instalarlo del lado torte to el brazo de liberaci6n del trole debe de estar horizontal posici6n cerrada con la flecha ap...

Page 49: ...de instalar el abridor 4 Desarmetodos los seguros y retire todas las cuerdas conectadas a la puerta de la cochera antes de instalar el abridor con el objeto de evitar que se enreden 5 Instale el abridor de la puerta de cochera a una distancia de 2 10 m 7 pies del piso 6 Monte la manija de liberaci6n de emergencia a una distancia de 1 80 m 6 pies del piso 7 NUNCAconecteel abridor de la puertade coc...

Page 50: ...sible instalar la mensula del cabezal hasta a una distancia de mdximo 1 20 m 4 pies a cada lado del centro de la puerta pero _nicamente si un resorte de torsidn o un placa central de apoyo se encuentra en el recorrido Tambien cuando el espacio es reducido se puede instalar la mensula en el cielo raso o plafdn de la cochera yea la pdgina 14 Asimismo se puede instalar invertida sobre la pared si es ...

Page 51: ...pulg Vea el ejemplo 3 Cierre la puerta de la cochera y marque una Ifnea horizontal sobre la pared delantera a la altura que le haya determinado mediante el cAIculo anterior NOTA Si el n mero total de centfmetros excede fa aftura disponibfe en su cochera use fa aftura mgxima posibfe o consufte fa pagina 14 para fa Instafacidn en el ciefo raso o pfafdn EJEMPLO Distancia entre la parte superior de la...

Page 52: ...r 10stornill0s de cabeza i cuadrada para sujetar la m6nsula Orificios opcionales para la instalaci6n en la pared Punto m_s alto del recorrido de la puerta de la coohera Lfnea Central vertical Tornillos de cabeza cuad rada de 5 16x9x 1 5 8 pulgadas Resorte de la puerta Puerta de la oochera Linea central vertical INSTALACI _N DE LA MENSULA DEL CABEZAL EN EL CIELO RASO Extienda la Ifnea central verti...

Page 53: ...oporte temporal para ayudarfe a que el rief pueda fibrar el resorte Coloque la m6nsula del riel junto a la m6nsula del cabezal Alinee los orificios de las m6nsulas y jOntelas con un pasador de chaveta como se muestra en la ilustraci6n Suj6telos con un anillo sujetador Resorts de torsi6n Riel Puerta de la cochera Hule espuma del empaque Pasador de chaveta de 5tl 6x2 3 4 de pulg Anillo sujetad_ Mdns...

Page 54: ...e d6 el sol directamente a la lente del ojo receptor Las m6nsulas para la instalaci6n han sido diseSadas para que se sujeten directamenta al carril de la puerta sin la necesidad de tornillerfa ni piezas adicionales Cerci6rese de que la energ aeldctrica no estd c0nectadaal abridor de la puerta de la cochera ANTESde instalar el sensor del sistema de reversa de seguridad Paraevitar una LESIONGRAVEo I...

Page 55: ...m 6 pulg del piso Sujete la m6nsula a la pared con tornillos de cabeza cuadrada o pijas no se incluyen Si est_ usando m6nsulas de extensiSn o pedazos de madera por la falta de espacio aseg0rese de que las dos unidades queden a la misma distancia de la superficie de montaje Asimismo aseg0rese de que no haya ninguna obstrucciSn Instalaci6n en el piso Use pedazos de madera o m6nsulas de extensi6n yea...

Page 56: ... la parte inferior del riel ya que es para el trole Con la punta de un desarmador meta bien los cables dentro de la canaleta NOTA Si fa puerta de acceso a su cochera se encuentra muy cerca de fa puerta de fa cochera puede optar por instafar fa unidad de control en este momento y correr el cabfeado def control de fa puerta a fo largo def rief junto con los cables de los sensores Use una canafeta de...

Page 57: ... interna y externa del mismo El trole puede permanecer desconectado basra el final del Paso 13 Paraevitar que la puerta de cochera sufra da_os apoye el riel del abridor de la puerta de cochera sobre un pedazode madera de 5 x 10 cm 2 x 4 pulg colocado en la secci6n superior de la puerta Pedazo de madera Mdnsula del de 5x 10 cm 2x4 pulg Puerta Hule espuma del empaque o D Trole c o _ Braz0 de Iiberao...

Page 58: ...diagonal con respecto alas m6nsulas existentes Vea la Figure 3 6 Verifique que el abridor est6 centrado sobre la puerta o alineado con la m6nsula del cabezal si la m6nsula no estA centrada sobre la puerta 7 Quite el pedazo de madera de 5x10 cm 2x4 pulg Haga funcionar la puerta manualmente Si la puerta golpea el riel suba la m6nsula del cabezal Pareevitar la posibilidad de una LESIONGRAVEsi se caee...

Page 59: ...orificios de conexi6n r_pida blanco a blanco y rojoiblanco a rojo 6 Use tachuelas o grapas para sujetar permanentemente la calcomanfa de advertencia sobre el riesgo de quedar atrapado esta calcomanfa debe estar en la pared y cerca del control de la puerta La calcomanfa de advertencia de la prueba de reversa de seguridad y liberaci6n manual debe colocarse en un punto prominente del interior de la p...

Page 60: ...INEACI _N DE LOS SENSORES DE SEGURIDAD Conecte el abridor las luces del sensor emisor y del sensor receptor se deben de encender y permanecer encendidas si todas las conexiones del cableado y el alineaci6n se ban hecho correctamente La luz anaranjada del sensor que emite el rayo se encenderA aunque est6 obstruido o fuera de alineaci6n pero si la luz verde del sensor receptor del rayo estA apagada ...

Page 61: ...tremo de la cuerda para evitar que se resbale Pase el otro extremo de la cuerda a trav6s del orificio del brazo de liberaci6n del trole exterior Ajuste el largo de la cuerda de tal manera que la manija quede a seis pies del piso y haga un nudo para asegurarla NOTA Si es necesario cortar fa cuerda queme con un ceriffo o un encendedor el extremo que cort5 para seffarfa y evitar que se desenrede Lent...

Page 62: ...6nsula Coloque la m6nsula sobre la parte frontal de la puerta dentro de los Ifmites siguientes A El borde superior de la m6nsula 5 10 cm 2 4 pulg debajo del borde superior de la puerta B La orilla superior de la m6nsula debe de estar directamente debajo de algOn soporte de la estructura a Io largo de la parte superior de la puerta Paraevitar que la puerta de la cochera se dame refuerceel interior ...

Page 63: ...ar Vea fa ifustraciSn de cofocaciSn opcionaf se_afada con fa ffnea punteada Tafadre dos orificios de 0 47 cm 3 16 de pufg y sujete fa mensufa a fa parte superior de fa puerta con torniffos de cabeza cuadrada de 5 16x1 1 2 pufgadas no se incfuyen ESTAS PARTES SE MUESTRAN EN SU TAMA_IO NORMAL Tuerca de 5 i 6 i 8 de pulgada Roldana de 5 t6 de pulgada Perno de coche de 5 t6 t8 por 2 t 2 pulgada Pared ...

Page 64: ...se muestra Figura 3 Opciones para alinear los orificios En caso de que los orificios del brazo curvo no se puedan alinear con los orificios del brazo recto desconecte el brazo recto y corte aproximadamente 15 cm 6 pulg del extremo que no tiene orificios Vuelva a conectarlo al trole con el extremo cortado hacia abajo como se muestra Junte las dos secciones de los brazos Localice dos pares de orific...

Page 65: ... ajustar el Ifmite del recorrido hacia abajo dAndole cinco vueltas completas hacia la derecha direcciSn de las manecillas del reloj MdnsuFa de la p_e_a Oprima el botSn de control de la puerta el trole deberA ir basra la posiciSn completamente cerrada Cierre la puerta manualmente y suba el brazo de la puerta al trole El brazo de la puerta deberA de tocar el trole justo adelante del orificio conecto...

Page 66: ...erda direcci6n opuesta alas manecillas del reloj cada revoluci6n del tornillo equivale a 5 cm 2 pulg del recorrido Si adn despuds de este ajuste la puerta continda sin cerrar completamente alargue el brazo de la puerta pAgina 26 y disminuya el I mite del recorrido hacia abajo Si la puerta retrocede cuando est6 en la posicidn completamente cerrada Disminuya el Ifmite del recorrido hacia abajo dd vu...

Page 67: ...equeSos ajustes haste que la puerta haga un ciclo completo y despu6s de Ilevar a cabo el ajuste haga funcionar el abridor durante un ciclo completo del recorrido No aumente la fuerza mAs del mfnimo necesario pare cerrar la puerta 2 Pruebe la fuerza del recorrido hacia arriba abrir Cierre la puerta manualmente agarrAndola por la parte inferior y det6ngala mAs o menos a la mired del recorrido HACIA ...

Page 68: ...y hacia abajo Vea fa ifustracidn en fa p gina 26 Repita la prueba Si la puerta retrocede autom_ticamente al hacer contacto con el pedazo de madera de 2 5 cm 1 pulg quite la obstrucciSn y abra y cierre la puerta completamente por Io menos cuatro o cinco veces para verificar que el ajuste sea adecuado Si despu6s de intentar varios ajustes la puerta no retrocede autom_ticamente al hacer contacto con ...

Page 69: ...dor funcionarA con varios controles remotos Security utilizando basra 8 funciones y un Sistema de entrada sin Ilave de Security Si compra un control remoto nuevo o si desea desactivar algQn control remoto siga las instrucciones que aparecen en la secciSn sobre CSmo programarel abridor Active su abridor de alguna de las siguientes maneras El Control remoto manual Mantenga oprimido el botSn grande h...

Page 70: ...control remote manual de tres funciones Para controfar as fuces de abridor Adem_ s de la operaci6n de la puerta tambi6n puede programar el control remoto para el funcionamiento de las luces 1 Con la puerta cerrada optima y mantenga oprimido un bot6n pequefio del control remoto que querer usar para el control de la luz 2 Optima y mantenga oprimido el bot6n Luz de la Consola de control Premium 3 Mie...

Page 71: ...ubricaci6n adicional No lubrique los rieles de la puerta LA BATERfA DEL CONTROL REMOTO Paraevitarlap0sibilidad de LESIONES GRAVES 0 INCLUSO LA MUERTE NUNCApermita que 10snifi0s pequefi0s estdn cerca de las bater_as Si alguien se traga una baterfa Ilame al mddico de inmediato La batefia de litio debe producir energfa durante cinco aSos Para cambiar la batefia use el clip del 3 FUBC ONES Abra este e...

Page 72: ... equivale a 5 cm 2 pulg del recorrido Vea Ajustes Paso t Repita la prueba de seguridad de reversa despu6s de terminar el ajuste 8 La puerta se detiene pero no cierra completamente Revise los procedimientos de ajuste de los Ifmites del recorrido que aparecen en la p_gina 28 Repita la prueba de seguridad de reversa despu6s de realizar cualquier ajuste al largo del brazo de la puerta a la fuerza o al...

Page 73: ...de la memoria de la unidad del motor Para desactivar cualquier control remoto que no desee usar antes que nada borre todos los cSdigos Oprima y mantenga oprimido el botSn Aprender de la unidad del motor basra que la luz del indicador de Aprender se apague aproximadamente 6 segundos Ya estarAn borrados todos los cSdigos anteriores Vuelva a programar cada uno de los controles remotos o la entrada si...

Page 74: ... para porter un PIN temporal 1 Oprima los cuatro botones correspondientes a su PIN de entrada personal no el L_ltimo PIN temporal luego oprima y mantenga oprimido el botSn _ La luz del abridor va a parpadear tres veces Suelte el botSn 36 NOTA Este m todo requiem dos personas si fa Entrada sin ffaves ya esta montada afuera de fa cochera 1 Ingrese un nQmero de identificaciSn personal PIN que haya el...

Page 75: ...s adicionales Control de luz enchufable Permite al duefio de la casa encender una IAmpara la televisi6n u otro aparato dom6stico con el control remoto desde el coche la cama o dondequiera que se encuentre en la casa GARANTiA GARANT A SEARS EL ABRIDOR DE PUERTA DE COCHERA TIENE UNA GARANT A COMPLETA DE 90 D AS Durante90dias a partir dela fecha de compra Searshar_las reparacionesdesu Abridor depuert...

Page 76: ...repair of carry in items like vacuums lawn equipment and electronics call or go on line for the location of your nearest Sears Parts Repair Center 1 800 488 1222 Call anytime day or night U S A only www sears com To purchase a protection agreement on a product serviced by Sears 1 800 827 6655 U S A 1 800 361 6665 Canada Para pedir servicio de reparaci6n a domicilio y para ordenar piezas 1 888 SU H...

Reviews: