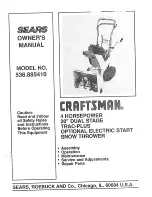
background image

Summary of Contents for 143.804062

Page 1: ...w all Safety Rules and instructions Before Operating This Equipment 4 HORSEPOWER 20 DUAL STAGE TRAC PLUS OPTIONAL ELECTRBC START SNOW THROWER Assembly o Operation Maintenance Service and Adjustments Repair Parts SEARS ROEBUCK AND Co Chicago aL 60684 U SoA ...

Page 2: ...uctures or buildings Check shear bolts and other bolts at frequent intervals for proper tightness to be sure the snow thrower is in safe working condition e Disengage all clutches and shift into neutral before starting the engine Adjust the snow thrower height to clear gravel or crushed rock surface Let engine and snow thrower adjust to outdoor temperatures before starting to Clear snow FUEL SAFET...

Page 3: ...ot water and space heaters clothes dryers and the like A_low the engine to cool before storing in any enclosure REPAIRtADJUSTMENTS SAFETY e After striking a foreign object stop the engine motor remove the wire from the spark plug disconnect the cord on electric motors thor oughly inspect the snow thrower for any dam age and repair the damage before restarting and operating the snow thrower o If th...

Page 4: ...ead and observe the safety rules o Follow a regular schedule in maintaining caring for and using your snow thrower e Follow the instructions under Maintenance and Storage sections of this owner s manual TWO YEAR LIMITED WARRANTY ON CRAFTSMAN SNOW THROWER For two years from the date of purchase when this Craftsman Snow Thrower is maintained lubricated and tuned up according to the instructions in t...

Page 5: ... I Ignition Key I0 11 12 index 5 L Levers Auger Drive Clutch 9 10 Choke 9 1O 12 Shift Rod Lever 9 10 Throttle Control 9 10 12 Traction Drive Clutch 9 t 0 Lubrication Auger Gear Box 14 Auger Shaft 14 Chain and Sprockets 14 Chart 24 Engine 11 15 Hex Shaft and Gears 4 15 Weight Transfer System 14 M Maintenance Agreement 4 Auger Gear Box t4 Auger Shaft 14 Chain and sprockets 14 Engine 5 General Recomm...

Page 6: ...t ments section of this manual Check track adjustment and fasteners regularly CONTENTS OF SHIPPING CARTON TOOLS REQUnRED FOR ASSEMBLY 1 Snow thrower completely assembled except for the crank assembly and the upper handle which is in the folded down position 1 Parts Bag Containing 1 Owner s Manual Not Shown Parts Shown Below 1 Knife to cut carton and plastic ties 2 1 2 inch Wrenches or adjustable w...

Page 7: ...th bolts securely NOTE This snow thrower is equipped with a track drive and can be hard to push when the engine is not running It is easier to pull the snow thrower backward if it must be moved without the engine running The drive system may be tight when you first use your snow thrower It loosens up as you use it HOW TO SET UP YOUR SNOW THROWER TO SET THE SKID HEIGHT For shipping the height adjus...

Page 8: ...r from the wormed end of the crank assembly and set aside See Fig 5 Rotate the notched section of the discharge chute o toward the crank adjusting rod_ Install the wormed end of the crank through the hole e in the adjusting rod and secure the end with the flat washer and cotter pin as shown Bend the ends of the cotter pin around the rod and re install the plastic cap o Hold the eye bolt in place w...

Page 9: ...ow gathering and throwing conditions to keep the snow thrower from climbing drifts TRACTION CLUTCH LEVER Propels the snow thrower and hard packed snow When released it eases trans forward and in reverse SHIFT ROD LEVER Selects the speed of the snow thrower 6 speeds forward and 2 speeds reverse CRANK ASSEMBLY Changes the direction of snow throwing through the discharge chute CHUTE DEFLECTOR Changes...

Page 10: ...he speed shift rod lever to the speed you desire Ground speed is determined by snow conditions Select the speed you desire by moving the speed shift rod lever into the appropriate colored area on the control panel Red Wet Heavy Slushy Extra Deep Amber Moderate White Very Light Green Transport only Engage the traction clutch lever See Fig 10 tett hand As the snowthrower starts to move maintain a fi...

Page 11: ...er handle firmly and push down on the weight transfer pedal See Fig_ 12 with the ball of your foot e To release pull up on the weight transfer pedal with the top of your foot BEFORE STARTING THE ENGtNE FILL ADD OIL The engine on this snow thrower was shipped without oil Add oil before you start the engine Remove the oil fill cap dipstick and fill the crank case to FULL line on dipstick about 21 ou...

Page 12: ...CONTAINER AND KEEP THE CAP IN PLACE ON THE CONTAINER CAUTION NEVER RUN ENGINE IN DOORS OR IN ENCLOSED POORLY VENTILATED AREAS ENGINE EX HAUST CONTAINS CARBON MON OXIDE AN ODORLESS AND DEADLY GAS KEEP HANDS FEET HAIR AND LOOSE CLOTH ING AWAY FROM ANY MOVING PARTS ON ENGINE AND SNOW THROWER WARNING TEMPERATURE OF MUFFLER AND NEARBY AREAS MAY EXCEED 150 F AVOID THESE AREAS DO NOT ALLOW CHILDREN OR YO...

Page 13: ...t all times Most efficient snow blowing is accomplished when the snow is removed immediately after it falls e For complete snow removal slightly overlap each path previously taken e The snow should be discharged down wind when ever possible o o For normal usage set the skids so that the scraper bar is 1 8 above the skids For extremefy hard packed snow surfaces adjust the skids upward so that the s...

Page 14: ...graph on page 17 e All screws and nuts should be checked often to make sure they are tight preferably after each use SNOW THROWER HEX SHAFT DISC DRI_ E PLATE FIG 16 LUBRICATION EVERY TEN HOURS Chain and Sprockets Oilchains and sprockets See Fig 15 with 10W 30 oil orequivalent after i 0 hours use and at the end of each season LUBRICATION NOT REQUIRED o Hex Shaft and Gears Hex shaft and gear s requi...

Page 15: ...w thrower so the oil drain plug isthe lowest point on the engine_ Remove the oil drain plug and oil fill cap dipstick Drain the oil into a suit able container The oil will drain more freely when warm Replace the oit drain plug and tighten securely_ Refill the crankcase with SA E_ 10W 30 motor oi or equivalent S A E 5W 30 motor oil may be used to make starting easier in areas where the temperature ...

Page 16: ...lts and nuts securing the scraper bar to the auger housing e Adjust the scraper bar to the proper position e Tightenthe carriage bolts and nuts making sure that the scraper bar is parallel with the working surface After extended operation the scraper bar may be re versed If the scraper bar must be replaced due to wear remove the carriage bolts and nuts and install a new scraper bar cA o N BE CERTA...

Page 17: ...pressure and does not require adjustment Check the clutch control cable adjustment before replacing the belt Replace the track drive belt if it is still slipping see To Replace Belts paragraph on page 18 AUGER DRIVE BELT see Fig 24 tf your snow thrower wilt not discharge snow check the control cable adjustment If it is correct then check the conditio n of the auger drive bell It may be loose or da...

Page 18: ...osition to pivot the auger housing and the motor mount frame into the proper position e Release the auger drive clutch lever and reinstall the bolts removed in the steps above_ Tighten the lower bolts if they were loosened e Place the drive belt on the auger drive engine pulley e Adjust the drive belt see To Adjust Auger Drive Belt paragraph on page 17 e Adjust the belt guides see To Adjust The Be...

Page 19: ...the track drive belt the traction drive cable or the friction wheel Ifthe friction wheel is damaged it will need to be replaced See the To Replace Friction Wheel para graph on page 20 If the fdction wheel is not worn check the adjustment as follows Disconnect the spark plug wire Drain the gasoline from the gas tank_ e Stand snow thrower on the auger housing end o Remove the bottom panel See Fig 28...

Page 20: ...bottom panel See Fig 28 Remove the self tap screws from the bearing at the left end of the hex shaft See Fig 32 and 33 Remove the bolts and nuts from the bearing at the right end of the hex shaft See Fig 33 CAUTION DRAIN GASOLINE OUTDOORS AWAY FROM FIRE OR FLAME ADJUST E T FRICTION WHEEL HEX SHAFT TRUNION BEARING Slide the hex shaft to the right until the frictionwheel can be removed install the n...

Page 21: ...the auger shaft Then rotate the auger to distribute the oil on the shaft Align the hole in the auger with the hole in the auger shaft Install the new shear bolt and Iocknut o Reconnect the spark plug wire TO ADJUST TRACK Ifthe snow thrower does not move forward evenly and the track slips slightly you need to check the track as follows e Pull up gently on the center ol the track near the center Mea...

Page 22: ... each setting to aitow the engine to react to the previous adjustments TO REPLACE JUST E 22 IMPORTANT NEVER TAMPER WITH THE ENGINE GOVERNOR WHICH IS FACTORY SET FOR PROPER ENGINE SPEED OVERSPEED1NG THE ENGINE ABOVE THE FACTORY HIGH SPEED SETTING CAN BE DANGEROUS IF YOU THINK THE ENGINE GOVERNED HIGH SPEED NEEDS ADJUSTING CONTACT YOUR NEAREST SEARS SERVICE CENTER WHICH HAS THE PROPER EQUIPMENT AND ...

Page 23: ... WHILE IN STORAGE Drain the gasoline from the fuel tank by removing the fuel line Drain the fuel and reinstall the fuel line CAUTION DRAIN FUEL INTO APPROVED CONTAINER OUTDOORS AWAY FROM OPEN FLAME BOWL DRAIN FIG 39 Start the engine and run at SLOW idle speed until the engine stops from lack of fuel e Drain the carburetor by pressing upward on the bowl drain See Fig 39 located below the carbure to...

Page 24: ... Screws and Nuts t_ Check Traction Clutch Cable Adjustment See Cable Adjustment _t Replace Spark Plug Adjust Drive Belts j_ Lubricate All Pivot Points Lubricate Auger Shaft See Shear Bolt Replacement Lubricaie Sprockets and Chains Sparingly Track Assembly Drain Fuel SERVUCE DATES 11 v Check Auger Clutch Cable Adjustment See Cable Adjustment t_ v II LUBRBCATION CHART irl Oil chains and sprockets wi...

Page 25: ... flush and refill with flesh Set choke lever to RUN position Use carburetor bowl drain to flush and refill with fresh fuel Adjust carburetor Stop engine immediately and disconnect spark plug wire Tighten all bolts and make all necessary repairs If vibration continues have the unit serviced by a competent repairman Repiace drive belt Adjust traction drive cable Replace friction wheel i Adjust auger...

Page 26: ...CRAFTSMAN 20 SNOW THROWER 536 885410 1 2 4 12 35 14 15 19 3 15 14 3 12 22 24 19 20 29 28 21 39 40 38 14 t4 _15 _42 37 37 36 26 ...

Page 27: ...er 5 16 Flatwasher 5 16 18 Hex Nut Lower Handle Auger Drive Clutch Cable Clutch Spring Boot Auger Clutch Spring 1 4 20 Locknut 5 16 8 x 1 2 Screw Wd F Lk PART NQ 71111 71072 1580 309344 71457 148 308145 17 309312 307399 304872 104 7 1082 7055 7058 7059 7052 70993 1162 302900 3O7137 PART NAME 3 8 16 Locknut 3 8 Flatwasher Traction Drive Clutch Cable Adapter Boot To Handle Eye Boft Eye Bolt Grommet ...

Page 28: ...CRAFTSMAN 20 SNOW THROWER 536 885410 28 61 31 87 i 33 22 38 16 15 62 40 14 _f12 3 ReL Item 7 8_ 12 11 18 39 51 47 53 41 58 59 6O 83 34 84 64 63 8 68 7O 71 51 78 79 28 ...

Page 29: ...0 x 3 4 Ph Pn Hd Tap Screw Key Pulley V Belt I 4 20 x 5 8 Bolt Shoulder Bolt Retaining Ring Flatwasher REFo NO PART NO PART NAME 45 46 47 48 49 50 51 52 53 54 55 56 57 58 59 60 6t 62 63 64 65 66 67 68 69 70 71 72 73 74 75 76 77 78 79 80 8I 82 83 84 85 86 87 88 89 3O1784 5O617 3O7960 302639 302621 30814O 3O2624 307959 307956 70968 308903 85501 53831 53830 71059 71034 300376 50610 120376 300380 3017...

Page 30: ...CRAFTSMAN 23 SNOW THROWER 536 885410 23 5 7 4 2 1 27 17 18 19 3O 15 21 33 36 41 61 53 24 27 35 o 3O 29 7 3O ...

Page 31: ...4 20 Hex Nut 302626 5 16 t8 x 3 4 Washer Head Screw 7I 060 5 16 Split Lockwasher 71071 Flatwasher 307983 Height Adjust Skid 307969 Impeller Assembly 32 33 34 35 36 37 38 39 4O 4t 42 43 44 45 46 47 48 49 50 51 52 53 54 55 56 57 58 59 60 61 PART NO 454565 70993 301375 302627 1t47 24274 50304 50684 48275 51404 273336 30O516 302628 51278 431787 514O5 5O221 51279 300515 51277 303008 3O8783 302630 30262...

Page 32: ...CRAFTSMAN 20 SNOW THROWER 536 8854810 9 18 11 5 14 19 20 12 _21 _o k 23 32 ...

Page 33: ...cket Track Support Frame 1 4 20 x 5 8 Wide FI Boft Plastic Bearing 1 4 20 Wide Range Locknut Locknut 21 32 Flatwasher E Ring Foot Pedal REF 1 NO I 13 J 14 I 15 1 16 1 17 l 18 1 19 1 20 I 21 I 22 23 I PART NOo 302136 273336 304128 308838 3O2847 9723 3O8142 30 228 7136O 302708 3O2624 PART NAME Torsion Spring Spring Pin Shaft Idler Axle 1 4 20 x 3 112 Bolt Cotter Pin Track Idler Wheel Spacer 1 4 20 x...

Page 34: ... P_FTSMAH 4 Y L N6iH MODEL NUMBER 143 804062 218 250 249 34 ...

Page 35: ... Spring Valve Cap Valve spring Ref No 87 88 89 9O 91 93 95 96 97 98 99 100 101 102 40 141 142 143 44 145 146 147 148 149 150 160 161 162 163 64 165 181 182 183 184 185 186 187 188 189 191 192 193 194 195 196 t97 198 201 202 203 204 2O5 211 216 2t7 218 219 22O 221 i i i MODEL NU NIB ER 143 804062 Part Name Part No 27666 31410 27234A 34146 35350 650128 29752 26756 32859 32649A 6201 650870 650664 326...

Page 36: ...y is riveted to the blower housing baffle Replacement speed control assembly includes screws and nuts for mounting Replacement baffle has threaded holes CARBURETOR NO 632113A 4 Lf ll 24 O_ 25 32 I I I 1 14 _ 15 1 _ _7 t Ref No Part Name Part No 632t 13A 1 631615 2 631767 3 631036 4 650506 5 630766 6 65PA17 7 632108 8 630735 9 631815 10 630748 11 631027 12 631021 13 631022 14 632O19 15 631024 16 63...

Page 37: ...590599A Pin Spring tncl No 4 590600 Washer 590615 Retainer 590601 Washer 590598 Spring Brake 590616 Dog Starter 590617 Spring Dog 590645 Pulley 590619 Spring Rewind 590620 Cover Spring 5 90647 Housing Assyo Starter 590451A iRope Starter Length 69 8 5 32 dia 590574 Handle Mitten Grip Not included with starter 37 ...

Page 38: ...ny Sears Service Center Department and most Sears Stores WHEN ORDERING REPAIR PAR TS ALWAYS GIVE THE FOLLOWING INFORMATION PRODUCT SNOW THROWER MODEL NUMBER 536 885410 ENGINE MODEL NUMBER 143 804062 PART NUMBER PART DESCRIPTION Your Sears merchandise has added value whenyou consider that Sears has service units nationwide staffed with Sears trained technicians Professional technicians specifically...

Reviews: