background image

Summary of Contents for 247.298780

Page 1: ...I CAUTION ReQd _FETY RULES and BNSTR_TaONS c refullv CRRFT_MRN_ Am E TiLL AssembBy O_rating o Maintenance RepOt Par_s ROEBLrC K AND CO Chl_U _0684 U_ PART NO 770 7764 PRINTED IN US A ...

Page 2: ...or commercial or rental purposes this warranty applies for only i thirty days from he date of purchase Warranty service is available by contacting the nearesi Sears store or Service Center i throughout the United States This warranty gives you specific legal rights and you may also have other rights _ Which vary from state to state Sears Roebuck and Co _ Sea_s Tower _ I_ BSC 4 14 _ C hie i_l d IL ...

Page 3: ...ot wear loose fitting clothing that could get caught on the tiller 6 Do not start the engine unless the shift lever is in the neutral iN position 7 Do n ot stand tn fi ont of the tiller while starttng the eilgtne 5_ 16_ I 7 8 Do not blac_ feet and ha nd S o n or near thi_ tines _vhen st_arttng the engine 5r white he 18 eng lne is i U_rilng 9 Do not leave thetll lar una t ended with the e6gtne runn...

Page 4: ...ility and performance Should you experience any problem you carinot easily remedy please con tact your nearest Sears or SimpsomSears Service Department They have well qualified competent trained technicians and the proper tools to service Or repair this unit PRE A SSEMBLY _ NOlrE The right and left side of your tiller is determined from operator s posi tion Before any step is undertaken the instru...

Page 5: ...RDWARE PACK A 2 Shoulder Bolts J Compression Spring B 2 Fiat Washers K 2 Hair Pin Cotter C 2 Bellevilte Washe s L 2 Self Tapping Sorews P 2 Hex Nuts 3 8 16 Thread M t Hex Nut 1 4 20Thread E Hex Screw 3f8_t6 x 1 50 Lo_g N 1 Lever F 1 HexScrewl 4 20xl 75 Long O 1 Ferrule G 3 Flat Washers 31B P 1 Hex Jam Nut 318 24 Thread H 1 Hex Locknuts3t8 24Thread Q 1 Hex Locknut 3 16 Thread K ...

Page 6: ...ill Lover 011Di Fuel Tank Fuel Cap Dum Counterweight Spsrk Plug Wire B_ t Cover die Assembly Tine Enga_er_e nt Lever i NQTE Wheel Engagempn_ Lever on other sld_ _ Depth Stake Depth Stake Adjustment Lever Tine Shield Flap FIGURE 3 S ...

Page 7: ...place FJOURE 6 FIGURE 4 C Preassemble depth stake to depth bar assembly with hex sdrew E flat washer G and hex locknut Q o See figure 5 T_gl_tep nut an d boU b_J t d0 net over tlOhtem P_ i hs mu_t pivOt Flat W_Sh er must go against s qt on depth bai assembly E At ta_ h front epd of d pt h bai assembly o tr_ni_mlssion hodsiag Slip depth bar over bolt _ nd secu_te w fth hair ptn 9otter K Seel 0 re 7...

Page 8: ...o the outside See figure 11 Place handle adjustment tevet in place on handle and secure with he sci ew F and f0cl nut M See figure 1t Do not over ttgilten handle adjustment lever must pivot freely FIGURE 10 F GU RE i1 M ThrOttl e Control ever NOTE _he throttle control may have four holes in the lever bracket The holes on the outside edge are to be used for mounting on this unit See figure 12 ...

Page 9: ...n and every 25 hours the re_ter CheGk 0 _ eve_ 8 operati ng h0grs _ 3 Fill fuel tank with c_ean fresh regular grade of gasoline see figure 14 4 Open gas valve ADJUSTNgNTS Handle Adjustment Lever See figure 15 NOTE Figure 15 is viewed from the bottom of handle panet A Use if not enough free play B Normal setting C Use _f pin wi t not withdraw c0mpletely from bracl et_ FIGURE 15 To make the above ad...

Page 10: ...e R Pull the gear shift lever back upward slowly to obtain reverse Always use caution when using the reverse_ When u_tng everSe if gear shift lever is re eased It w tl sqap ba_k int_ neutral N Se_ figure 18 2 Throttle Control The throttle con trol iever is IQcated on the right h_nd side of handle panel arid _ontrels the engine speed A St_op Pull lever back upWard to stop the engine See fig0re 19 B...

Page 11: ...ted on the right har_d handle bar See figure 22 FIGURE 23 FIGURE 24 FIGURE 22 A Squeeze up on handle adjustment lever and place the handle in One Of nine 9 positions See figures 23 24 25 and 26 _NOTE Figure 23 is viewed from the front of tiller for clarity FIGURE 25 11 ...

Page 12: ...lever outward To diseng ge tlnes rdove _ver Inward See ffgL_re 27 FIGURE 27 12 FIGURE _8 OPEBAT O N TO START ENG N E BE SURE NQ ONE IS STANDING IN FR0NT oF THE TiLt ER WHiLE THE ENGINE IL SRUNNING OR BEING STARTED 1 Place t he gear shift lever in neutrat N position See figure 17 2 Plaae the tine engagement lever in the disengaged position See figure 27_ 3 Place the wheel er_gagement lever in the d...

Page 13: ...l all vines and long gt_ass should be removedo This will preveht vibes from wrapl_ lng around _he fine s h_ft Whlcl_ slows ttl ing operation The best method will be determined by the soil condition In some soils the desired depth is obtained the first time over the garden tn other so ils the desired depth Is obtained by going over the garclen two or three times_ In the latter t_ase the depth stake...

Page 14: ...r flat washers See figure 31 _ NOTE Upon reassembly make sure the belt is inside the guide ptn s See figure 34 2 To remove th e front belt short pui gear shift lever back to reverse R position S p the belt off ehglne pulley towards the engine See figure 32 Engine FIIGURE 33 _ FIGURE 32 3_ Slip the belt off variable speed pu ey remove and replace with new bert See figure 3 3 14 FIGURE 34 4 To remov...

Page 15: ... on top of the earbUretor must be sei viced ariel everj ten hburs of use Under extremely dusty opeta tirig b0tldit ons the air eleanor tfiust be sei_i ed dfter eyery hour of operatton See fjlgtJre36 t Remove the _iing nut and cover 2 Remove the S _cend wing n ut and metal disc hotd ng the foam and paper element 3 Remove t _e We elements from the support b ase 4 To clean tap the paper element eithe...

Page 16: ... plan to change the oil when the gasoline tank and carburetor are empty After the first two hours of operating a new en gine drain the oil from the crankc_ase while the engine is still hot and refill the crankcase with new oil thereafter change the ott after ev r_ 25 tiours of operation THis proc edbre ensures for minimum wear of engine parts and provides for virtually trouble flee opera ti Qn To ...

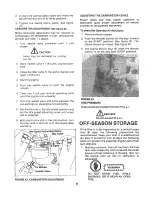
Page 17: ...e idles smoothly Idle Speed Adjusting Screw Idle Valve eedle Valve FIGURE 42 CARBURETOR ADJUSTMENT ADJUSTING THE CARBURETOR CHOKE Proper choke and stop switch operation is dependent upon proper adjustment of remote contfols on the powered equipment TO check the Opi_ration o_ the Choke 1 Remove the air cleaner 2 Push the throttle control all the way forward to the START position See figure 20 The c...

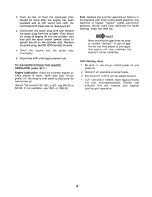
Page 18: ...t h new winter grade oil Run engine until wa rmto_istribute the new winter oi Use oil fdr sei v ice 80 SD dr SE Use 5W 20 or 5W 30 If not available use tOW o r t 0W 30 Fuel Replace any summer gasoline on hand or in the fuel tank with fresh winter grade gasoline Use lead free or leaded regular grade automotive gasoline Winter fuels have additives for faster starting Keep fuel tank full NOTE Many au...

Page 19: ...19 ...

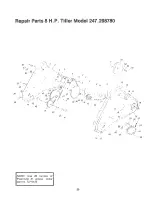
Page 20: ...Repair Parts 8 H P Tigter Mode 247 2 t8780 3 7 6 2O ...

Page 21: ...Ass y _R H_ 45 736 0259 Not Shown 46 04835 21 721 0162 Gasket_Shift Housing 47 7t3 0225 22 741 0862 Ball Detent 250 Dtao 23 732 0863 Compression Spr ng 48 750 0314 24 719 0237 Shift Housing L H_ 49 710 Ot95 7 9 0238 Shift Housfng RH 50 736 02t9 r Iot Shown 51 7 0 0629 25 7 0 0601 HexTap Tite5116 18 x 75 52 736 0159 Lg 53 736 01 19 27 7t7 0383 Ctutc h Dog 54 710 0627 55 756 0297 j 65 DESCRIPTION Do...

Page 22: ...Repair Parts 8 HoPoTilBer Moden 247o298780 i 42 41 22 ...

Page 23: ...O 69 53 712 01t6 54 714 0474 55 736 0290 56 736_01t9 57 738 0258 58 736 0105 59 7 0 0623 60 0484t 61 710 0601 62 710 02 6 63 714 01 t5 6 4 04796 65 712 0130 66 736 0I 69 67 714 0115 68 04806 69 747 0278 70 723o0156 71 04812 72 7t 2o0221 73 7t I _0663 74 732 0132 75 7t4 0474 t6 736 _0253 _7 747 0254 _8 736 0i92 _0 712 0158 31 748 0516 3 2 0 4819 33 736 0289 34 738 0148 851 712 0267 861 736 0119 871...

Page 24: ...6 64 5O 48 4_6 53 23 24 3O 2 5 2 27 28 i 41 14 5 24 ...

Page 25: ...c_ 70 71 72 73 74 75 76 77 78 79 80 81 82 83 84 86 86 ltems_May Be Purchased Locally 04848 734 0808 734 0456 7 0 0t52 710 0359 04860 736 Ot79 736 0921 712 0384 723 0340 712 02t 4 712 0267 736 01 9 04844 732 OI53 04864 712 0138 712 0130 04837 736 0237 714 0474 738_0380 710_0106 7t 2 0324 04841 710 0623 710_0621 736L01 t9 750 0381 05080 756 0296 710 0599 04840 736 0 73 712 0117 736 0173 7 0 0t 95 7t...

Page 26: ...Repair Parts 8 H P CHAIN DRIVE TILLER MODEL 247 298780 ENGINE MODEL 190402 TYPE 0944 01 304 _ I_ _ _ 363 334_ 75 26 ...

Page 27: ...RepaBr Parts 8 H P CHAIN DRIVE TILLER MODEL 247 298780 ENGINE MODEL 190402 TYPE 0944 01 25 26 F8_3 iS _EQU I RE S SPECIAL TOOL S g_ E EPAIR IN_T UCTIO AAAWUA8 Z20 616 2 9 209 356 27 ...

Page 28: ... DRIVE TILLER MODEL 247 298780 ENGINE MODEL 190402 TYPE 0944 01 729 TO INSTALL SE_R_ P 4 R iHS zRUCZiON 4NU 4_ _ _ 270 _i _ _iL_ _ _ 64 3 __ 445 _ 121 CARBURETOR OVERHAUL KIT _o_ _ _oo _ tz _a _ 104 i tB _119 _ _ yO t66 3O5 28 ...

Page 29: ... Rod wi th 020 dn dersfze Crankptn Bo re O rdei No 390773 30 222 1t3 Dlpper_Oonnecttng Rod Included in Gasket Set Part No 299577 1 Included in Carburetor Overhaul Kit_Part No 295938 29 32 92659 33 390419 34 261055 35 65906 36 26828 40 221596 41 292260 42 93630 45 260933 46 210728 50 211812 5I 270684 Note 52 27828 53 93128 54 93208 55 295272 56 295871 Note 57 294303 58 66884 59 230228 60 66728 63 2...

Page 30: ...rust PIate Gov Control Lever Ass y _Gdvernor Washer Washer Governor E lter Ass y _Fuel Cover Ass y Fue Filter Valve_Fuet Shut Off Gasket Set Part No 299 577 1 Included in EF _ PART _o NO 243 22547 244 230318 245 68477 246 298683 247 99665 265 221535 268 65616 Note 269 26633 Note 270 63426 271 290568 278 22358 300J 3913t3 304 299853 305 93158 306 221898 307 93 163 308 221901 333 298968 334 93381 33...

Page 31: ...221798 DESCRIPTION Bushing Governor Crank Bolt Governor Lever Nut Hex 10 24 ClampZ Fuel pipe starfe_ Ass y Rewind Screw Muffler Mtg Cotter Hair Pin Retainer E F ing Crank Governor 1 diameter Used after Code No 75060511 230842 Crank Coy 3t 16 alia Used before Code No 75060611 Switch Stop Elbow Spark Plug Cover_AIr Cleaner Cup Air Cleaner Screw_Sem Deflebter Exhaust Shield_Heat Clip_Wlre Screw Sere ...

Page 32: ... AND CO or SIMPSON SEARS LIMITED RETAIL or CATALOG STORE WHEN ORDERING REPAIR PARTS ALWAYS GIVE THE INFORMATION AS SHOWN IN THIS LIST 1 The PART NUMBER 2 The MODEL NUMBER 247 298780 3 The PART DESCRIPTION 4 The NAME OF MERCHANDISE Tiller FOLLOWING If the parts you need are not stocked locally your order Wilt be electronically t ransmitied to a Sears Repair Parts Distribution Center for expedited h...

Reviews: